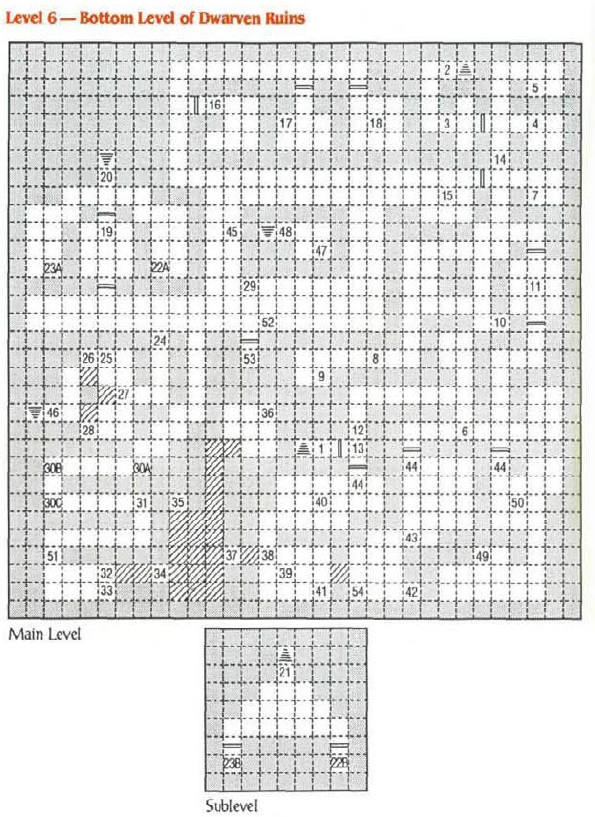
Level 6: Bottom Level of Dwarven Ruins
Back to Eye of the Beholder
Level 6: Bottom Level of Dwarven Ruins
Kenku roam the halls of level 6 and tend to flock together in groups. They can cast the Magic Missile spell so be ready to dodge out of the way when you see them. They will continue to spawn while you’re on this level so find what you need and continue down to the next level.
1) Stairs up to Level 5 Location #35.
2) Stairs up to Level 5 Location #66.
3) An inscription on the wall reads “Store weapons before proceeding”. You don’t need to put away all your weapons, just put a weapon on each of the Pressure Plates and the eastern door will open. You can then take your weapons back again.
4-6) Kenku roam this area.
7) Kenku Egg.
8) Kenky roam this area.
9) Kenku Egg.
10) A Dark-Robed Mage. When killed he drops a Mage Hold Person Scroll, Potions of Extra Healing and a Wand of Frost.
11) When you step here four darts fly from the east and west walls.
12) A Key.
13) Push the Button on the door to open it.
14) Use a Key on the west door to open it.
15) Two Kenku.
16) Four Kenku guarding a Kenku Egg.
17) Three Kenku guarding a nest of five Kenku Eggs.
18) Three Kenku guarding two Kenku Eggs.
19) When you step on the Pressure Plate in the center of this room four darts will fly out from the walls.
20) Stairs down to Location #21.
21) Stairs up to Location #20.
22A) Pit.
22B) You land here from #22A where you’ll find a Dwarven Key.
23A) Pit.
23B) You land here from #23A where you’ll find another Dwarven Key.
24-25) Kenku patrol this area.
26) Use a Dwarven Key in the keyhole to the south. A large t-shaped block will rotate around clockwise revealing another keyhole.
27) After using a Dwarven Key at #26 another keyhole appears here. Use a Dwarven Key to rotate the block again.
28) A third keyhole appears here after using a Dwarven Key at #26 and #27. Use a third Dwarven Key to rotate the block once more and reveal a set of stairs.
29) Rock.
30A-C) Pressure Plates and dart traps. The Darts will fire twice when you step on Plates B and C and three times when you step on A.
31) Pressure Plate that activates a Dart Trap.
32) On the shelf is a Wand of Magic Missiles.
33) The inscription on the east wall reads “Silverware rack, be neat.” You’ll need to place a Darts or Daggers on the shelves to open up the walls. You’ll need up to 20 Darts or Daggers to open up all the walls.
34) Dwarven key. Take the Key before placing some “silverware” on the shelf or it will disappear.
35) A +1 Dwarven Shield.
36) Cleric Scroll of Dispel Magic and Cure serious Wounds.
37) There’s a Secret Button on the south wall that removes the east wall. There’s also a +3 Mace.
38) One Kenku.
39) Non-magical Red-Gem Ring.
40) Pits in the ceiling where you can drop down from Level 5.
41) A Secret Button on the east wall that makes the east wall disappear.
42) Cleric Scroll of Flame Blade.
43) One Kenku.
44) These doors can only be opened from this side.
45) There’s a Portal on the east wall that’s activated with the Stone Ring. It teleports you to Level 10 Location #9.
46) Stairs down to Level 7 Location #1.
47) Stone Ring Portal Key.
48) Stairs down to Level 7 Location #9.
49) Bracers. The only way to this room is by falling down the pits on Level 5 Location #46.
50) One Kenku. The only way down to this room is by falling down the pits on Level 5 Location #46.
51) The shelf on the west wall has a Dagger and a Dart.
52) The inscription on the south wall reads “Nest”.
53) Two Kenku.
54) A Secret Button on the west wall makes a passages to the west appear.
Back: Level 5: Dwarven Ruins and Camp Next: Level 7: Upper Reaches of the Drow