Act 2 – Old Hatreds
Quest 1: Infiltrate Theramore
Objective: Meet up with Samuro and place Unstable Concoctions in 5 key locations around the Human camp.
When you arrive in the Troll camp you’ll have three heroes with you, Rexxar, Rhokan and Chen Stormstout. Unfortunately you don’t get to keep your gold from the previous Act but will begin with 1,500 gold coins. There is a very important item for sale in the Voodoo Hall. It’s the Necklace of Spell Immunity that makes one of your heroes invulnerable to magic but it costs 3,000 gold.
Make your way to the north-east to the location marked on the map. You’ll have the opportunity to take out Centaur Khan along the way. Head through the path to the east to the Coastal Base.
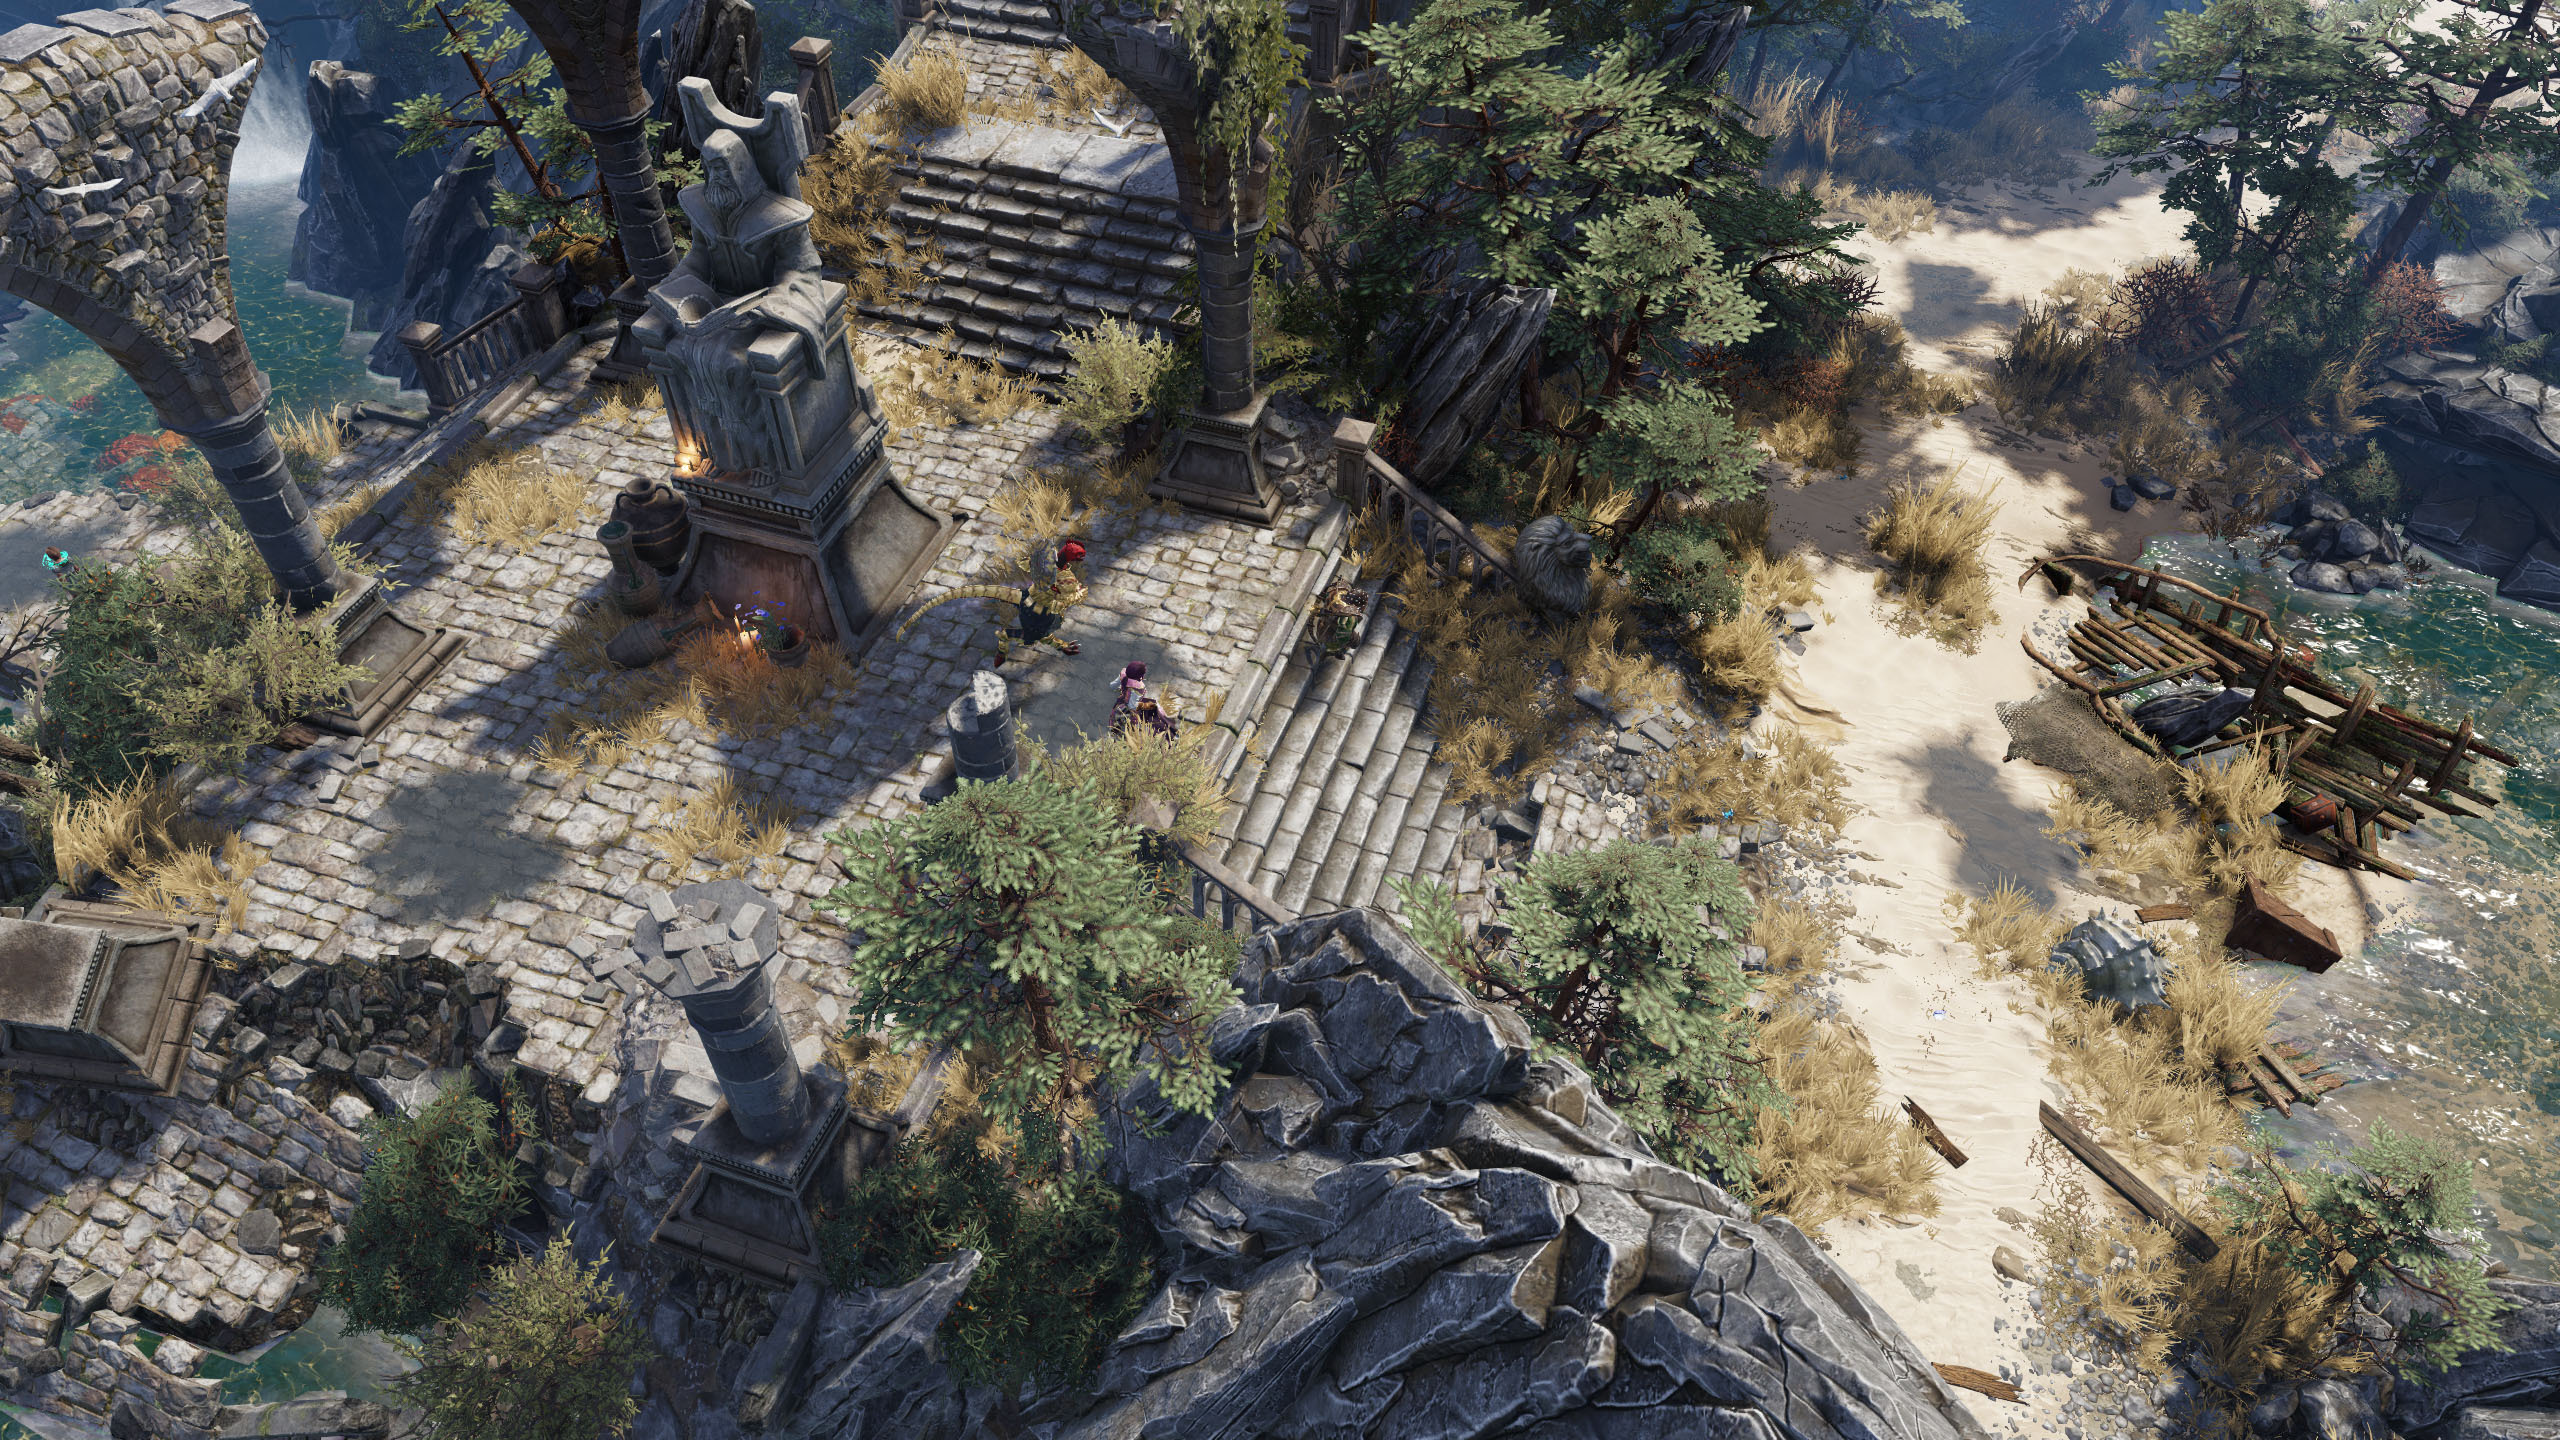
Now you have met up with Samuro and he will have to go alone through the Human camp to place the Unstable Concoctions. Your other heroes will be waiting behind the line.
Use the Wind Walk ability to move unseen through the camp. Magic Guard Towers will still be able to spot you so use the explosive barrels under the towers to destroy them quickly and then cast Wind Walk again.
Use your map to find the 5 locations for the Unstable Concoctions. Once they are all placed your three heroes will make their getaway to Theramore.
Optional Quest 1: Bloodbeak’s Rage
Objective: Slay Bloodbeak the Berserker in the top north west of the map
You can complete this quest with Samuro but it’s much easier when you have come back with all of your heroes after visiting Theramore. There are Wildkin to the north west area of the map. One of them is Bloodbeak. Slay him to complete this quest and he’ll drop behind a Talisman of Evasion for one of your heroes.
Quest 2: Human Survivors
Objective: Reach the Naga lair and rescue any Human survivors
You begin in the north eastern coast of the isle. Jaina Proudmoore is with you on this quest. The Naga are everywhere but as long as you stick together your heroes should survive. Use Rhokan’s spell to heal everyone if you do start to take too much damage.
Make your way to the south to find the Naga lair. From here you’ll need to fight your way to the west. Follow the path around until you reach a gate. The Nage will open the gate when you get close and rush out to attack you. Be ready to micromanage your heroes to keep them alive. They have their own hero, Lady Darkscale, who might cause some problems for you. Remember if your heroes do die they will respawn at the obelisk.
After defeating Lady Darkscale speak with the only surviving human. You’ll now need to take a ship back to Theramore Isle. Use Jaina’s Teleport ability to bring your whole group over to the boats in the north east to complete this quest.
Quest 3: Escape Theramore
Objective: Secure naval transport, destroy the harbor gates and return to Vol’jin
The gate to the south is invulnerable so don’t bother trying to break it down. Instead head to the east to break the three cages and free the Hawks. You can use these to explore most of the map although there are enemies who will take shots at them.
Make your way down to the south and you’ll find one of Jaina’s Transport Ships. The city is protected by a number of harbor gates. You’ll need to open them one by one as you progress from section to section. Continue south by foot and step on the pressure plate. This will open the first harbor gate.
Get in the Transport Ship and take it first to the north east. You’ll find a Cloak of Flames that will do 10 damage per second to nearby enemies.
Sail down to the the south and west and land on the southern shore before second set of closed harbor gates.
Continue on foot to the south. Take out the group of War Golems who are immune to magic and press on the second pressure plate to the east, opening the second set of harbor gates just to the south. Explore the western section of this island, past the barricades. Follow the path around to the north for the third pressure plate, opening another set of harbor gates.
Get back on the Transport. As an optional extra you may want to explore the area to the north west. There are no pressure plates here but you will find a couple of Tomes.
Take the Transport to the south-west section of land and find a spot to unload. On the eastern side of the island in the south-west is yet another pressure plate. Stand on it to open the harbor gates just in front. Head back onto the Transport and sail through the gate to the east.
Unload in the eastern corner for a battle with Arius the Seeker, a level 6 hero, 2 Elite Hydromancers and a bunch of Elite Chaplains. This battle is actually much tougher than it first looks because the Chaplains will continuously heal each other up. Target the Chaplains first and then the others.

Break through the gate to the north, take out the Golems and then go through the WayGate. Step on the pressure plate and then head back to your Transport. Continue towards the north to the last gate.
Opening this gate is the most difficult. When you land to the north you’ll be attacked by 3 heroes and many other units. You can try to defeat them all but the best option is to make a run for it and step on the pressure plate before your heroes die.
Once the gate is open take the Transport out of the map to the east to make your escape from Theramore.
Quest 4: Enlist the Tauren
Objective: Take the Zeppelin to Mulgore and secure the aid of the Tauren chief
The Zeppelin to Mulgore lies directly west and a little to the north from your base camp.
Once you reach Mulgore it’s Cairne Bloodhoof that you’re searching for. You can find him directly to the east. He won’t help you until his son has been returned.
Complete the optional quest first if you want and then rescue Cairne’s son.
Optional Quest 2: The Kodo Poachers
Objective: Slay the Harpies
Speak with Tagar just near to the Goblin Merchant. He wants you to destroy the Harpies that have been killing the Kodo herd.
There are two paths out of the village. The north east path leads to Baine and the north west path leads to the Harpies. Take the north-west path first and clear this area completely of the nasty Harpies.
There are 32 Harpies in total to kill. Once you have killed them all return to Tagar to complete this quest.
Quest 5: Rescue Cairne’s Son
Objective: Destroy the Centaur Village and bring Baine back to Cairne
Take the north eastern path out of the Tauren village. There is only one path to take. You’ll follow it north to the Outcasts who will join your group and then south to the Centaur camp.
There is a Mercenary Camp building here where you can train extra Spirit Walkers. They can bring fallen Tauren back to life.
Continue all the way to the south and destroy all the Centaurs along the way. To the very south you’ll find a level 15 Centaur hero called War Khan. Kill him and his retinue to rescue Baine.

The quest is only half complete. You’ll need to bring Baine back to his father Cairne. You’ll find a number of rock blockages along the path and caves where Centaurs will come out and attack. Kill the Centaurs and clear the path back to the Tauren base.
Speak with Cairne to complete this quest. He’ll join your group as your fourth hero! Bring all your heroes back to the Zeppelin and speak with Vol’jin to complete quest #4 Enlist the Tauren as well.
Quest 6: Enlist the Ogres
Objective: Travel to Dustwallow Marsh and convince the warlord Kor’gall to join you
The Zeppelin to Dustwallow Marsh is in the far south west corner of the map.
Once you reach Dustwallow Marsh head straight to the north and speak wtih the warlord Kor’gall. He’ll give you a few challenges. Once you complete the two following challenges return to Vol’jin to complete this quest.
Quest 7: Trial of Strength
Objective: Defeat the Gauntlet and then return to Kor’gall
Follow the path to the east to enter the gauntlet. Continue around the path, defeating large numbers of foes along the way. When you defeat the Wildkin at the end of the gauntlet the task will be complete. Return to Kor’gall to let him know of your success.
Quest 8: Trial of Blood
Objective: Defeat Kor’gall in Combat

Kor’gall is one tough dude. If you think you’ll need a hand defeating him then run past the gates in the corners to release the Thunder Lizards. Run away from them and they should start attacking Kor’gall. There are also Runes located around the outskirts of the arena that you can use to heal or for speed.
Once you defeat Kor’gall you’ll become the new Ogre Champion. You’ll command the Ogres to join you in battle against the Humans. Return to Vol’jin to complete this quest.
Optional Quest 3: Khan Gragtor
Objective: Investigate the Centaur Camp
As you explore the main map to the north east you’ll discover hoofprints and be given the quest to investigate the Centaur camp. The camp can be found in the very north east part of the map. Slay Khan Gragtor to complete the quest. He’ll drop 3 different Tomes for your heroes.
Dungeon 1: Tomb of the Ancients

The dungeons provide optional small maps to explore with some tough opponents in each one. The Tomb of the Ancients is located by entering the small structure to the northern-center part of the map.
Head to the west and pick up the Tome. In the north-east you’ll find the Mistress of Shadows. She’ll drop a Tome of Intelligence +2.
In the top center of the map you’ll find the big boss fight with Lord Talendar with 10,000 HP and over 300 damage per hit. Take out all the other creeps first and then focus all your attention on this giant skeleton. When he dies he drops the Talendar Skull Helm.
When you are finished here leave the dungeon and go back to the main map.
Dungeon 2: Magistrates Temple
To the south and slightly to the west of the entrance to Dungeon 1 you’ll find the entrance to the Magistrates Temple. It’s in an open temple-like structure with steps leading up to the entrance in the center.
The main battle in the Magistrates Temple is the battle with the Revenant of the Burning Souls. A level 15 Undead Revenant with 4,000 HP. Actually the battle isn’t too bad and by now you should be able to defeat him fairly easily. Once defeated he’ll drop the Necklace of Burning Souls.
Some other notable features about this dungeon are the Hydra boss in the lower eastern side of the map and the Makura Tidal Lord just north of the Hydra. Behind the waterfall here you’ll find a gold coin.
Clear out the western side of the map just like the eastern side. There are some Doom Guards and Infernals to contend with but nothing too bad.
There are a couple of secrets in this dungeon. The first is to the south west corner of the map. You can access this area by heading south just to the left of the rocks.

Inside this area you’ll find 5 Gold Coins and 3 Tomes.
The other secret is found by returning to the main central corridor. Follow it north and take the second path to the east. Along the way you’ll find some rocks that can be broken to reveal a ‘black market’. When you are done here head back to the main map.
Dungeon 3: Outland Arena
To the west of the entrance to the Magistrates Temple you’ll find a Shimmering Portal that leads to the Outland Arena. To the west of the entrance to the Magistrates Temple you’ll find a Shimmering Portal that leads to the Outland Arena. This is a small map where you can challenge three heroes. Each time you defeat one of the heroes they’ll drop Tomes. Each hero will increase in difficulty each time you defeat them and they will drop Tomes 10 times before only dropping gold.
It takes some time to defeat each of the heroes ten times so only stay here if you really want the extra Tomes or need to gain experience. The experience cap for Act 2 is level 12.
Dungeon 4: Den of the Lost
From the main base head to the south-west towards the corner of the map. Head over a bridge and north into the swampy area. Along the wall to your left is an entrance to the Den of the Lost. This is a very small map so it won’t take you long to finish.
When you get to the Mur’gul camp destroy the rocks to the bottom left corner. You’ll face two Sludge Monstrosities that will keep splitting. They have a ton of health as well. Continue up to the north to the Wendigo camp. The leader is a level 15 hero that can wipe out one of your heroes in no time flat. He will also regenerate once. Take out his friends first and then focus all your firepower on the leader. When he dies he drops a Tome.
When you are done here return to the main map.
Eldritch Deathlord: There is one more thing you may want to do before completing the quest with Thrall. Head over to the lower eastern part of the map to face the level 20 Eldritch Deathlord. This guys no joke and has 10,000 HP. Use Hex, Thunder Hammer and Cairne’s Stomp to keep him stunned or turned into an animal. It’ll only last a second but it’ll give you time to whittle down his health. When he’s killed he’ll drop the Shield of the Deathlord.
Optional Quest 4: Standard of Durotar
Objective: Retrieve a Wildkin Claw, Storm Lord Eye and Bronze Dragon Scale and take them to Thrall in Tidefury Cove
This quest is pretty self explanatory. Make your way to the three locations shown in the map below.

Once you have the three items head out to Thrall who is now in Tidefury Cove. The exit from this map is in the lower right corner. Thrall will ask you to carry the banner which is worthwhile because it has decent special abilities.
Quest 9: First Blood
Objective: Destory Proudmoore’s Base
This quest is quite a challenge and you’ll come under heavy resistance as you make your way to Proudmoore’s base in the north. You only need to destroy the giant castle and it doesn’t repair itself so if you can at least make it to the castle and do some damage you’ll be making progress.
There are some smaller Human bases along the way to Proudmoore’s base. You can destroy these which should hopefully reduce the number of units you’ll have to face. You can also train your own units and have a food cap of 40. I found only the Ogres or Tauren where worthwhile taking as everything else was torn to shreds within a few seconds.
The entrance to Proudmoore’s base is well defended and as soon as you enter he’ll send dozens of units at you. There are also four Guard Towers defending the entrance. Draw out some of the Human units and then focus on taking down the Towers.
With a few attempts you should be able to push through and start destroying the Barracks and Gryphon Aviary. Once they have been destroyed you should be good to start making your attack on the main Castle. Once it’s destroyed this act will be completed.
Next: Act 3: A Blaze of Glory
Back: Warcraft 3: The Frozen Throne Walkthrough