Battletech
 Battletech is a deep tactical wargame where you lead a lance of Mechs into battle. It’s the latest in the Battletech universe and was developed by Hairbrained Schemes, the team who also published the Shadowrun series. Battletech began as a tabletop mech game back in the 80s and has spawned many Battletech and Mechwarrior games over the last 40 years.
In the year 3025 the galaxy is split between the noble houses who fight with enormous BattleMechs. You’ll take command of a mercenary group who are trying to make their way in the galaxy. While searching for contracts you’ll stumble across a wealthy client whose missions will lead you into a much larger war with some of the bigger houses.
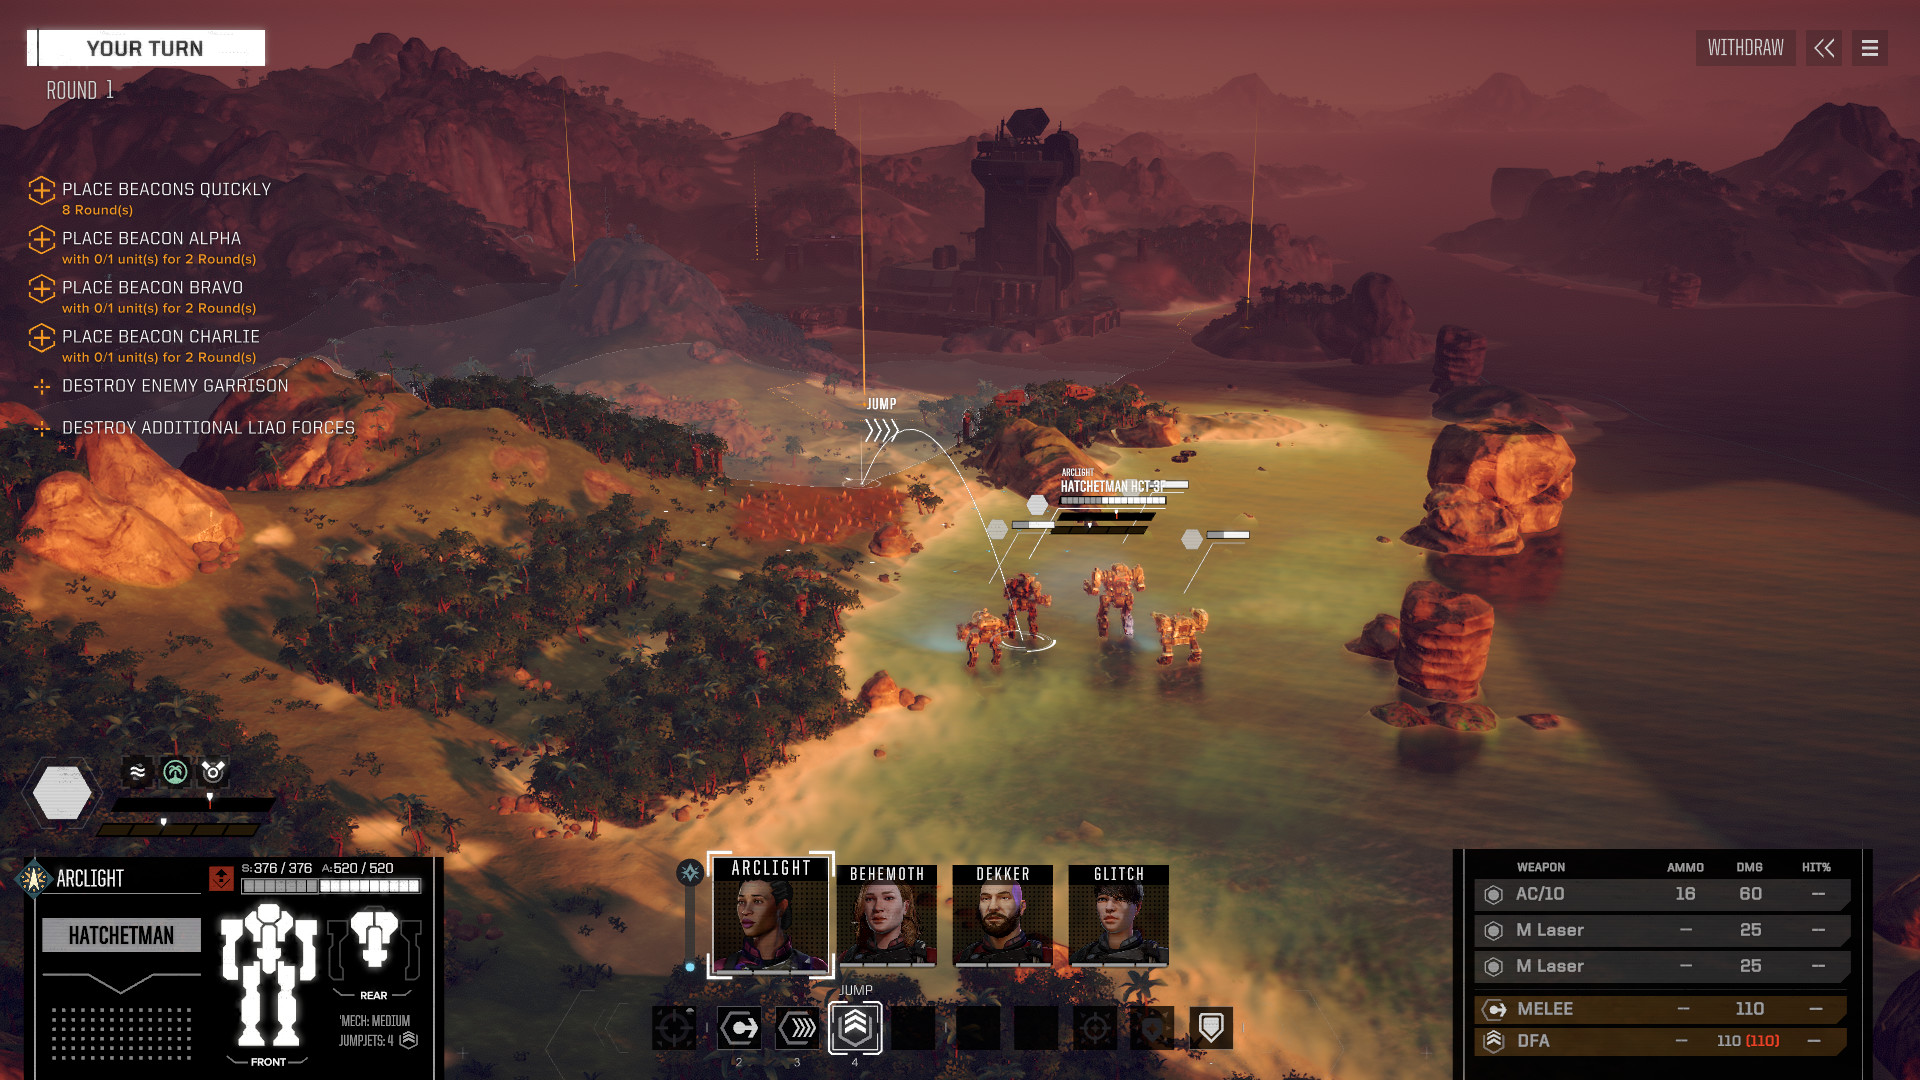
Since Battletech has been released there have been three new expansions packs, Flashpoint, Urban Warfare and Heavy Metal. Flashpoint adds new branching short stories to link together mercenary missions. New mechs include the Hatchetman, Crab and Cyclops. Urban Warfare adds new urban landscapes which are fully destructible and new enemy vehicles. Heavy Metal adds 8 new mechs, 7 from the original board game and 1 new design for this expansion. It adds new weapons systems, including a mortar with area of effect damage.
Battletech Tips
Show UI During Attack
It can be difficult to see how and where you’re shots are hitting the enemy mechs. From the options turn on “Show UI during attack”. This will bring up a paperdoll during all attacks so you can see precisely where each strike is hitting.
Speeding Up Gameplay
While the animations and graphics are nice you’ll find after a few missions that gameplay is quite slow. There are a few ways to speed up the missions, including removing the pauses added for dramatic effect.
To remove the dramatic pauses open the following folder. If you purchased from GOG you can find Battletech in GOG Games folder.
Steam\SteamApps\common\BATTLETECH\BattleTech_Data\
StreamingAssets\data\constants
From here open “AudioConstants.json” in Notepad or other text editor. look for the following lines and change the numbers next to all of them to 0.
“AttackPreFireDuration” : 0.0,
“AttackAfterFireDelay” : 0.0,
“AttackAfterFireDuration” : 0.0,
“AttackAfterCompletionDuration” : 0.0,
“audioFadeDuration” : 0.0,
The other option for speeding up gameplay is to go into the options menu and select “Speed up timeline for singleplayer” and “Speed up combat for singleplayer”. Speeding up the timeline will make the days pass quicker while you’re travelling and speeding up combat will speed up all aspects of combat.
Hit Percentages and Accuracy
When you fire a shot you have a 75% base chance to hit. Each point of Gunnery skill adds 2.5%. After that penalties will be added for things like indirect fire and evasion charges. For example if you have a Mech Warrior with 2 points in Gunnery and no penalties than the chance to hit will be 80%.
All bonuses and penalties are combined together into a single modifier. Penalties can include things like firing outside of a weapon’s range, firing at small Mechs, recoil for autocannons, and so on. Bonuses can come from weapon accuracy bonuses, mounted weapons, TTS mods, elevation and being inspired.
The bonus shot modifier can never be larger than the negative. In other words the modifier is only ever zero or negative. Bonuses can wipe away all negative penalties but they can’t turn the modifier into a positive. For this reason the single best way to increase accuracy is to increase a Mech Warriors gunnery skill. A gunnery skill of 10 will give you a base accuracy of 100%.
Battletech Campaign
1) Tutorial
The tutorial mission will introduce you to the basic game mechanics. You’ll have the chance to test out your weapons, use the jump jets, sprint, cool off in water and perform melee attacks. You’ll also be introduced to two important characters, Raju Mastiff and Lady Kamea of House Arano.
2) Coronation Day
It’s Lady Kamea Arano’s big day but her uncle decides to launch a coup d’etat and take over the council. You begin the mission in your trusty Blackjack BJ-1. You’ll also have Raju Mastiff in a Centurion CN9-A and Lady Kamea in a Kintaro KTO-18.
You’re to investigate the Guard Post and then rendezvous with the Royal Guard. The Royal Guard look a bit beat up and obviously they’ve been in a fight. When you approach they’ll turn hostile. They have a Panther PNT-9R and a Shadow Hawk SHD-2H.
Next you’ll need to make your way to the Rotua Township’s Armory. Along the way you’ll need to wipe out the vehicles, 2 Strikers, a Galleon and a Scorpion.
Once you arrive you’ll learn it’s too late. Victoria Espinosa will demand your surrender and when you refuse she’ll drop in a Cicada CDA-2A, a Spider SDR-5V and a Locust LCT-1S. Take them out and then make your way to the next site. Along the way you’ll need to wipe out a Scorpion and a Striker.
Finally as you move towards the Dropship for your escape you’ll be stopped by Captain Haust in a Wolverine WVR-6R and 2 Turrets. Take them all out and move to the pickup zone to complete the mission.
3) Thee Years Later
Three years after the Coronation Day you’ll be working with Markham’s Marauders. This mission has been taken out of desperation to pay off loans and bills. Your lance consists of a Blackjack BJ-1, a Vindicator VND-1R, a Shadow Hawk SHD-2H and a Spider SDR-5V.
Make your way to Platform Alpha and take out the defences, 2 Turrets, a Commando COM-2D and a Spider SDR-5V. You can also deal with the Turrets by destroying the Generator which is on the side of one of the main buildings. Once the turrets are taken out you’ll be attacked by a Shadow Hawk SHD-2D.
Return to the starting point to find out your clients don’t want to pay you for the job and want you to surrender your Mechs. This obviously isn’t an option so destroy the Turret Generator to wipe out their turrets and then destroy their vehicles, a Galleon, Scorpion and Striker.
4) Benefactor
A mysterious benefactor has offered to pay off your debts if you’ll help her on a few missions. Make your way to Bellerophon to meet the mysterious woman who turns out to be Lady Kamea Arano. There is no battle for this mission.
5) Capture the Argo
This mission takes place on a lunar surface with a -35% heat sink efficiency. Make sure you bring along cooler Mechs if you have them. When you get close to the Argo the Pirate Queen, Grim Sybil, will start sending Scorpions, Strikers and a Bulldog your way. You’ll also have a couple of Light Laser Turrets around the perimeter.
Taking out the generators will blow also blow up the turrets. Once the vehicles have been dealt with you can take down the Radar Towers. Make your way to the wreck of the Argo and Dr Murad will drop in with her team of engineers.
Once you have the Argo secured the Pirates will counterattack with a wave of 3 Mechs and two Vehicles, a Commando COM-2D, Jenner JR7-D, Locust LCT-1S, Scorpion and a Galleon.
Once you’ve killed off a few of the Pirates the Pirate Queen herself will drop down in a Quickdraw QKD-4G with her wingman in a Shadow Hawk SHD-2D. Finish them off to complete the mission.
6) Liberation of Weldry
Once you’ve captured the Argo you’ll need to complete at least one contract mission before this becomes available. You’ll be launching a strike against the prison complex on Weldry called the Icebox. You’ll be fighting in a Tundra biome, making heat sinks +10% more efficient.
The outer fortifications are guarded by Turrets so try to bring a Mech with LRMs so you can target down the Turret Generators. Once the Warden wakes up to the fact that you’re attacking he’ll send a Bulldog, Scorpion and Striker along the interior road and a Bulldog and Scorpion by the coast.
There are two gates to get through and you can go through either one by destroying or jumping over them. Once inside you’ll be met by a lance of four Mechs including a Jenner JR7-D, Centurion CN9-A, JagerMech JM6-S and a Trebuchet TBT-5N.
Try to take out the JagerMech first and then worry about the other Mechs. After two rounds Kamea will join the fight in a Kintaro KTO-18. She’ll flank them from the north side and will make this fight much easier.
After the battle you’ll find out that Raju Mastiff was held here and tortured to death. At this point Kamea declares open war against the Directorate.
7) Liberation: Panzyr
You’ll need to complete 2 regular contracts after Liberation of Weldry before this contract becomes available. You’ll be dropping into a polar climate with +20% heat efficiency so bring Mechs with good firepower.
Your first objective is to destroy the 5 vehicles guarding the garrison so they turrets can be reprogrammed. You have 6 rounds to take out 2 SRM Carriers, 2 Bulldogs and a Striker. Focus on the SRM Carriers first as they can destroy your Mechs in a couple of rounds.
Once you have the turrets under your control move forwards with your heaviest Mech. The DropShip Control Center will be guarded by 6 Mechs, a Jenner JR7-D, Centurion CN9-AL, Trebuchet TBT-5N, Panther PNT-9L, Hunchback HBK-4G and a Dragon DRG-1N.
Try to take down the Hunchback and Dragon from long range as their close range weapons can be devastating. You have 15 rounds to destroy the DropShip Control Center. It only has 100 hit points so if you’re held up in the center of the map try to sprint or jump your lightest Mech around to take it out.
8) Liberation: Smithon
This mission becomes available after completing 2 regular contract missions after Liberation: Panzyr. You’ll be fighting in a desert area that reduces heat sink efficiency by -15%. Your objective is to capture the Directorate munitions dump so the Restoration Army will have access to resupplies.
You’ll be facing Laser and LRM Turrets as well as 2 full lances of enemy Mechs. There are 6 ammo crates scattered about and they make a big explosion if you hit them. You can blow them up intentionally if you think it will damage a nearby enemy Mech. An optional objective is to preserve most of the ammo crates for the Restoration Army. You can also attempt to shoot the Transports as they’re driving away but you’ll need an extremely fast Mech to catch up with them.
Enemy Mechs will start coming towards you from the other side of the munitions dump. There are 8 Mechs in total in these variations, Locust LCT-1V, Firestarter FS9-H, Spider SDR-5V, Panther PNT-9L and a Dragon DRG-1N. The scariest Mech is the Dragon so try to take it out from a distance.
9) Served Cold
Your objective for this mission is to destroy a fuel depot that’s being used to fuel DropShips that are running weapons and Mechs to the Directorate. This is a Martian environment with with reduced heat sink efficiency so bring cool Mechs. Make sure you bring a couple of Heavy Mechs or you’ll be outclassed.
You’ll be given a turn timer in which you need to destroy the Fuel Depot. It’s defended by Turrets and a lance of light Mechs featuring a Commando COM-2D, Panther PNT-9R, Shadow Hawk SHD-2H and a Wolverine WVR-6R.
It’s highly recommended you take out the light lance first as once you’ve destroyed the depot or there’s only a few turns remaining a heavy lance will drop in. This lance consists of a Firestarter FS9-H, Centurion CN9-A, Dragon DRG-1N and a Catapult CPL-K2. The Catapult is led by Lady Victoria Espinosa herself.
10) Grave Robbing
This is a story mission that details information from a LosTech Drive that was found onboard the Argo. It reveals information about a Star League Castle Nautilus on Artru that may still house ancient technology and Mechs from the days of the SLDF. Obviously you’ll want to get there as quickly as possible to check it out.
11) Raising the Dead
Kamea insists on coming along for this mission so you’ll only be able to choose Mechs for the other three slots.
As you approach the armory something goes wrong and the defenses will activate. SLDF Heavy and Medium Drones will start pouring out of the nearby vents. The Argo itself also goes quiet.
To begin with you’ll have to take out 6 SLDF Drones. As you get closer to the castle the Turrets will activate and more SLDF Drones will come out of the vents. You’ll need to hold off the Drones for three full rounds before Farah is able to find the authentication codes. Head to the entrance to the castle to find out what’s inside.
12) Escape
Escape occurs just after the last mission. When you enter the armoury you’ll find SLDF Battlemechs. Unfortunatly the Taurians have landed a battalion of Mechs outside. You’ll need to use the SLDF Mechs to punch your way through to the pickup zone.
The Mechs you’ll be using will be an Atlas AS7-D-HT, Highlander HGN-732B, Black Knight BL-6B-KNT and a Griffin GRF-4N.
When you come out you’ll be surrounded by a lance of light Mechs, a Jenner JR7-D, Firestarter FS9-H, Commando COM-1B and a Shadow Hawk SHD-2D. You should have not trouble taking them out but try to focus on the Firestarter first.
Once the first lance has been defeated you’ll face a few more Taurians, a Jenner JR7-D, Panther PNT-9R, Enforcer ENF-4R, a Striker and a Scorpion. Tank the damage with your assault Mechs and keep pushing forwards to the Delfinas. Along the way Yang will detonate the explosives he left in the Castle.
Once you get close to the Delfinas Ostergaard will call down an artillery strike and blow it up. You’ll need to find another way out by getting to the second landing zone.
The second landing zone is on the other side of the valley and it’s blocked by a Griffin GRF-1N, a Vindicator VND-1R, a Zeus ZEU-6S, an Awesome AWS-8Q and a Battlemaster BLR-1G. If you’re lucky you’ll be able to get 3 salvage from one of these Mechs. Try to knock down the enemy Mechs a few times to knock out the pilots. You could also try for head shots although that’s fairly difficult to do.
Make your way to the landing zone and get out of there. At the end of the mission you’ll be given the Highlander HGN-732B assault Mech for your trouble.
13) War Council
Now that the Taurian Concordat is at war with the Restoration the situation is looking grim. While you’re waiting for an opportunity to break up the alliance between the Taurians and the Directorate you’ll need to head to Smithon to protect them from enemy forces. This is a story mission and bridges the gap between the escape and the next defense mission.
14) Defense: Smithon
This is a difficult base defense mission where you need to stop the Directorate from blowing up the DropShips with refugees. There are three DropShips and to complete the mission at least two of them must get off the planet.
When you begin the mission the enemy Mechs will be sprinting towards you. This makes them fairly difficult to hit. From the main entrance you’ll be attacked by 2 Jenner JR7-Ds, a Panther PNT-9L, Thunderbolt TDR-5S and a BattleMaster BLR-1G.
After a couple of rounds you’ll be attacked on both flanks by a pair of Spider SDR-5Vs and Commando COM-1Bs.
If you fire at the enemy Mechs there’s a good chance they’ll fire back at you rather than hitting the fuel depots. Try to bring Mech Warriors with the Multi-Target ability to target down multiple Mechs each turn.
Luckily you have a few Turrets and Vehicles on your side so you’re not as outnumbered as it first appears. Having a Mech with LRMs such as the Archer is a big plus as you’ll be able to target down any Mech in range.
15) Liberation: Itrom
This is a timed strike mission where you need to clear the Mechs guarind a series of 3 silos before they get the chance to blow them up. The enemy Mechs won’t be able to use sensors so stay outside of visible sight for as long as possible.
Once you’re spotted by one of the Mechs you’ll have 5 rounds to clear out the enemies before they blow up the silo. Make sure all your Mechs are ready to attack on the first round of combat and bring some Mechs with heavy firepower.
At the Alpha silo you’ll find a Blackjack BJ-1, Commando COM-1B, Griffin GRF-1S and a SRM Carrier.
At the Bravo silo you’ll find a Locust LCT-1V, Centurion CN9-AL, Trebuchet TBT-5N and a LRM Carrier.
At the Charlie silo you’ll find a Jenner JR7-D, Cicada CDA-3C, Shadow Hawk SHD-2H and a SRM Carrier.
Once you’ve captured the first silo you’ll be shown the evac zone. You can capture the other two silos for a bonus payout or head straight to the evac zone if you’re Mechs aren’t up for more fighting.
16) Defense: Panzyr
This is a base defense mission in a polar setting so your heat sinks are +20% more effectve. The Taurians are attacking the spaceport in attempt to stop the relief effort on Panzyr.
Your first objective is to stop the Sleipnir APCs from reaching the Command Center. There are 6 of them in total and they’re accompanied by a Jenner JR7-D, Panther PNT-9L, Commando COM-1B, Trebuchet TBT-5N and a Griffin GRF-1N.
At first 4 Sleipnir APCs will make their approach and then another 2 Sleipnir APCs will be dropped off in round 4. They are coming from different directions so keep your Mechs in a good position. Once the APCs are destroyed the Turrets will come back online and dealing with the enemy Mechs will be much easier.
A secondary objective is to stop the APC from reaching the Barracks on the hill. You’ll need a fast Mech such as a Jenner to reach it in time. The APC will get to the Barracks during round 4. If you can stop it you’ll get a 25% bonus payout.
17) Extraction
Alexander has been captured by the Directorate. Luckily he has his transponder with him so that should make it easy to figure out where he’s located. He also has incriminating evidence of Directorate activities so getting that data is a priority.
Lady Arano will drop down with you. She’s piloting an Atlas AS7-D-HT. Keeping her alive won’t be a problem as she’s in one of most armored Mechs in the game.
The first objective is to destroy the vehicles and Mech guarding Lord Madeira’s APC. You’ll face a Griffin GRF-1S, Bulldogs, Strikers and Manticores. They’re en-route to a refueling station which is surrounded by Turrets. You can take you the Turrets themselves or the 3 Turret Generators.
Once the escorts have been defeated you’ll find out that Madeira is not in the APC. Victoria will send out a second wave of attackers including more Bulldogs, Manticores and Strikers, as well as a Locust LCT-1V and a Firestarter FS9-H.
Lady Arano must now make a difficult choice, to go after Alexander or to retrieve the data. She decides to collect the data as this may mean the end of the war.
You’ll be given a new objective to recover Alexander’s data. You’ll have to stand in position for 5 rounds to collect the data while being attacked by enemy reinforcements. The reinforcements are a Commando COM-2D, Jenner JR7-D, Spider SDR-5Va, Shadow Hawk SHD-2H, Enforcer ENF-4R, Thunderbolt TDR-5SE and a Hunchback HBK-4P.
If you step outside of the zone the timer will pause until you’re back in position. You can of course just kill all the enemy Mechs instead of waiting the 5 rounds.
18) Liberation: Tyrlon
You’ll need to complete 2 regular contracts after Extraction before this mission becomes available. This is a strike mission on the Directorate’s last stronghold before Coromodir.
Bringing slightly faster Mechs or Mechs with jump jets will be an advantage for this mission. You have 17 rounds to destroy 3 Power Generators and some of them are up the top of fairly steep hills. To make things more difficult Spider Mechs are being used to target artillery strikes in this area. The artillery will hit every second round until the Spiders are killed. Make sure you’re Mechs are out of the red zones.
The first wave of enemies includes a Quickdraw, Jenner, 2 Strikers and 2 Spiders. Once they’ve been killed a DropShip will bring down the third Spider, a Vindicator, Trebuchet and JagerMech.
Once the Power Generators have been destroyed within 17 rounds the mission will be a success.
19) Locura
For this mission you must deliver Dr. Farah to the Control Tower so she can send out the Locura program to the Iberia. She will be riding in the first Mech you select for this mission.
An optional objective is to get the 2 Sleipnirs to the Turret Controls so they can take them over. It will take 5 rounds for the turrets to be turned over to your side. The initial opposition includes a Jenner JR7-D, Catapult CPLT-C1, Vindicator VND-1R and an Orion ON1-K.
Once you reach the Control Tower a lance will drop down. This includes a Quickdraw QKD-5A, Quickdraw QKD-4G, Grasshopper GHR-5H and an Orion ON1-V.
After another 5 rounds a second lance will drop down. This one includes a Jenner JR7-D, JagerMech JM6-S, Banshee BNC-3M and a Battlemaster BLR-1G.
Hold off the enemy Mechs for another 5 rounds and the Iberia will get infected with the Locura virus. It comes crashing to the ground and Director Espinosa orders his troops to stand down.
20) Showdown
This is the final mission of the main story in Battletech. You’ll drop down to the arena for a show down with Lady Victoria. Any Mechs you were using for the last mission will be automatically repaired and any injured pilots will be healed.
Bring the best Mechs you have as Victoria will be piloting a 100T King Crab. She’ll have three heavy Mechs by her side, an Awesome-8T, Cataphract and a Jagermech-S.
The King Crab has so much armor that I found it easier to take down the other three heavy Mechs first. You can then focus fire with all your Mechs to take down the King Crab. Taking a Firestarter is also a valid option but if it gets caught it won’t last long against heavy Mechs.
Once you’ve completed this mission the credits will roll. After the credits you’ll have the option to continue your campaign with the same group. The map opens up and you have the freedom to explore any system you wish.