
Bloodstained: Ritual of the Night
Bloodstained: Ritual of the Night is an action platformer with RPG elements, set in a gothic demon-infested castle. You play the role of a Shardbinder called Miriam. As you defeat enemies you’ll acquire shards that will give you new magical abilities but if you have too many shards your body will begin to crystalize. Each enemy has a chance to drop a shard. The more shards you have of a particular type the more powerful it becomes.
Bloodstained is a metroidvania-inspired game with numerous areas to explore, tons of weapons and equipment, food crafting and a dozen or so bosses. Weapons can be found in chests while exploring, bought from the shop in the village outside of the castle or crafted. You can also prepare food items which give you a permanent stat boost and restore health.
Bloodstained Character Stats
The basic stats for your character are Attack, Strength, Intelligence, Luck, Defence, Constitution and Mind. There isn’t much information about how they interact with each other but I’ll briefly describe each of them below.
ATK: This is the default damage value for offensive attacks. Depending on your equipment this will be further divided into damage type, such as Stab, Strike or Cut.
STR: Strength determines your attack power with melee weapons. Some weapons scale differently so a 2-handed sword will scale better with strength than a dagger.
INT: Determines your attack power with magic spells.
LCK: Luck influences your chance of a critical hit as well as the drop rate of items.
DEF: Determines the amount of damage you take.
CON: Constitution relates to how much physical damage you take.
MND: Mind influences how much magical damage you take.
Bloodstained Walkthrough
There are multiple endings for Bloodstained. The progress route shown below will take you through to the True Ending. Use the maps to help you explore each of the areas. The blue dots show breakable walls, the red rooms are save locations, green are portal rooms, orange are hidden rooms and purple are boss rooms.
Galleon Minerva
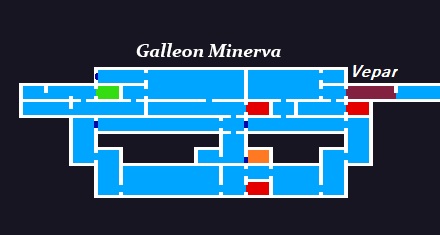
This is the tutorial area where you’ll find your first shard and equipment. You’ll be given clues to learn the basic game controls and have a chance to look around for secret areas. Eventually you’ll head to the bow of the ship where you’ll face the first boss, Vepar. After defeating the boss you’ll land on the shore by the village of Arvantville.
Not all areas can be reached your first time here. Come back once you have the double jump to explore some of the out of reach areas. Blue chests contain resources and they respawn when you reenter the area. Other colored chests have unique items and weapons and can only be opened once. Make sure you break the breakable walls for Max HP Upgrades and Max MP Upgrades.
Arvantville

Arvantville is the game hub and you’ll be coming back here quite often to speak with NPCs and upgrade your gear and shards. After the initial cutscene you’ll find Dominique at her supply post. You can buy basic food items and various bits of equipment from her. Johannes is to the east of her and can craft weapons and items. He also upgrades shards and prepares food items.
The first time you eat a food item you’ll get a once off increase to your stats or health. Try to eat as many different kinds of food as you can to improve your stats. On the western side of the base you’ll find two NPCs, a farmer and a lady who will ask you to find items to honor the dead. Give the farmer seeds and come back later for your harvest.
Dominique will give you the village key that you can use to open the door to the east. Johannes will tell you about crafting. Speak to Lindsay in the stairwell to obtain the first quest. Explore the village and then head to the east to the Entrance to the castle.
Entrance
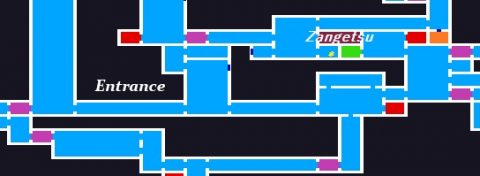
You only have one option here and that is to go east. Explore each of the rooms as much as you can for extra loot and items. Just above the Save Room on the eastern side of the Entrance you’ll meet Alfred, an experienced Alchemist who is looking for a book called The Liber Logaeth. After talking to him follow the path east to the Garden of Silence.
Garden of Silence

Head east one room and then up to the Coachman. He’ll tell you that he’s willing to take you to the other side of the Garden if you can figure out how to move the block in front of his coach.
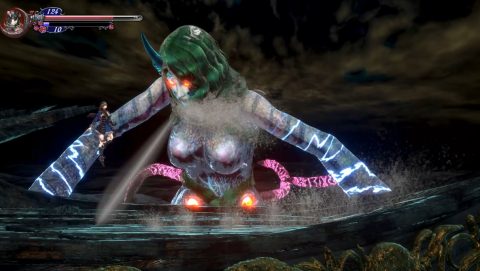
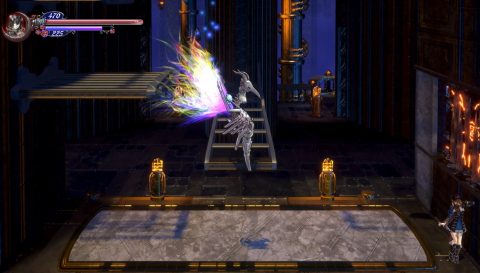
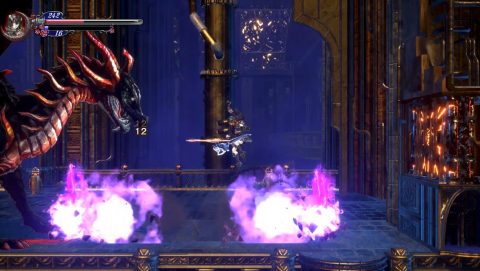
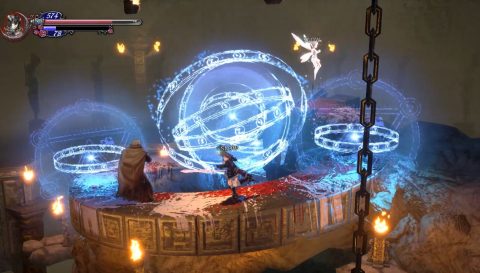
With the path blocked to the east make your way up and then back west into the upper area of the Entrance. This is where you’ll face the first boss, Zangetsu. It’s a tough first boss so I recommend going back to Arvantville and buying or crafting better equipment.
Zangetsu wields a Katana and has quite a large swing with lots of knockback. Try to stay close to him and jump behind him when he attacks. Walk or slide under him when he grapples so you can hit him from behind. When Zangetsu stops and holds his Katana up in a defensive position either wait or jump behind him to strike. I prefer larger weapons such as Great Swords for this fight.
Once you’ve defeated Zangetsu you’ll be interrupted by Dominique who stops the fight. Continue to the west into the cathedral.
Dian Cecht Cathedral
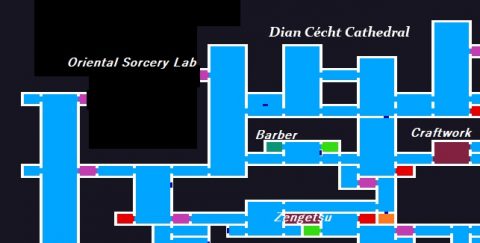
Enter the room to the west of where you fought Zangetsu for a HP Max Upgrade and a chest with a Waystone. Remember to smash the breakable walls for extra loot and upgrades as you explore this area.
Drop down and head into the room to the east, just under the Zangetsu room, to find Ben. He’s lost and wants a Waystone to get back. Luckily you just found one in the chest above. Give him the Waystone for a reward. He’ll get lost a few more times so make sure you buy a few more Waystones from the shop at Arantville.
Just like the Garden not all of the cathedral can be explored the first time you visit. Continue exploring the area until you find Todd, the “good killer barber”. You can visit him to change your hairstyle or character colours. You’ll find more hairstyles as you explore.
Once you’ve found Todd continue east until you come to the third boss called Craftwork. This boss acts like some kind of mechanical hand. Try to keep your distance as it will flick or charge at you. Weapons with a bit of range are good for this boss fight.
Once you defeat the Craftwork you’ll gain the Manipulative Shard to move items. This is what you need to free the coach. Return to the Coachman in the Garden of Silence.
Garden of Silence Revisited

Speak to the coachman and use the Craftwork Shard to move the obstacle in front of the horse. Sit on the back of the coach and you’ll be taken across to the eastern side of the garden.
Explore the new area as you make your way east. There are two paths on the eastern side. The lower path leads to the Bridge of Evil while the upper path leads to the Tower of Twin Dragons. The Bridge of Evil is blocked for now so head up to the Tower of Twin Dragons.
Tower of Twin Dragons
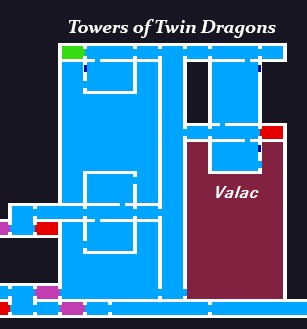
You won’t be able to reach the top of the tower on your first visit. The goal is to find the entrance to Livre Ex Machina where you’ll find the double jump.
On the way up the tower take a detour to the left to find the HP Max Upgrade. Drop down to the gears underneath this walkway and jump across the gears to the chest to the left. If you can’t make the gap using the spinning kick with the Kung Fu Shoes to make the distance.
Open the chest for one of the best weapons so far, Flying Edge. This is a throwing sword that usually hits enemies multiple times. If you have trouble reaching the chest don’t worry about it right now. You can come back once you have the double jump.
When you’re done exploring this side of the tower head up as far as you can go and then make your way west to meet Gebel. After his altercation with Alfred continue west into the Livre Ex Machina.
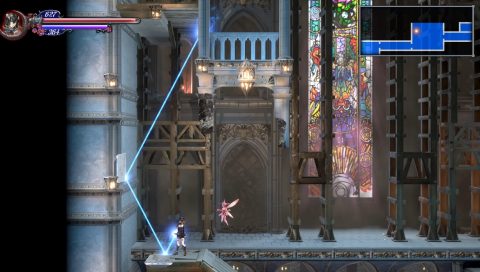
Livre Ex Machina
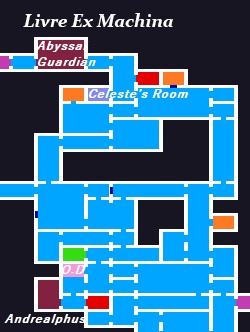
For now you’ll be exploring the bottom half of the mechanical library. You’ll need the reflector shard to get into the upper areas. Explore the library and make your way to the west. Eventually you’ll find the librarian, Orlock Dracule, or OD. You can borrow books from him to improve your stats. Return them at any time and take out new books as needed.
Just down from here you’ll find the Save Room, and further west from that the boos room where you’ll face Andrealphus.
Andrealphus has 1500 HP and is weak to Thunder, Strike and Thrust attacks. His attacks include a spin kick, overhead crescent kick if you’re above, a downward diagonal power kick and sending out rainbow projectiles.
Duck and slide to avoid the projectiles. Otherwise try not to get above Andrealphus. Instead crouch, duck and use backstep to avoid his attacks. Shards that hit multiple times, such as the Heretical Grinder, work very well against this boss. Once its been defeated you’ll be given the Double Jump Shard.
Tower of Twin Dragons Revisited
With the Double Jump Shard head back to the Towers of the Twin Dragons. Double jump up through the gap in the roof at the highest point you could reach last time to enter the new area.
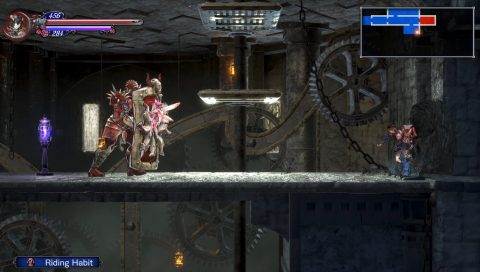
There’s still a fair bit to explore so make your way up to the top of the tower and then east across the connecting hallway to the second tower. Make your way down this tower until you find the Save Room. In the room underneath this room is a breakable wall where you’ll find the best armor so far, the Riding Habit.
Continue down and then go through the door to the boss room which is actually the outside walkway of the tower. As you step forwards you’ll meet the twin dragons, Valac.
The Valac boss is actually two dragons that will keep you hemmed in between them They are weak to Thrust, Ice and Light. As soon as the fight starts you’ll have about 5 seconds to do as much damage as possible. Then the dragons will start moving and you’ll have to stay between them. The Flying Edge sword or other ranged weapon will make it easier to continue doing damage while you’re moving.
Once Valac has been defeated you’ll be given the Inferno Breath Shard. This shard is only dropped by Valac so unfortunately there is no way to increase its grade.
Open the Golden Chest at the bottom of the tower for the Silver Bromide. This is very important. You’ll need it to take a photograph back at the base. Return to Arvantville and talk to Dominique. She’ll take a Photo of you.
With the photo in hand return to OD in Livre Ex Machina. Talk to him and he’ll make a Passplate for you. This lets you get past the barrier at the Bridge of Evil under the Twin Towers.
Bridge of Evil

Make your way down the hallway under the towers and you’ll come to the train station. If you have the Passplate from OD you’ll be allowed to enter through the gate. Inside the station you’ll find Zangetsu. The two of you decide on a truce and team up together.
Make your way with Zangetsu along the train carriages. You have 5 minutes to make it to the other side and defeat the boss. You have plenty of time to explore the entire train so there’s no need to rush.
At one point Zangetusu will use the chain to grapple up. Climb up to the roof and go left first for the Capacity Upgrade. Continue along the roof of the train and then through a few more carriages until you come to the boss, Glutton Train.
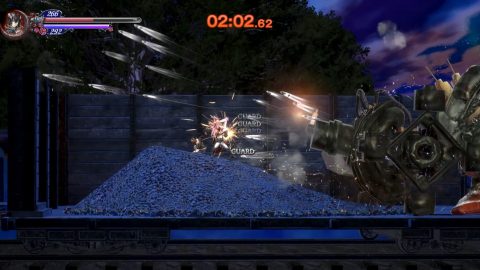
When Glutton Train uses its Gatling Gun attack stay behind Zangetsu as he’ll block all of the shots. Run forwards and strike as quickly as you can. In the beginning Zangetsu will be doing most of the damage. Once the face plate is broken off you’ll be able to do more damage.
The Glutton Train also has a Crawling Fire attack and a Hammer Knuckle attack if you’re too close. This boss fight is pretty easy as long as you stay behind Zangetsu for the gatling gun attack. After the battle continue down to the Underground Sorcery Lab.
Underground Sorcery Lab
The Underground Sorcery Lab is a small area under the Bridge of Evil. After the boss fight with Glutton Train Zangetsu will leave you to explore on your own.
After entering the lab head two rooms to the west and you’ll find Dominique. What is she doing here? After a brief chat she’ll tell you that she’s looking for Zangetsu and isn’t happy that he went off with you.
Head another two rooms to the west for the Save Room and then enter the boss room above for a fight with Bathin. He is weak to Ice and Darkness and uses the Reflector Ray which you’ll get as a reward after you defeat him.
His attacks include using the Reflector Ray to zoom about the room, using a single purple ray, a dash attack and dropping down a series of mines on the ground.
His green laser attack can be difficult to dodge as it takes up most of the room. The other attacks can be fairly easily avoided.
Once you defeat Bathin you’ll be given the Reflector Ray Shard. This is what you need to make it to the upper levels of the Livre Ex Machina so we’ll head there next.
Livre Ex Machina Revisited
Make your way as high as you can in the library. Once you get to the room outside of where OD is staying you can go either east or up. You’ll need to use the Reflector Ray to progress in both directions but the paths lead around to each other.
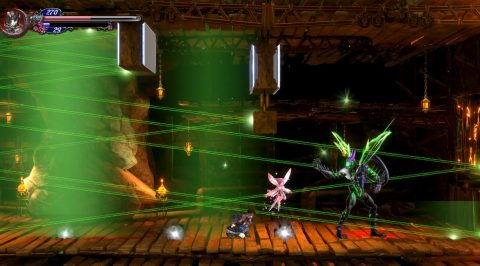
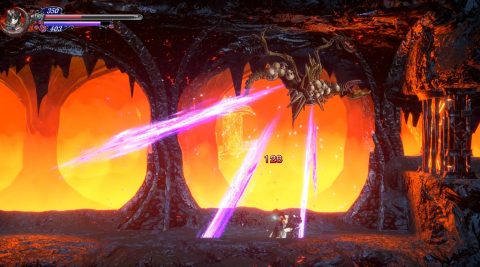
Continue up to the very top of the library where you’ll find the Abyssal Guardian protecting the entrance to the Hall of Termination. This boss is weak to Light and Thunder but has a devastating Flame Breath attack.
His other attacks are a claw attack and tail whip. Use a flame breath attack of your own, or something similar, when you have the chance. The tail whip can do a lot of damage so jump out of the way when you see him turning around. Once the Abyssal Guardian has been defeated you’ll be free to explore the Hall of Termination.
Hall of Termination

The Hall of Termination is an easier area compared to the upper levels of Livre Ex Machina. There’s also no boss fight unless you want to see the bad ending.
Make your way down and around in a clockwise direction. Eventually you’ll come to a Save Room under a Portal Room. To the east of the Portal Room you’ll see a room with a long flight of stairs leading up to a boss door. If you go inside you’ll have a boss fight with Gebel. Defeating him now will lead to the bad ending and you’ll get the Game Over screen.
Explore the secret rooms at the very top of the hall. Inside the first one you’ll find 3 chests with 2000 Gold, Celeste’s Key and a greatsword called Gram.
Break the wall to the west for a second secret room. This one has a magic bookshelf next to a painting of Igarashi (the producer of this game). Interact with the bookshelf to enter the 8-Bit Nightmare secret level. This level is really hard so I recommend levelling up before trying it.
Dian Cecht Cathedral Revisited
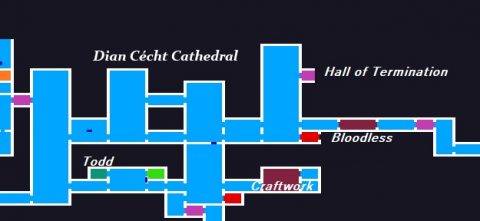
Fast travel to the portal room just to the east of Todd the Barber. From here make your way west to the first cathedral tower. Use the Reflector Ray on the left side to make your way up higher in the tower.
Explore this tower and then the next 3 towers to the east. You won’t be able to explore some of the highest areas until you have the ability to flip gravity. Continue east to the Save Room and then get ready for the boss fight With Bloodless in the corridor above.
Bloodless has around 3000 HP and once she gets down to zero she’ll draw in the blood around her and replenish her health back up to around 3000 HP. If you wear the Gauge Glasses you’ll be able to see how much health she has remaining. She is weak to Thrust, Light and Slash

Using a quick weapons such as the Rhava Bural can make short work of Bloodless. Jump over her blood stream attacks and keep attacking her from behind. Once she gets down to zero health she’ll go into the blood steal animation. Take her down to zero again to finish her off and you’ll be given the Blood Steal Shard as a reward.
Head into the next room and open the chest for the Red Umbrella weapon. If you continue to the east from here you’ll end up back in the Livre Ex Machina.
Forbidden Underground Waterway
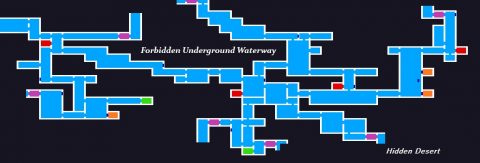
Now that you have the Blood Steal shard you can head over to the pool of blood in the Entrance. Activate the blood steal and all the blood will be soaked up, revealing an exit at the bottom of the pool. Drop down and you’ll be in the Forbidden Underground Waterway.
The Underground Waterway is a large area and some of the passages have been flooded. When you find a body of water look out for the Deeseama. They have a 10% chance to drop the Aqua Stream shard. This shard lets you move about underwater.
Explore the passages as much as you want and when you’re done head down to the lower east to find the entrance to the Hidden Desert.
Hidden Desert

From the entrance to the Hidden Desert make your way directly to the east. You’ll come to the portal room where you can fast travel back to the home base if you need to. From there make your way down, east and then up to the Save Room. Take the lift up and get ready for a boss fight with Alfred.
The boss fight takes place on a small circular path. If Alfred runs away turn around to catch up with him in the other direction. Alfred likes to cast spells such as Curse, Poison, Ice Shards and Fire. They are fairly easy to avoid once you know the range and how much time you have to slide out of the way.
Once Alfred is down to about half health he’ll cast the Slow spell. Try to stay out of the slow zones or you’ll be easy pickings for his other spells.
This is a slower fight because Alfred likes to run away after casting a spell. A ranged weapon might make it easier to do more consistent damage. Be patient and use the Gauge Glasses when you want to see how much health Alfred has left.
Once Alfred has been defeated take the lift to the middle room. Break the white sphere for the Deep Sinker shard. This shard let’s you walk on the bottom of the water so you can open chests and use the Reflector Ray.
You can go back and open some of the chests you couldn’t open earlier in the Forbidden Underground Waterway. When you’re done make your way to the western side of the waterway. Use the Reflector Ray under the wall and and continue west to find the entrance to the Secret Sorcery Lab.
Secret Sorcery Lab
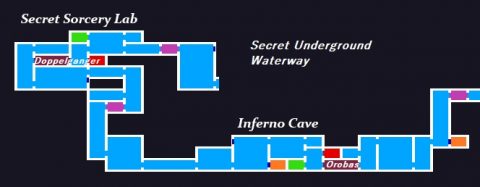
When you enter the Sorcery Lab you’ll interrupt a conversation between Dominique and Alfred. Apparently the two of them are working together. Alfred runs away and Dominique explains to you what they are doing.
Continue into the Sorcery Lab and you’ll find the portal room to the top left. Drop down a few rooms for the Save Room which is opposite the next boss fight. When you’re ready open the door to the west to meet Miriam’s Doppleganger.
The Doppleganger has a powerful slashing attacks as well as the ability to cast Flame Thrower and Dragon Breath. She sticks mostly on the ground so I prefer to fight her with a large weapon such as a Greatsword. When you see her getting ready to cast the flame thrower or dragon jump over her so you can attack her from behind.

You can mostly jump out of the way of her other attacks although she does hit hard so you might want to have a few potions or food items handy. once you’ve defeated the Doppleganger explore the rest of this small area and then head down to the Inferno Cave below.
Inferno Cave
Head down and then to the east. There’s a hidden room and a breakable wall you’ll come across along the way. See the map above for the locations. Continue east to the Save Room and Portal Room before meeting the boss of this area, Orobas. He likes to hang out upside down and shoot toxic purple beams from his back.
Use a shard or ranged weapon to continue attacking while it’s on the roof. This boss is quite slow, just try to stay out of the way of those purple beams. Once Orobas has been defeated you’ll get the Invert shard. Pull the L-Stick down, up and press A on your controller to invert the screen. This will allow you to reach previously inaccessible areas.
Collecting a Few Items
Portal over to the Tower of Twin Dragons. Ride the elevator down and go into the eastern tower. Use the Invert ability and you’ll fall down to the top of this room where you should see a chest. Open it to find the Aegis Plate. This plate lets you walk through spikes without taking damage or being knocked back.
Next portal over to the Dian Cecht Cathedral. Use Invert to explore the upper areas of the towers. At the top of the eastern most tower you’ll find the Carpenter’s Key. You’ll need this to open a door in the Oriental Sorcery Lab.
Head to the western tower of the cathedral and make your way up as high as you can. Use the Craftwork shard to push aside the trap. Then use the Aegis Plate to walk through the spiked corridor without taking damage. This should lead up to the entrance to the Oriental Sorcery Lab.
Oriental Sorcery Lab

As you make your way to the east you’ll spot Benjamin trapped under a rock arch. To get to him you’ll need the Dimension Shift shard. Continue east to the top of the cathedral tower if you want an extra MP Max Upgrade and then come back to the large room with portals in the Sorcery Lab.
The portals all link to each other but you’ll be taken to a different portal depending on which side you enter. It’s not too hard. Just a bit of trial and error will get you to the top of the room.
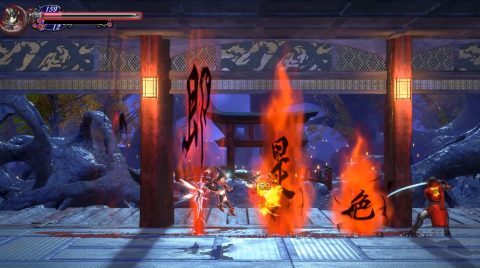
From here head west to the Portal Room. The Carpenter is just above although this is an end game boss so you may want to come back once you’ve levelled up a bit. Continue making your way around until you reach the top of the Sorcery Lab. You may want to kill a few of the Ninjas along the way. They have a chance to drop the Shinobi Garb, a powerful piece of armor, and Crimsonite, used in crafting some weapons.
The Save Room is just to the east of where you’ll fight Zangetsu one last time. Zangetsu has around 6,000 HP and large sweeping attacks. He also likes to cast fire columns which are difficult to avoid. For the second phase he’ll set his sword on fire and do even more damage.
Once you’ve defeated him walk up to him and interact with him. You’ll be given the Zangetsuto.
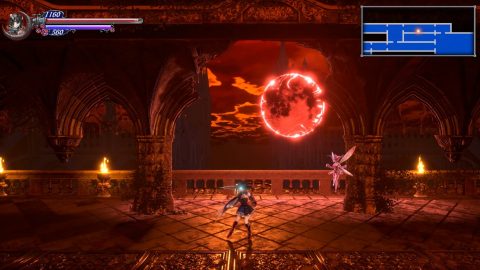
Chasing the Moon
Now that you have the Zangetsuto sword it’s time to confront Gebel. Go back to the Hall of Termination and head up the long staircase in the top right. Gebel is an easy boss to defeat but you don’t want to kill him. Use the Gauge Glasses if you have them to see how much health he has left. Once he gets down to about 500 HP the moon will turn red. Jump up and strike at the moon with the Zangetsuto sword.
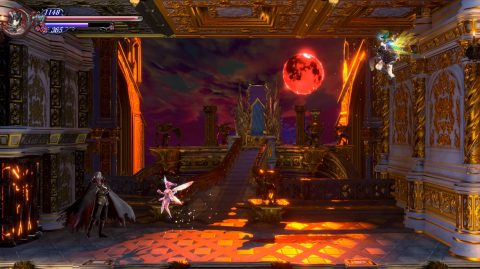
You’ll need to find the red moon once more. Head over to the Garden of Silence to where you found the Coachman. Make your way up and then to the hall one room to the west. You should notice that the moon is large and red. Strike at it to reveal Gremel who will disappear through a portal.
When you are ready make your way through the portal and you’ll end up in the Den of Behemoths.
Den of Behemoths

The Den of Behemoths is an extremely large area as everything seems to be three times bigger than it should be. The portal will take you to the top center of the Den. Go east to explore the map and then west to meet Alfred, Johannes and Zangetsu.
Head down and to the west first until you come to the Race room. A ninja will be standing by the start line. As soon as you cross the line the race will begin. Equip the Speed Belt and use the Reflector Ray so you can slow time to get ahead. You’ll also want to wear the Aegis Plate so you can run past spikes. Once you beat the ninja you’ll be given the Accelerator, a manipulative shard the lets you run much more quickly around the world.
Now head back up and to the east and then make your way down to the Save Room. Across from the Save Room you’ll meet Valefar. This is an easy boss fight although you might want to wear the Aegis Plate as there are spikes on the roof.
During the second phase Valefar will steal all of your gold and replenish his health. Once you defeat him the gold will be returned will a little bit extra for your trouble. Once you’ve finished exploring continue down to the entrance to the Glacial Tomb.
Glacial Tomb

The Glacial Tomb is a smaller area but the enemies are quite tough unless you’ve levelled up and have good equipment. There are two paths, one to the west to the Bael and the other down to Gremory. The path to Bael is blocked so you’ll need to fight Gremory first.
Gremory has about 6,500 HP and is weak to Light. She’ll cast a few spells including Swamp Hands, Half Moons and Beams of Light. The beams of light are the most difficult to avoid and you’ll need to invert gravity to get away. Other than that this boss isn’t too bad. Once you’ve defeated her you’ll be given the Dimension Shift shard.
Use the dimension shift to make your way along the path to the west for the final boss fight. Save your game in the room across from Bael and make sure you’ve finished off anything else you want to do. Make sure you’re stocked up on health potions and food items before this fight.
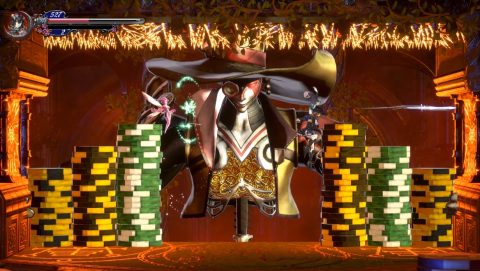
You’ll first face Dominique. She’s weak to Dark and resistant to Fire, Ice, Thunder and Light. Dominique has a powerful melee attack so try not to get to close to her. Keeping jumping over her when she runs towards you. Stay just out of range and close the distance when you want to strike.
Before she’s defeated Dominique will jump through a portal. You’ll follow her through and face the demon she’s trying to summon, Bael.
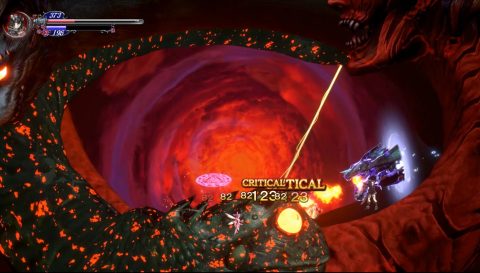
Bael is really three swirling demons. They each have around 8,000 HP and will circle around you. When you see Dominique ride one of the demons go after that one. You only need to defeat the demon she’s riding on. The other two can be defeated but the battle will continue.
During the battle Dominque will likely shift from one demon to another. Make sure you keep track of where she is. You’ll want the best equipment and shards for this fight. I used the Oracle Blade which is an improved version of the Flying Edge. The Rhava Velar is also very good. This is an improved version of the Rhava Bural that you find from killing the Barbers.
Once Bael has been defeated you’ll have a final cutscene with Johannes and the evil castle will disappear from the land. Congratulations on completing Bloodstained: Ritual of the Night!
