Fantasy General
 Fantasy General is the third game in the Five Star General series and takes place on a fantasy world with mythical creatures and races. There are four generals to choose from. Each of them will give your army a unique advantage as you battle the Shadowlord across the five continents.
Fantasy General features four races, Mortal, Beasts, Magical and Mechanical, with 10 classes of units. You’ll have to decide whether to save gold for recruiting new units or investing in research to upgrade your army. Mortal units can be upgraded to the next tier once the appropriate level of research has been completed. Non-mortal units are stronger than ortal units but can’t be upgraded so they eventually become obsolete.
Fantasy General Quick Tips
There are three modes of attack, missile, skirmish and melee. Each unit has one main attack but can deal damage in the other modes. The order of attack goes from missile, to skirmish to melee. A unit deals damage in all of the modes until they reach their main attack and then they stop. For example if a skirmish unit is equipped with a magical bow that unit will deal missile damage and then skirmish damage and then stop. Flying units can only be attacked by units that have a missile attack.
If you move into a hex with an unseen enemy they get a free ambush attack. Scout ahead before moving your units to hexes outside of your visual range.
Ground units move faster over roads and at normal speed over clear terrain. Flying units are unaffected by terrain and always move at normal speed.
If an archer unit is next to another unit that is getting attacked in skirmish or melee it gets Defensive Fire. This occurs before any other attack so it’s a good way to whittle down the enemy before they can engage in hand-to-hand combat.
Sky Hunters can intercept enemy Bombardiers. If an enemy flier tries to bomb a ground unit next to a Sky Hunter they’ll be forced to fight the Sky Hunter instead.
Siege units get a bonus attack if you’re attacking a nearby town with another unit. Siege units are also a great way to shoot down enemy fliers.
Experience is gained by attacking, defending or suffering wounds. There’s no extra experience for killing an enemy unit. Units get 5 experience for each attack and each defense. Single entities, such as heroes or giants, get 3 experience points instead. Each wound or death the unit suffers gives them an extra 1 experience. Casting spells also gives experience.
The Four Generals
Knight Marshal Calis: Uses regular mortal units and specializes in cavalry. This means he can recruit light and heavy cavalry cheaper than other generals. He’s a limited spell caster and can cast healing on all of his units once per battle.
Sorceress Mordra: Can recruit beasts in her army as well as regular mortal units. At the beginning of each battle she can summon two beasts to help her.
Archmage Krell: Is a powerful spell caster that can recruit magical units. Krell can cast one of four spells each turn. These are Whirlwind, Fireball, Weakness and Fear.
Lord Marcus: Recruits regular mortal units and specializes in foot infantry. This means he can purchase Light and Heavy Infantry cheaper than other generals. He is skilled in battle and gives all of his units one extra level of experience.
1st Continent: Dragga
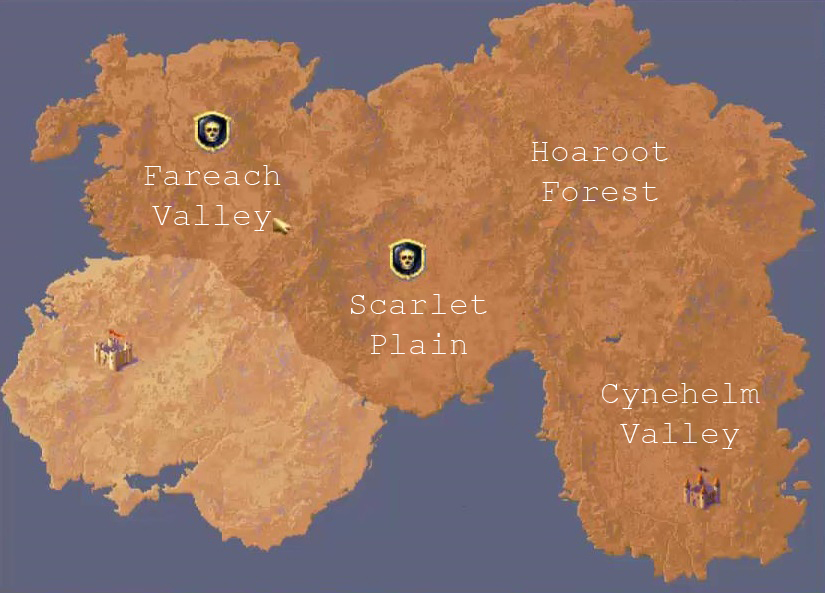
This is a small continent with only three battles. You shouldn’t have any trouble getting through it on normal difficulty even if you’re new to the game.
From the starting castle you have the option of going to either Scarlet Plain or Fareach Valley. Try to investigate as many sites as possible because you may find Gold, Volunteer Units or Magic Items. On later missions you’ll find Heroes.
The enemy commander can recruit new units from any town that it holds unless you have a ground unit in a nearby hex. Try to send out a unit to stand next to the enemy towns as quickly as you can to prevent new units from being recruited. The enemy has a limited amount of gold so you can drain them of resources by killing off new units if you can do so safely.
From either Scarlet Plain or Fareach Valley you’re next battle will be in Hoaroot Forest. If you are playing as Calis you may find the hero Malric here. If you’re playing as Mordra you may find Shandel.
From the Hoaroot Forest you’ll march towards the keep at Cynehelm Valley. If you’re playing as Krell you may find Lorric and if you’re playing as Marcas you may find Borric. Be sure to search all locations to find the heroes. Once you’ve taken the keep this continent will be completed and you’ll move to the next one.
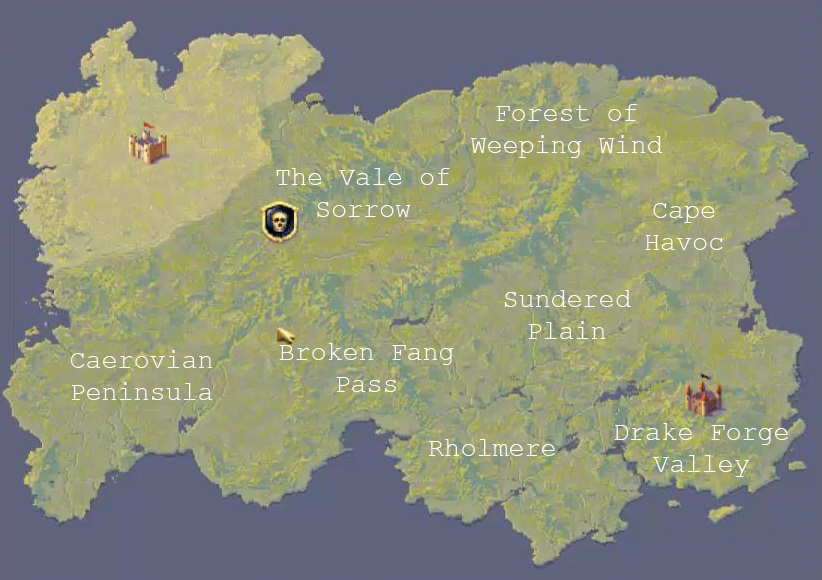
2nd Continent: Aelcar
The enemy general is a spell caster and likes to use Whirlwind to destroy your flying units. If you have flying units make sure you keep them healed up or they’ll be quickly taken out.
The Vale of Sorrow is the location of the first battle on this continent. If you reach the Temple of Handola quickly, in about 10 turns, the Priest of Handola will join you. If you arrive too early he’ll give you Gold or an Amulet and if you’re too late he’ll already be dead. Complete this battle in under 13 turns and the Caerovian Peninsula will be open. Otherwise you’ll need to go to either the Forest of Weeping Wind or Broken Fang Pass.
The Caerovian Peninsula is where you’ll find the MechMaster Ferras. He doesn’t join your army on the battlefield but he will give you the ability to research and recruit mechanical units. From here you can go to either the Forest of Weeping Wind or Broken Fang Pass.
From the Forest of Weeping Wind or Broken Fang Pass three options will open up, Rholmere, Sundered Plain and Cape Havoc. If you are playing as Krell or Marcas you can find the powerful hero Dreggo in the Sundered Plain. You’ll have the option to visit two of these three options before you’re forced to march on the keep at Drake Forge Valley. Defeat the enemy here to complete the continent.
3rd Continent: Ssazikar
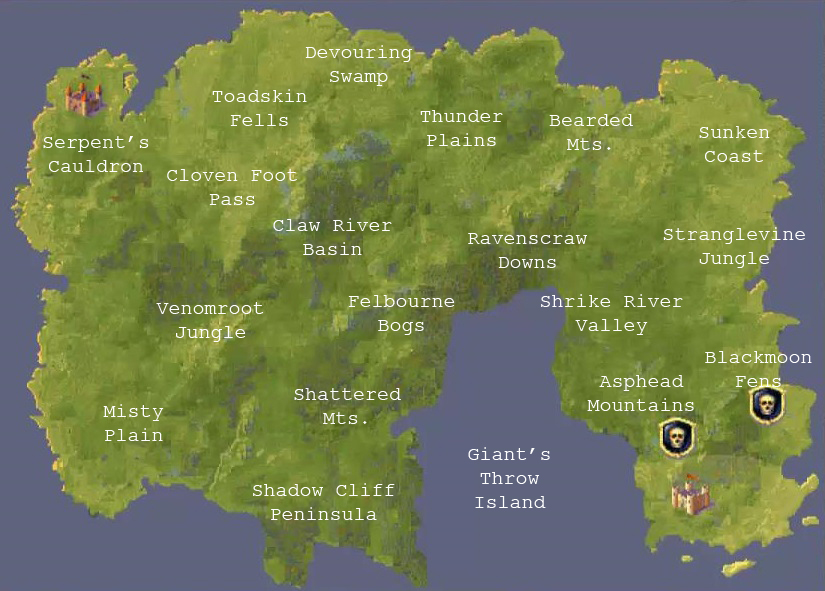
The enemy has the ability to cast the Plague once per battle. This causes between 0 to 3 wounds on all of your units.
When you reach this continent you can head to either Blackmoon Fens or Asphead Mountains. At Blackmoon Fens you can find Valira and at Asphead Mountains there’s a chance you may find Krindel. From here you can go to Shrike River Valley or Stranglevine Jungle. If you complete Stranglevine Jungle quickly then the Sunken Coast will open up. This is where you can find the engineer Niels. Once found he’ll allow you to rest your mechanical units to heal them. Otherwise you’re next options are Ravenscraw Downs or Bearded Mts.
From the Sunken Coast you can go to either Ravenscraw Downs or Thunder Plains. Ravenscraw Downs takes you to Felbourne Bogs, Claw River Basin or Devouring Swamp. Bearded Mountains takes you to Sunken Coast (if it’s open), Ravenscraw Downs and Felbourne Bogs.
If you complete Felbourne Bogs quickly a new island will appear in the sea, Giant’s Throw Island. It’s worth getting to this island if you can because you can find Saegar the Ranger. He gives all of your units +1 to search range and allows you to move through woods at normal speed.
If you took the path to Thunder Plains and complete the mission then you’re max army size will increase by 2 units. From here you can move to either Felbourne Bogs, Claw River Basin or Devouring Swamp.
The Felbourne Bogs will lead on to Claw River Basin, Devouring Swamp, Shattered Mts. or Giant’s Throw Island (if open).
Claw River Basin leads to Cloven Foot Pass or Toadskin Fells. Devouring Swamp leads to Shattered Mts., Venomroot Jungle or Toadskin Fells.
Shattered Mts. goes to Claw River Basin if you haven’t done it already, Shadow Cliff Peninsula or Venomroot Jungle.
Shadow Cliff Peninsula leads to Cloven Foot Pass or Toadskin Fells. Venomroot Jungle leads to Misty Plain or Cloven Foot Pass.
Misty Plain and Toadskin Fells both lead to Cloven Foot Pass and from here the last location is Serpent’s Cauldron where you’ll face Ssazikar.
The battle with Ssazikar isn’t too bad if you’ve taken the time to research and level up your Heavy Infantry. Having 6 or 7 Sky Hunters to take control of the skies will definitely be an advantage. Keep your ground troops out of the marsh and jungle hexes because Ssazikar has a Druid that can cast some kind of strangle vine spell on ground units.
Once you take over the objectives and the fortress Ssazikar will surrender and you’ll move onto the next continent. All volunteer armies will leave but you’ll be given 500 gold for research and to purchase new units.
4th Continent: Maloch
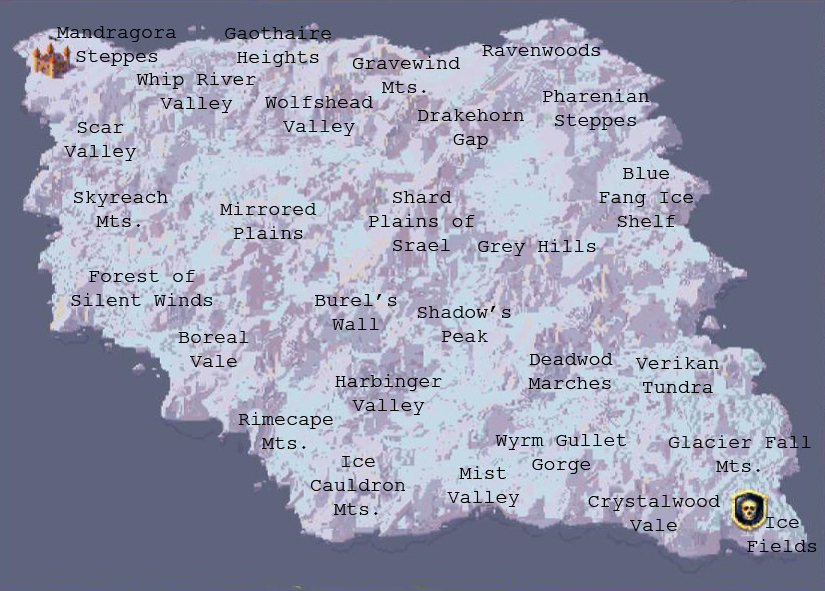
Your army arrives on the south-east cost of the continent where you’ll battle with Maloch’s forces in the Ice Fields of Noiraneskap. If you reach the western shrine quickly you can find the hero Sir Kalador.
From the Ice Fields you’ll have two choices, Crystalwood Vale or Glacier Fall Mts. These both lead on to either Wyrm Gullet Gorge or Verikan Tundra. From here the paths split up a little.
From the Wyrm Gullet Gorge you can go to either Mist Valley, Shadows Peak, Grey Hills or the Pharenian Steppes.
If you went to Verikan Tundra the available paths are back to Wyrm Gullet Gorge, Deadwood Marches or Blue Fang Ice Shelf.
Mist Valley takes you to Drakehorn Gap, Ice Cauldron Mts, Harbinger Valley or Shard Plains of Srael. Shadows Peak opens up Mist Valley, Harbinger Valley, Shard Plains of Srael, Drakehorn Gap or Ravenwoods. The Grey Hills lead to the Shard Plains of Srael. The Pharenian Steppes open up to Mist valley, Shadows Peak, Shard Plains of Srael, Drakehorn Gap or Ravenwoods.
If you went to either the Wyrm Gullet Gorge, Deadwood Marches or Blue Fang Ice Shelf from the Verikan Tundra then you’ll be able to move to Mist Valley, Shadows Peak, Grey Hills or the Pharenian Steppes.
Going to Ravenwoods leaves open paths to the Ice Cauldron Mts, Harbinger Valley, Shard Plains of Srael and Drakehorn Gap. From Drakehorn Gap you can go to Ice Cauldron Mts, Harbinger Valley or Burels’ Wall.
All paths eventually lead to Burel’s Wall and you’ll need to pass through it to reach the second half of the map. This map features two large walls with units stationed along them. Proceed slowly and make sure you have heavy melee units ready to support any scouting units you send out.
In the Ice Cauldron Mts you can find Xyphon. If you take too long to reach him he’ll be dead by the time you get there. From here you can go to Harbinger Valley.
Harbinger Valley leads to the Shard Plains of Srael if you haven’t been there already and Burel’s Wall. The Shard Plains of Srael lead to Burel’s Wall.
Once you’ve defeated Maloch at the wall the second half of the map will open up. The available paths are Rimecape Mts, Boreal Vale, Mirrored Plains and Gravewind Mts.
Both Rimecape Mts and Gravewind Mts lead to Wolfshead Valley, Boreal Vale or Mirrored Plains. Boreal Vale leads to Wolfshead Valley or the Forest of Silent Winds. The Mirrored Plains leaves open Boreal Vale and also opens up Wolfshead Valley.
From the Wolfshead Valley you can go to either the Forest of Silent Winds or Gaothaire Heights. The Forest of Silent Winds goes to Gaothaire Heights or Skyreach Mts.
Both Gaothaire Heights and Skyreach Mts open up to Scar Valley and Whip River Valley. Both of these then lead to the final battle at Mandragora Steppes.
5th Continent: Shadowlord
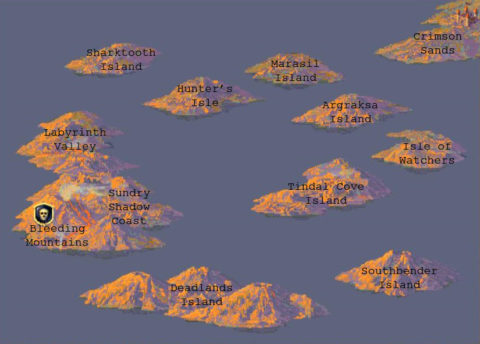
You’ll be facing the Shadowlord for the first time. This map is a smaller map with only 7 battles and it consists of a series of islands. Make sure you save money to build up your army as much as possible because the final battle at Crimson Sands is the toughest yet.
The first battle takes place at the Bleeding Mts. From here you can go to Labyrinth Valley or Sundrey Coast. Both of these then lead to Sharktooth Island or Deadlands Island.
From either Sharktooth or Deadlands Islands you can go to Hunters Isle or Southbender Island. From here you can choose either Marasil Island or Tindal Cove Island.
No matter what path you choose the next two islands to open up will be Argraksa Island or Isle of Watchers. From here you can jump to the mainland for the final battle at Crimson Sands.
The battle at Crimson Sands is especially tough because most of the Shadowlords army hides in a woodland just beyond the lava river. They will wait for you to try and cross before attacking. They also have level 4 or 5 flying units which can demolish your sky hunters if you’re not careful. Once you’ve taken the towers and the castle you’ll proceed to the next map.
6th Continent: Shadowlord
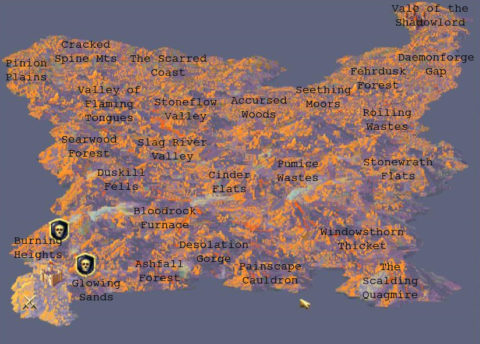
This is the final continent and you’ll face the Shadowlord once more. Luckily the first few battles won’t be as difficult as Crimson Sands on the last map.
From the place where you landed on the continent at the end of the last map you can march your army to Burning Heights or Glowing Sands. Both of them open up to Searwood Forest, Duskill Fells and Ashfall Forest. Completing any of these three gives you access to Pinion Plains, Cracked Spine Mountains, Valley of Flaming Tongues, Bloodrock Furnace and Desolation Gorge.
Pinion Plains is a standard random map and doesn’t open up any new areas. Cracked Spine Mts opens up The Scarred Coast and Slag River Valley. The Valley of Flaming Tongues leads to The Scarred Coast, Slag River Valley, Cinder Flats and Painscape Cauldron. Completing Bloodrock Furnace opens up The Scarred Coast, Slag River Valley, Cinder Flats and Painscape Cauldron. Bloodrock Furnace remains open until the final battle unless you complete it. Desolation Gorge opens Stoneflow Valley, Slag River Valley, Cinder Flats and Painscape Cauldron.
The next line of missions are Stoneflow Valley, Slag River Valley and Cinder Flats. Completing Stoneflow Valley opens up Falcon’s Beak Peninsula where you can find a Dwarven Scroll.
Completing the previous missions lead to Painscape Cauldron, Accursed Woods and Pumice Wastes. The Pumice Wastes will remain open until the final battle or until you complete it.
The previous three battles lead to either the Seething Moors or Widowsthorn Thicket. These two lead to Fehrdusk Forest and Stonewrath Flats. Widowsthorn Thicket also opens up The Scalding Quagmore.
Fehrdusk Forest leads to Daemonforge Gap. Stonewrath Flats and The Scalding Quagmore both lead to the Roiling Wastes. Roiling Wastes then leads to Daemonforge Gap. From the Daemonforge Gap you can go to the Vale of the Shadowlord for the final battle.