King’s Quest 5
 King’s Quest 5: Absence Makes the Heart Go Yonder! is the award winning graphic adventure game by Sierra. It brings vastly improved graphics and a point-and-click interface into the series instead of typing. It sold over 500 million copies on its release.
King’s Quest 5 follows the adventures of King Graham as he returns to the Castle of Daventry only to find a wizard enchanting it and lifting it away in a whirlwind. Graham befriends the helpful owl, Cedric, and goes on a quest to save the castle and his family.
Graham learns that it was the evil wizard Mordack who stole the castle. Mordack is the brother of Manannan who was turned into a cat in King’s Quest 3. Graham must travel to the land of Serenia in order to confront Mordack and somehow bring the castle back to Daventry.
King’s Quest 5 Walkthrough
The Town
You begin the game at Crispin’s cottage. From here walk south twice to the town. Enter the town and talk to the man by the wagon. Enter the Tailor’s shop just next to the man and talk to the shopkeeper there. Exit the shop and the man by the wagon will be gone. Pick up the Silver Coin that he left behind. Look in the barrel just to the left and pick up the Fish.
If you want to find out who’s in the town you can talk to the shopkeepers in the Toy shop and Shoe shop. Exit the town to the west.
Continue heading west twice and enter the Baker’s shop. Give the Silver Coin to the baker to purchase a Custard Pie. Exit and walk west twice. Throw the Fish to the bear. Pick up the Stick and grab the Honeycomb.
Walk north and throw the Stick to the dog. The ants will be thankful and they’ll return the favour later on. Walk west to the edge of the desert.
The Desert
If you stay too long in the desert without finding an oasis you’ll die. Here’s a map with all of the oasis location and it will help you navigate this difficult part.
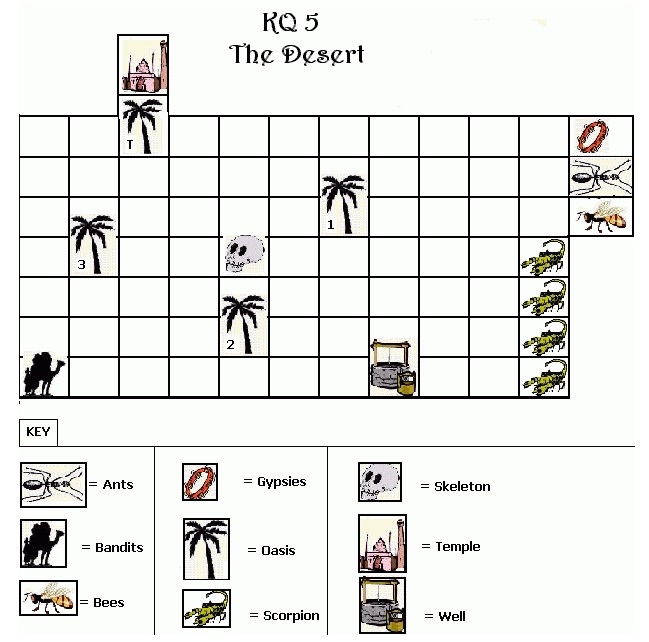
Walk a further four screens west and then south to the first oasis. Take a drink of water. Walk west four more screens and then north twice to the pool of water in front of the temple. Take a drink of water and then hide behind the rocks. Wait for the bandits to arrive and see how they open the door to the temple.
Walk east twice and south four times to the skeleton in the desert. Take the Old Shoe and walk twice south to the next oasis.
Head south once and then east four times to the bandit’s camp. Take a drink of water from the jar. Enter the small tent and carefully walk around the sleeping bandit to pick up the Staff. Exit the tent, go east once and then north three times to the next oasis.
Go east once and north three times to the small pool in front of the temple. Take a drink again and then go north to the temple door. Use the Staff on the door to open it. You have a very short amount of time inside so don’t worry about looking at anything. Just pick up the Lamp and the Gold Coin and then run back outside.
Walk south back to the little pool and take another drink. Walk east nine times to the gypsy camp.
Back in Town
Give the man the Gold Coin so that you can see the fortune teller. She will show you what has happened to your family and also give you an Amulet of protection.
Walk east and talk to the Weeping Willow. She’s lost her heart.
Walk east to the entrance to the forest. Wear your Amulet before entering to the north. Once you enter the forest you won’t be able to get out again the way you came.
Walk west and the evil witch will try to turn you into a frog! Luckily your amulet will protect you. Walk back to the east and then the north. Talk to the witch and then give her the Lamp. Now that she’s taken care of enter the witch’s house to the north.
Look at the lamp and take the Key from the lamp. Open the chest and grab the Spinning Wheel. Open the drawer to the left and take the Pouch. Open the Pouch to find Three Emeralds. Exit the witch’s house.
Go south, east and north to the tree. Use the Key on the little door in the tree to find a Heart. Walk around the back of the tree to the west. Continue to the west to a strange stone the blocks the path. Use the Honeycomb on the ground and then the Emeralds on the eyes in the forest three times. The third time a little elf will get stuck in the honey.
The elf will show you the way out of the forest. Follow him to the west twice. In exchange for the emeralds the elf will give you a fine Pair of Shoes. Walk through the tunnel to the east to exit the elf cave.
Walk to the west and give the Heart to the Weeping Willow. She’ll turn back into a princess!
Walk to the west and pick up the Tambourine that the gypsies left behind. Go south and then east. Give the Spinning Wheel to the gnome in exchange for the Marionette.
Go south. Look at the hay stack and the ants will help you find a Golden Needle.
Walk east once and then move to the right side of the screen. When the cat comes towards you chasing the mouse throw the Old Shoe at the cat. The mouse will be very grateful.
Go east and enter the town. Visit the Tailor’s shop and give him the Golden Needle in exchange for the Cloak. Exit the store and go to the Toy shop. Give the shopkeeper the Marionette in exchange for the Sled. Exit the store and go to the Shoe shop. Give the man the fine Pair of Shoes and he’ll give you his Hammer.
Exit the shop and go west out of town. Walk west three times and enter the Inn. talk to the men and you’ll be kidnapped. If you’ve rescued the mouse already he will come out of his hole and chew threw the rope. Pick up the Rope and then use the Hammer on the door.
In the next room open the closet and get the Leg of Lamb. Walk to the west to escape the Inn. Walk north and then east twice. use the Tambourine on the snake to scare it away and then walk east up the mountain pass.
Over the Mountain
When you start to shiver wear the Cloak and continue to the north-east. Use the rope on the outcropping as shown in the pic below.
1:03:00
If you get hungry eat the Leg of Lamb. You’ll save half of it for later. Up the top you’ll need to jump across the rocks. Jump across the three rocks at the back, forward once and then over to the other side. Walk across the log and then to the east.
A wolf will kidnap Cedric. Use the Sled to get down the mountain slope. When you crash walk east and talk to the eagle. Give him the Leg of Lamb. Continue to the north.
The wolves will take you before the Ice Queen. When you get a chance play the Harp. She’ll let you live as long as you take care of the Yeti. Walk north to the Yeti cave and throw the Pie at the Yeti. Go inside the cave and use the Hammer on the Crystal to take a piece of it. Head back south and talk to the wolf.
The Ice Queen will set you and Cedric free. Walk to the south and climb up to the top near to Cedric. A large Roc will carry you away. You’ll need to be quick here. When the Roc drops you into its nest quickly grab the Locket before the eagle rescues you.
Sailing
You’ll be dropped off by the ocean. Take the Iron Bar and then walk towards the small boat to the north. Use the Beeswax on the boat to fill up any holes. Use the boat and sail to the east three times and to the south once.
Harpy Island
Before you’re able to do anything you and Cedric are captured by harpies. While they’re talking to each other play the Harp. It won’t have any magical effect but they will get interested in it and start fighting over it.
Pick up the Fishhook just to the left and then walk to the west. Pick up poor Cedric and carry him with you. Walk west and pick up the Shell before getting back into the boat.
Unknown Island
Sail to the west four times until you come to another island. Ring the bell next to the door and a partially deaf man will come out. Give him the Shell so that he can hear you. He’ll invite you inside and heal Cedric. Watch the cut-scene as you’re taken by a mermaid to find Mordack.
Mordack Island
Pick up the Fish and then walk up the stairs. Use the Crystal on yourself and you’ll be able to get past the Snake Statues.
Walk to the west and use the Iron Bar on the grate to open it. Climb down inside the grate to the labyrinth.
You’re starting position is 1 facing north. To make it through the Labyrinth you’ll need to find the beast, marked B, in one of the corners first of all. Use the Labyrinth map below to find your way.
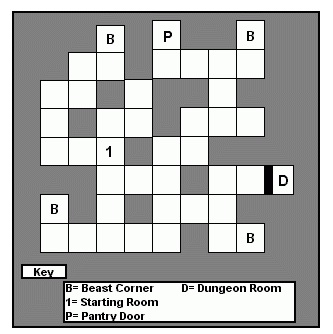
Once you find a beast give him the Tambourine. He’ll bounce off and leave behind a hairpin. Take the Hairpin and head towards the Pantry Door, marked P on the map. Use the Hairpin on the door to unlock it and go inside.
Open the cupboard to the left and take the Bag of Peas. Walk north into the kitchen and take to the maid. She’ll be scared of you at first so give her the Locket and she’ll talk to you. Talk to her again and then walk to the east twice. A blue beast may be here or to the south. Move up and down the screen or wait until the beast appears. If it’s a cat you’ll need to try again.
When the blue beast appears he will capture you and put you in the Dungeon. Look in the mouse hole and then use the Fishhook on the mouse hole to get the Cheese. Wait around until Cassandra rescues you. Follow her through the labyrinth to the Pantry door.
Walk north to the kitchen and then east twice to the dining room. Either wait here or walk south to try to find the blue beast again. This time when he appears throw the Bag of Peas at him. You’ll now have an empty bag.
From the south of the Dining room walk west. Keep going back and forth until you see a cat. Throw Fish at the cat and then use the Bag on the cat to catch it.
Walk up the stairs, go west into the bedroom and down into the private study. Read the book on the table in the foreground to see the transformation spells. Wait until Mordack appears and goes to sleep.
Go north and take Mordacks Wand. Walk east twice, go up the spiral staircase and use the strange device to the right. Place both Crispin’s wand and Mordack’s wand on the device and then throw the Cheese into the machine. Take Crispin’s wand.
Mordack will appear. When he transforms into a flying lizard use Crispin’s Wand and transform into a Tiger.
He’ll then transform into a dragon. Use Crispin’s Wand and transform into a Rabbit.
Mordack will transform into a snake. Use Crispin’s Wand and transform into a Mongoose.
Lastly, Mordack will transform into a ring of fire. Use Crispin’s Wand and transform into Rain to defeat him once and for all.
Enjoy the final cut-scene! Congratulations you’ve won King’s Quest 5! I hope you’ve enjoyed this walkthrough and check the main page for all the latest games.