King’s Quest 6
 King’s Quest 6: Heir Today, Gone Tomorrow was released by Sierra in 1992. This time it follows the adventures of Prince Alexander as he searches for his lost love, Princess Cassima in the Land of the Green Isles. The Isle of the Crown where Cassima resides has been taken over by an evil vizier. Cassima is held captive in her castle and Alexander must find a way to rescue her.
King’s Quest 6 features an open world with many of the quests being optional. There are two main endings to choose from, a quick ending and a more complete full ending. The walkthrough below will take you through both of these endings. The endings also contain a number of variations depending on how the game was played.
King’s Quest 6 Walkthrough
Isle of the Crown
Pick up Prince Alexander’s ring. Move the wooden plank and then open the box underneath. Take the gold coin from the box.
Walk north once and then north-east towards the castle. Speak with the dog guards and then show them your ring to be let in. After speaking with the vizier you’ll be kicked out of the castle and asked never to return.
Walk south and then north-west towards the town. Enter the pawn shop and speak with the storekeeper. Give him the gold coin in exchange for an item from the desk. Take the nightingale. Look at the glass jar and take a mint. Leave the shop.
Enter the bookstore and pick up the boring book by the door entrance. Look at the book shelf to the top right on poetry. When you put the book away a love poem will fall out. Pick up the love poem. Talk to the owner behind the desk and then try to pick up the book of spells on the counter. You can’t buy it yet. You’ll need another rare book to exchange for it.
Walk to the north and then the west. Ignore the boy in the water who tries to get you to go swimming and instead knock on the door on the ship. Talk to the man and he’ll invite you in. Speak with him a few times to get an idea of what’s going on. He’ll tell you the pawn shop owner has a magic map to travel to other islands. Grab the rabbit’s foot on the table and then exit the boat.
Return to the town and enter the pawn shop. Talk to the owner once more. Give him your ring in exchange for the magic map. Exit the store. Walk south and then north again to catch the pawn shop owner dumping rubbish into the clay container. Search the container for some invisible ink. Walk south twice to the beach and then use the magic map to teleport to the Isle of the Sacred Mountain.
Isle of the Sacred Mountain
Pick up the black feather and the pungent flower. Use magic map.
Isle of Wonder
Talk to the oyster. He’s having trouble sleeping. Use the boring book and read it to him. When he opens his mouth take out the pearl. By now the words in the water should have drifted closer to you. Take the incomplete sentence.
Walk further north and 5 gnomes will walk out to find out who you are. Use the pungent flower on the gnome with the big nose. The nightingale on the gnome with big ears. The rabbit’s foot on the gnome with big ears. The mint on the gnome with a big mouth and lastly the invisible ink on the gnome who wants to see you.
Walk to the east. Grab the pile of books in the center and a bookworm will talk to he. He will give you a rare book only if you give him something in return.
Look closely at the spider’s web. Pull the thread at the bottom and when the spiders goes to fix it grab the bit of paper at the top.
Walk west and then north Grab the iceberg lettuce. Walk north through the doors. Try to enter the chessboard land and talk with the queens. When they leave grab the red scarf.
Walk south twice back to the beach. Use the magic map.
Isle of the Beast
Talk to the creature dangling from the tree. It’s a dangling participle! Give it the incomplete sentence and it will join you.
Go north and throw the iceberg lettuce in the boiling pool. Grab the lamp hanging from the tree.
Walk north and ignore the gardener. Instead grab the brick and walk south twice back to the beach. Use the magic map.
Isle of Wonder
Walk to the east and give the dangling participle to the bookworm. He’ll give you a rare book. Read the book to notice a piece is missing. It’s the piece you found in the spider’s web. Walk back to the west and use the magic map.
Isle of the Crown
Walk north and then north west back to the town. Enter the pawn shop and exchange the nightingale for the flute and the pearl to trade back Alexander’s insignia ring.
Leave and enter the bookshop. Give the riddle book to the man in exchange for the spell book. Have a look at the spell book to see what ingredients you need. You can turn pages by moving the cursor to the right and left side of the book.
Jollo the clown is sitting down reading. Talk to him and show him your insignia ring. He’ll realize who you are and agree to help you. Exit the bookshop. Walk south twice and use the magic map.
Isle of Wonder
Walk north once and take the milk bottle from the plant next to the dog tree. Walk west. Give the milk bottle to one of the baby’s tears plants. The rest of them will start crying. Use your lamp on one of the crying plants to collect some baby tears. Grab the rotten tomato.
On the wall you’ll notice a hole in the wall. If you try and grab it the wallflowers will protect it. Play the flute to make the wallflowers dance. While they’re still dancing grab the hole in the wall. Pick up the teacup from the chair.
Walk back to the south and use the teacup on the swamp ooze. The stick in the mud will protest to you trying to take the ooze and have an argument with the bump on the log. Give the bump on the log the rotten tomato and the two will get into a slinging match. Use the teacup this time to take the swamp ooze that lands on the bump on the log.
Head south to the beach and use the magic map.
Isle of the Crown
Walk north and then north west back into town. Go into the pawn shop and swap the flute for the tinder box. Exit, walk south twice and use the magic map.
Isle of the Sacred Mountain
Now it’s time to make your way up the side of the cliff. Read the inscription on the side of the cliff for the first logic puzzle. Click on the letters R I S E from top to bottom to reveal some steps. Climb up the steps to the next logic puzzle.
For the second puzzle you’ll need to type in the word S O A R but in a different language. Have a look at the picture below to see which symbols to press.
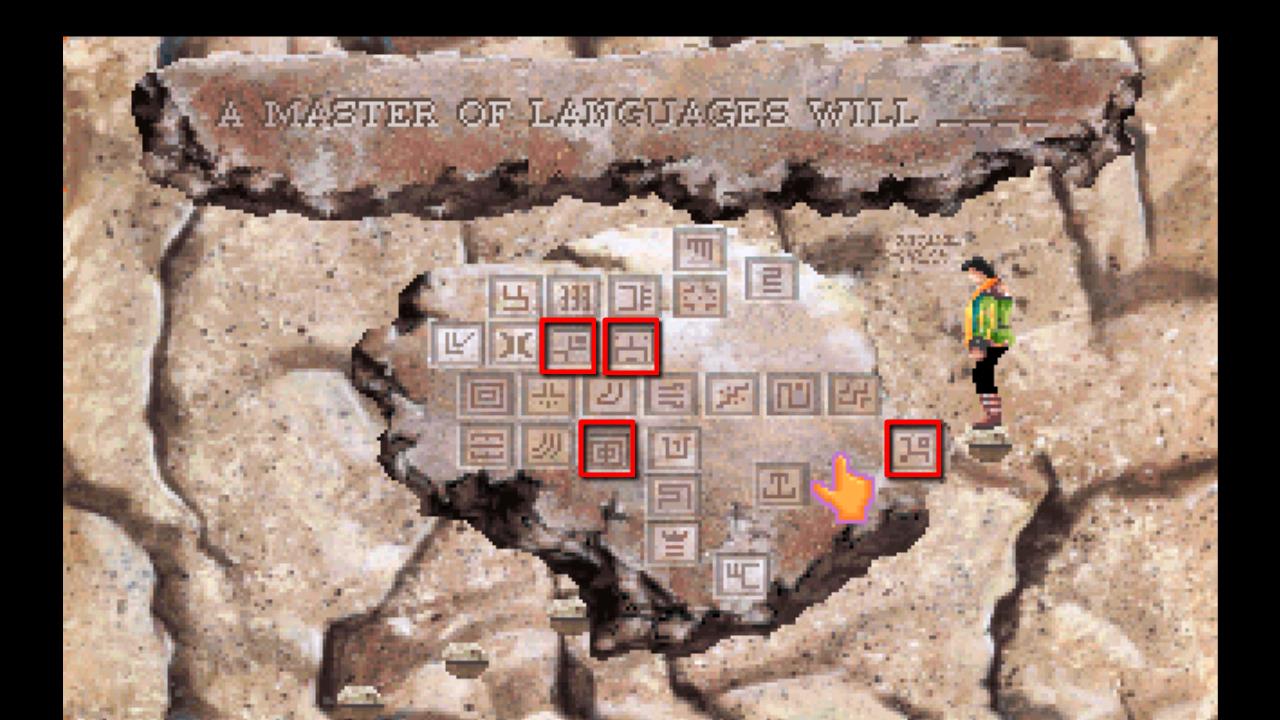
New steps will appear. Climb up them to the third logic puzzle. There are four buttons here. From left to right click on them in this order 4, 1, 2. New steps will appear. Climb up them to the fourth logic puzzle.
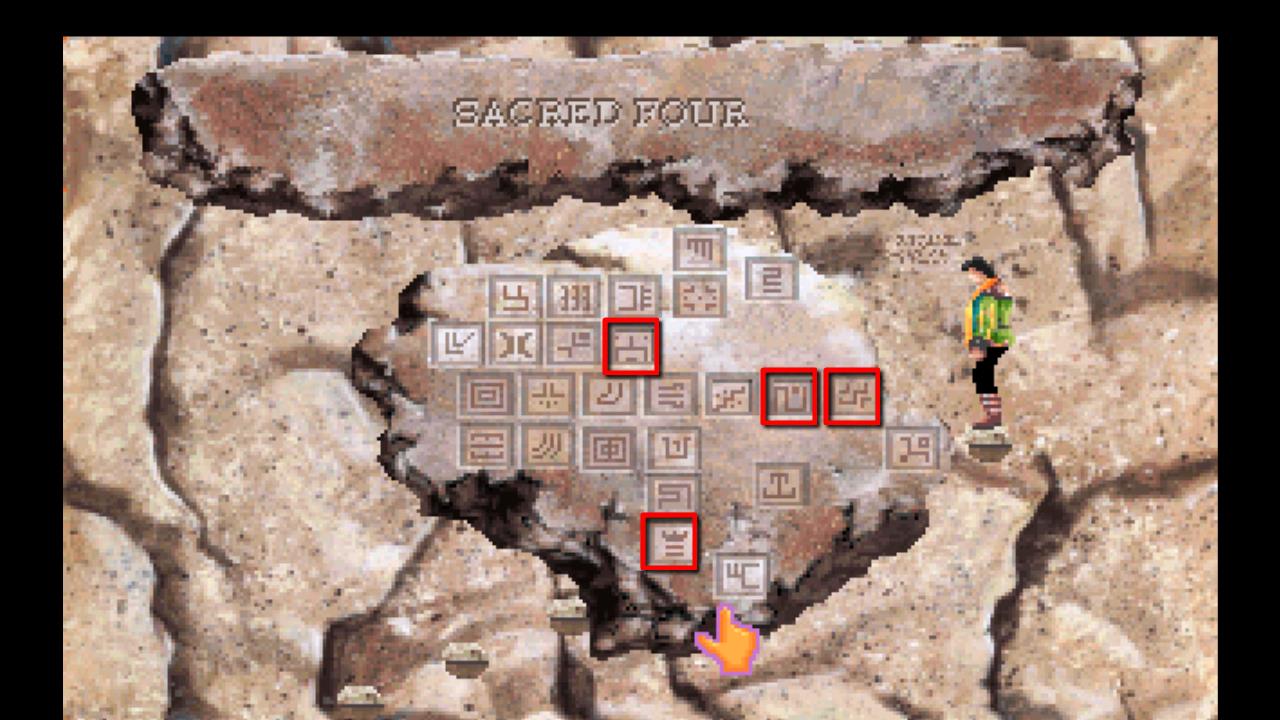
For the Sacred Four logic puzzle you need to press the buttons corresponding to Azure, Caterpillar, Tranquility and Air. They are as follows.
Walk up the new steps to the last logic puzzle. For this one click on the letters A S C E N D. One letter for each word. Climb up the last set of steps to the top.
A suspicious old woman is here. Ignore her until she goes away and then crawl into the small opening. Light the tinder box and climb into another small opening to the right side. It’s quite hard to spot so you might need to click around with the hand to find it. Take the peppermint leaves and exit the cave the way you came.
Take the path to the north to meet the winged beings. You’ll be dropped into the catacombs in order to defeat the Minotaur and rescue the princess.
Catacombs
Take these directions once inside the catacombs.
N, N, E, E, N and then pick up the skull from the ground.
S, W, W, N, W to the puzzle room. Step on the pressure plates in this order to make it across. N, SW, SW, N, N, NW, SW and S to the safe spot. Walk west.
Head north and grab the shield from the wall.
N, N, N, W, W to find the corpses. Take coins from the corpse.
E, E, S, E to the trapped room with the collapsing roof. Place the brick in the gears to stop the roof.
E, E, N, E and the floor will collapse under you. You’ll now be on the second level of the catacombs. Use the tinder box to light the unlit torch.
W, W, W, W, W, S, S, E and you’ll be able to hear the Minotaur behind the wall. Use the hole in the wall to spy on the Minotaur.
W, W, W, S, S, E, S, E, E, N, E, N, N to find the room with the tapestry. Look behind the tapestry to find a latch that opens a secret door.
Walk east to the Minotaur’s lair. Enter the room and the Minotaur will notice you. Once he backs you up to the fireplace use the red scarf on the Minotaur and he’ll charge into the fire.
For your service to the winged beings Celeste will give you her dagger and you’ll get a chance to speak to the Oracle who will give you a vial of sacred water. Back on the beach use the magic map.
Isle of the Mists
Walk west into the Druids camp. Take the coal from the fire pit and the scythe hanging on one of the huts. Go back east to the beach and use the magic map.
Isle of Wonder
Walk back to the garden (north and west) and pick up the “drink me” potion on the table. Walk through the doors to the north and give the coal to the White Queen. She’ll give you her spoiled egg in return. Go back to the beach, south three times, and use the magic map.
Isle of the Beast
Head north twice and use your shield on yourself to make it past the archer. Take a white rose from the rose garden and try to continue north. Your way will be blocked by hedges. Use the scythe to cut your way through the hedges. You’ll meet the beast who’ll tell you you’re now under the same curse as him but you have two hours still in your human form. He’ll give you his beast’s ring. Walk south three times and use the magic map.
Isle of the Crown
Walk north and then north west. Enter the bookshop and speak with Jollo. Exit and walk north. Speak with the maiden. She’s too shy so give her the white rose. Give her the beast’s ring and she’ll agree to follow you to the Isle of the Beast.
Isle of the Beast
Watch the cut-scene as the spell is broken and the beast is turned into a handsome prince. The maiden will give you her old clothes and they will depart. Use the hand to search the clothes and find the maiden’s hair.
Use the vial with sacred water on the lamp and collect some of the fountain water in the lamp also. Open the spell book and cast the Make Rain spell. Walk south. Grab another white rose. Head south twice more and use the magic map.
Isle of the Crown
It’s time to make contact with Cassima. Walk north and give your ring to the nightingale. The nightingale will return with a ribbon. Take the ribbon and give the nightingale the white rose. The nightingale will return again. This time give the nightingale the love poem and Cassima will return a letter.
Read the letter and then walk northwest. Enter the pawn shop and drink the “drink me” potion. You’ll pretend to die and the genie will run off to tell his master. Make sure you keep a look out for the design of the genie’s bottle so you can find a replacement later.
From here there are two ending paths to choose from. The quick ending the complete ending for full points. I’ll describe the complete ending path below.
Complete Ending
Swap the tinder box for the paint brush and exit the shop. Go south twice and use the magic map.
Isle of Mists
As soon as you land on the island the druids will capture you and take you back to see there leader. You’ll be placed inside a cage over the burning fire and use the clothes automatically to beat out the fire in the cage. The Make Rain spell will automatically be cast as the water starts to boil and you’ll be freed.
Use the skull to collect some embers. Add the strand of hair to the skull and the spoiled egg to the skull as well. Walk south and use the magic map.
Isle of the Sacred Mountain
Climb up the logic cliffs again. Don’t worry you won’t have to solve the riddles again. Stay back from the Night Mare so you don’t scare it off. Open the spell book and cast the Charm Creature of the Night spell to be flown away to the Realm of the Dead.
Realm of the Dead
Stay away from the dead walking around but talk to the king and queen, Cassima’s parents. The queen will give you a ticket. Walk to the east and speak to the ghost. She’ll give you a handkerchief to give to her son if you find him.
Walk to the north and play the xylophone. The skeletons will start dancing. Grab the skeleton key that falls down as one of the skeletons dances. Show your ticket to the skeleton to the right guarding the entrance.
Look at the knight to the right and take the gauntlet. Continue around the path to the north. Use the teacup to get some River Styx water and then give the coins to Charon to ride across the river.
Walk to the door and talk to it. You’ll be asked a riddle to be allowed entrance. The answer was on the scrap of paper you found in the spider’s web, LOVE.
Talk to Death and show him the gauntlet to issue a challenge. In order to make him cry show him the mirror of truth. You’ll be free to go and take the king and queen with you.
Isle of the Crown
Walk north then northwest and exchange the lamp for the genie’s lamp (the tall blue one). Walk south and then northeast to the castle. Walk north around the side of the castle. Use the feather to stir the teacup and then paint the side of the castle with the paintbrush. Open the spell book and cast the Magic Paint spell. Open the door to enter the castle.
Castle of the Crown
Inside the castle walk east and open the door to the east which is Jollo’s room. Give the lamp to Jollo so he can exchange it with the real one later. Exit the room and walk back west. The three doors to the right are cell doors. Open the center one and talk to the boy ghost. Give the ghost the handkerchief. He’ll tell you about a secret behind the suit of armor.
Exit the cell and walk to the north. Click on the right arm of the suit of armor to uncover a secret door and go through. Look through the hole in the wall to the right to spy on the guards. You’ll discover the first part of the password, ALI.
Climb up the stairs and look through another hole in the wall into Cassima’s room. You’ll have an intimate moment with her. Give her the dagger.
Walk to the west twice and look through another hole into the Alhazred’s room, the vizier. He is writing a letter showing who he really is.
Walk north and open the secret door to the west. Open the black box on the table and look inside to see the second half of the password (ZEBU). Use the skeleton key on the chest and take the letter. Go back the way you came, down the stairs to the suit of armor.
Walk west and speak to the door to the west. Say the word, A L I Z E B U and the door will open. Uncover the table in the center and look at the four treasures individually. Exit the room and walk to the east. Climb up the steps and open the door at the top.
Saladin will come out to meet you. Give him the letter and he’ll take you in to see the wedding. Step closer to interrupt the ceremony. The real king and queen will burst into the room. As soon as Alhazred runs from the room follow him out and up the stairs to the top room.
When the genie appears Jollo will throw you the genie’s lamp. Show the lamp to the genie and you’ll become his master. Grab the sword from the wall and use the sword on Alhazred.
When you’re about to be defeated Cassima will stab Alhazred. While he’s dazed use the sword on him again to knock him out and watch the final cut scene.
Congratulations you’ve completed King’s Quest VI!

King’s Quest 6 was released by Sierra On-Line in 1992. Roberta Williams was the creative genius behind the game which is widely regarded as the best King’s Quest adventure game. It sold over 400,000 copies during the first week of its release. It featured an intriguing plot, improved voice acting and multiple endings. If you like the King’s Quest series make sure you check out the latest game, King’s Quest 2015.