Quest for Glory 5: Dragon Fire
 Quest for Glory 5: Dragon Fire is the fifth in the series and takes the quest to a whole new level. It was developed by Yosemite Entertainment for Windows 98 and Macintosh in 1998. It’s the final game of this great series and takes place on the island of Silmaria. It makes use of more action and role playing mechanics but puzzle solving and exploration still play a large part.
Many of the characters from previous games will make an appearance here. You’ll meet Erasmus and Fenrus, Katrina, Elsa, the liontaur Rakeesh and more. There is a day/night cycle and certain characters will move about or go home at certain times during the day. You’ll also need to eat at least once per day but you can get a free meal at the inn where you’re staying.
Just like the previous games you can choose between a Wizard, Fighter, Thief and Paladin. If you have no Paladin saved from a previous game you can load up a default game with the Paladin as the main hero.
The combat controls are quite different from the earlier games and happen in the adventure screen. There’s a wide variety of weapons and spells so make sure you try them out to find out what works best for you.
Quest for Glory 5 Walkthrough
At the beginning of the game Erasmus sends you to Silmaria to take part in the Rite of Rulership to decide who becomes the new king. After having a chat with him you’ll end up on Nob Hill under a giant wizard’s hat.
Wizard: Cast Trigger on the wizard’s hat to activate a teleport. You’ll be taken to the clouds. Answer the cloud’s questions with “your real name”, “quest to save Silmaria” and finally the meaning of life, “42”. Cast Open or knock on the door to the castle and you’ll be let inside. Talk to Erasmus about everything, leave the castle and go back inside. The second time you see Erasmus talk to him about everything and he’ll give you a Scroll of Whirlwind. Memorize the spell and you can use it to trap enemies for a short period of time.
Walk left, past the Colosseum (enter if you want to see inside and speak with Ferrari), and then enter the Hall of Kings. You’ll meet the Counselor Logos (Speaker of Silmaria). He’ll tell you about the Rites and then you can ask him about everything.
Leave and continue to the left. Check out the Noticeboard. You can come back here for an update on the news or any other notices.
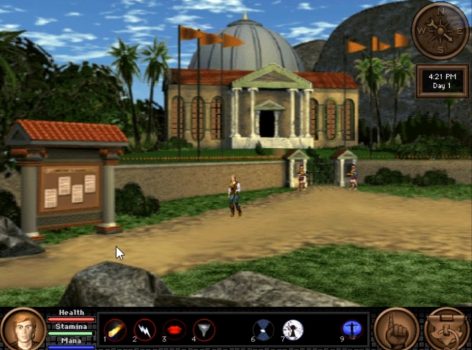
One of the notices tells you that to enter the Rites you’ll need to pay a fee of 1000 drachmas. Continue to the left to enter the town square.
The Town of Silmaria
There are a few places to visit in the town. You may want to wander around for a bit to find out where all the stores and people are located. You can talk to everyone and examine everything.
One of the first things you’ll want to do is enter the First Bank of Silmaria and withdraw your 500 drachmas. The bank will get robbed within the next couple of days so you want to keep your money safe until then.
Visit Sarra, the jewelry merchant and Wolfie, the artisan. Talk to Wolfie about everything and then buy at least 3 Amphorae pots from him. You’ll also want the Map and the Balloon Painting, although you won’t need the painting for a while.
If you continue to the left you’ll find Gnome Anne Lands Inn. This is where you’ll be staying. Go inside and say hello to Anne. Get your Room Key and check out your room if you want. It’s the first door on the first floor. You have a chest where you can store items.
Leave and head to the right. Across the bridge you’ll have the Adventurer’s Guild. Go inside to sign and read the Logbook. Read the message board to find out Sarra lost her basket somewhere on the beach southwest of Silmaria. The Apothecary also wants Pegasus Feathers for their potions. Talk to Toro and then leave.
Take the exit to the right to the Dead Parrot Inn. If it’s after dark you’ll be able to enter. There’s not much to do here for now but you can have a look around.
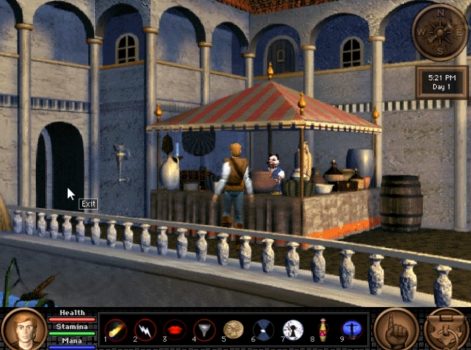
Continuing to the right you’ll find the Weaponsmith Pholus, Famous Adventurer and the gate leading to Science Island. The exit back into town takes you to the Food Seller. Buy some food from him in case you get hungry. You’ll also need the two kinds of Pizzas for later. Behind him you’ll find the Magic Shop where you can find Shakra.
Talk to Shakra about everything and buy the Mystic Magnet. Place one of the Magnets in your chest in your room and the other on your hotbar. Use the Magnet on yourself and you’ll immediately be teleported back to your room. This is a must have for all adventurers.
Wizard: Buy Mana Pills, RIP Spell and other spells if you can afford them.
To the right of the Magic Shop you’ll find the Apothecary. Inside you can talk to Julanar and Salim. Talk to them about everything and buy 2 x Poison Cure Pills and as many Healing Pills as you think you’ll need.
At some point go back to the stone between the Arena and Nob Hill. Rakeesh will be standing on the stone. Talk to him and he’ll give you Katta Pin (Wizard/Paladin/Fighter) or Magic Grapnel (Thief).
Paladin: If you’re a Paladin he’ll also tell you about the Ring of Truth. Visit the Hall of Kings and talk to Logos. He’ll give you the Ring of Justinian to make a start.
When you are done exploring for the day head back to the Inn and get some rest.
Side Quests
Sarra’s Basket
Leave town by the gate near to the Inn. When you leave the next screen you’ll be on the island map. Make your way down south along the coast. At some point you’ll be stopped and attacked.

Fight off the enemies and then look around. You should see a Basket by the shore. Pick it up and take it back to town. Give the Basket to Sarra and she’ll reward you with a Shell Necklace.
Science Island
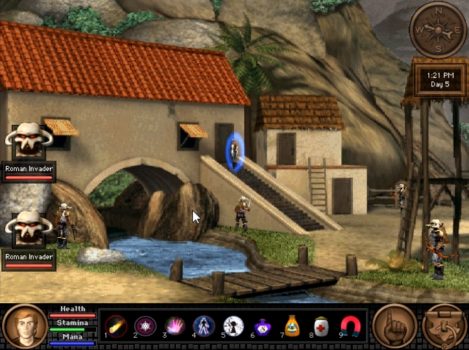
Talk to the weaponsmith and buy a Spear. Pick up some Rocks from the ground. Take the gate to the right of the weaponsmith and you’ll see Science Island. Walk up to the Windmill and pull the Lever. This starts the windmill and powers the contraption.
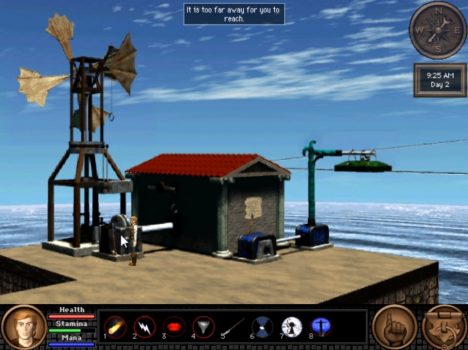
Pull the Lever to the right, by the sign, and it will break. Use the Spear in the Lever slot and pull the Lever again. This time the contraption will run. Wait for the Gondola to turn around the corner in front of the shed and pull the Lever again to apply the breaks. Hop inside the Gondola.
Fighter/Paladin/Thief: Throw a rock at the Lever to start the mechanism.
Wizard: Cast Force Bolt at the Lever.
The Gondola stops automatically on the other side. Get out and look at the window by the strange wheel. You’ll have to take the Science Academy Quiz to get inside. The questions are quite simple. Once you answer them correctly the entrance to the Academy will be open.
Inside the Academy have a look at the flickering screen to the left. This is the Science Aptitude Test. You’ll need to pass it to get the secret password. Answer all questions correctly and you’ll be given the Secret Scientific Laboratory Access Code. For me it was: PIZZA, but the code changes every game.
During the day Dr. Pretorius will be sitting at the desk. Talk to him and most importantly find out what kind of pizza he likes. He’ll tell you Anchovies and Artichokes are the best.
During the night you’ll find Dr. .. sitting at the desk. Talk to him about everything to find out he likes Pepperoni and Jalapeno on his pizza.
Talk to the fisherman in the morning, outside the Dead Parrot Inn, and ask him about small fish. He’ll give you some Anchovies. Go to the Apothecary and take the Jalapeno hanging from the back wall. Buy an Anchovy Pizza and Pepperoni Pizza from the food merchant.
Open your inventory, click on the Pepperoni Pizza so the image is displayed to the left. Drag the Jalapeno pepper and drop it onto the pizza.
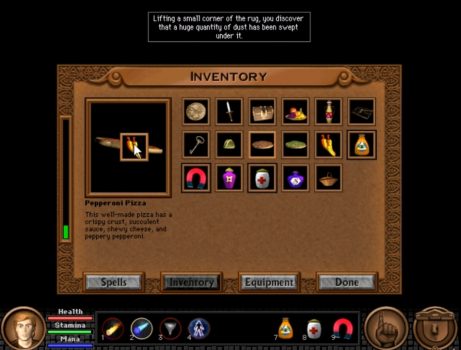
Now do the same with the Artichoke Pizza. Place the Anchovies on top to make an Artichoke and Anchovy Pizza. Take the two pizzas back to Science Island and give them to the scientists. There’s nothing more you can do here now but the Scientists will be happy and let you explore the academy later.
Bank Heist (Wizard/Paladin)
On the third day or later visit the bank to find out it’s been robbed. Talk to the Banker and ask about the Robbery, Thief and Evidence. Take a look at the floor near the vault entrance to find an Interesting Toolkit.
Take the Interesting Toolkit to Shakra at the Magic Shop. He’ll tell you that Erasmus might have a few spells to reveal more information. Go see Erasmus and show him the Interesting Toolkit.
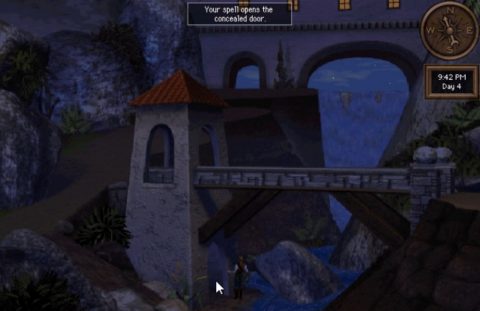
Go to the Dead Parrot Inn at night and watch for a one-armed man leaving. Follow him back to the bridge and watch him open the secret door.
Go to the magic door and if you’re a Wizard cast Trigger and Open. If you’re a Paladin use Magic Ward and then force the door open. Talk to Arestes until he agrees to go with you to the Hall of Kings. You’ll be taken to the Bank the next day and rewarded with 2,000 drachmas.
Pegasus Pass
To the very north of the island you’ll see the symbol of a Pegasus. This is Pegasus Pass.
Walk to the stream surrounding the pass and fill up two of your Amphorae with water. You’ll now have Hippocrene Water. Take a drink from the stream to refresh yourself if you want.
Fighter/Paladin: Stand on the seesaw between the two peaks. Throw a rock at the larger rock on the side of the cliff. You’ll be thrown up to the cliff opposite the nest. Use the tree root to swing across and walk up to the nest to grab the Pegasus Feathers.
Wizard: Walk as far up the bluff with the nest on top as you can. Cast Levitate to be lifted up to the higher ledge. Walk up and grab the Pegasus Feathers.
Thief: Walk up the bluff with the nest and use the Magic Grapple to walk across to the other peak. Then use the tree root to swing across to the first peak. Climb up and grab the Pegasus Feathers.
Head back to town and visit the Apothecary. Sell most of your feathers but keep one or two for yourself. You’ll now be able to buy Stamina Pills if you need them.
Visit the Famous Adventurer and give him the Hippocrene Water. Leave and come back for a reward.
Fighter/Paladin: He’ll give you a Magic Helm.
Wizard: He’ll give you the Thermonuclear Blast spell.
Thief: He’ll give you a Stealth Charm.
Thief Quest
Show the thief sign to Elsa in the Adventurer’s Guild, Ferrari, Ugarte and Arestes when you see them. The Thieves’ Guild is located under the bridge outside the Adventurer’s Guild. Use your toolkit to open the hidden door on the pillar on the left side. Disarm the trap and enter.
Arestes will be inside. Talk to him and join the Thieves’ Guild. Buy Oil, Torch, Pickpocket Knife, Blackjack and Rope. Combine the Rope with your Magic Grapnel in your inventory. You can practice pickpocketing on the dummy until you’re proficient. During the day you can pickpocket people in the town. Sign up for the Chief Thief competition on the board to the right.
The mansion to the left of the Arena is deserted. At night time light your Torch with the Tinderbox and pick the lock. Sneak instead and use the Dagger to pry open the cupboard. You’ll find another Dagger. Take the Amphora from the table and search the couch to find a Gold Ring. Open the drawers to find a few Drachmas. Move the painting on the right wall and disarm the safe. Open it for Drachmas and Jewellery. Leave and sell any goods you don’t want to keep to Arestes.
From Nob Hill sneak down into the town. Once the patrolling guard has started to head away from the bank sneak up to the door and pick the lock. Go inside and pick the lock on the gate. Disarm the trap on the vault and then open it. Grab the treasure bags and use your Magnets to return to the Inn.
You can come back to the bank to loot the vault again but you may need to use the Blackjack on the patrolling guard. Money inside the bank will increase by 100 Drachmas per day.
Marriage
You’ll have the opportunity to marry one of 4 different women, Nawar, Elsa, Katrina or Erana. You’ll need to be persistent and take multiple attempts to woo them.
Nawar: Can be found at the Dead Parrot Inn at night. Talk to her every night and give her Jewellery, Flowers and Chocolate. Talk to her when she’s on the balcony at the Inn on at least 3 separate occasions. Offer her Hera’s Ring, then fight Abdul outside the Inn. You’ll need to offer her Hera’s Ring again. Give Ferrari the Peace Statue and give her Hera’s Ring one final time and she’ll accept.
Elsa: Is also one of the contenders in the Rites of Rulership. The marry her you’ll need to fight her in the arena. Make sure you let her take the credit for defeating the Hydra in the Rite of Valor. Give her Flowers, any combat equipment and the Ice Diamond Sword. Talk to her each time she visit’s you in your room and give her Hera’s Ring.
Katrina: You can only marry Katrina if you’re a Fighter or a Wizard. Once you’ve freed her from Hades give her Flowers and Chocolate. Once you get the Peace Statue go and see her and give her a Defense Amulet. Visit her at the beginning of the final rite, the Rite of Justice, and give her Hera’s Ring.
Erana: You can only marry Erana if you’re a Wizard or a Paladin. After you free her from Hades go to see her and give her Flowers and Chocolate. Make sure you give the Magic Seeds to Ann to help with her Inn. Go and see Erana after getting the Peace Statue. Talk to her at the beginning of the Rite of Justice and give her Hera’s Ring.
Rite of Freedom
Go to the bank and talk to the Banker. Pay the 1,000 drachmas to enter the Rites, then go to the Hall of Kings to begin the Rite of Freedom. The first Rite is a quest to free the fishing villages. Your assigned village is Naxos, to the south of Silmaria. You only have a few days to complete this challenge so make sure you act quickly once it begins.
Make sure you have plenty of Healing and Stamina Pills, and Mana Potions if you’re a Wizard. Travel to the village of Naxos to the south. Enter the first house on the left up the stairs with the red roof.
Go inside, open the chest and take the Naxos Sigil. Do the same to the other four villages if you’re up for a challenge. Show the Naxos Sigil to the guard outside the Hall of Kings to be let in and complete the first Rite.
Rite of Conquest
Once the first rite is completed you’ll be automatically summoned for the second rite, the Rite of Conquest. You must defeat a General named Claudius and return with his shield.
Visit the Magic Shop/ Weaponsmith and Apothecary to make sure you have all the necessary items and equipment for combat. Then leave town and visit the Dragon Pillar directly to the north. Kill any enemies waiting here and then pick up the Beeswax in front of the pillar.
In the morning go and see the fisherman Andre and ask to rent the boat. He’ll tell you the fortress is rumored to be on an island in the southwest. You can find it here.
Save your game once you reach the island. Run to the right and the up the stairs to the entrance to the fortress. You can kill the mercenaries if you want or just run straight past them. Once inside the fortress kill the guards and if you’re a fighter or paladin pick up the Spears from the central cart. Run up the stairs to the right.
Run along the top walkway towards the bottom of the screen and you should spot the Centaur Wizard.
Fighter/Paladin: Throw Spears at the Centaur until he’s defeated.
Wizard: Cast Reversal to reflect the Centaur’s spells and then cast Flame Dart or one of the other offensive spells. The Centaur will cast Reversal as well so you’ll only get a few shots. Then he’ll teleport to the other side of the fortress so you’ll need to run over to the other side and repeat the process until he’s been defeated. For a quick kill cast Trigger on his staff. If you do it this way he doesn’t drop any loot.
Thief: Sneak along the rock wall to the stairs. Climb up and use the Magic Grapnel to climb over the ledge. Once inside kill the guards and grab the Spears from the cart. Throw spears at the Centaur until you’ve killed him.
Once the Centaur Wizard is defeated the General will appear. He’s a regular soldier so you can kill him any way you like. Look his body for the General’s Shield and then use the Magnet to teleport back to the Inn.
Go to the Hall of Kings and show the General’s Shield to the guards out the front to complete the rite.
The Assassin
After the second rite you’ll come out of the Hall of Kings and walk over to speak with Rakeesh. During the conversation he’ll be struck by a poison dart. Quickly give him the Cure Poison Pill to stabilize him. You’ll return to the Hall of Kings and given the quest to find the assassin.
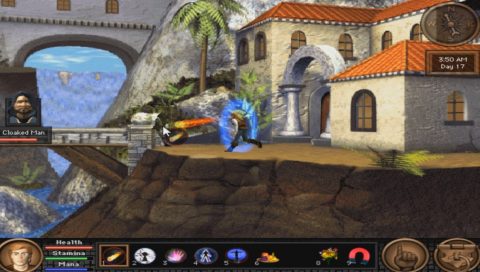
Visit Erasmus in his castle. Fenris will tell you that he ate some chocolates and fell into a deep sleep. Fenris will give you the Chocolate Box. Return to the Inn and talk to Ann. She’ll tell you about her debts to Ferrari and she asks if you could talk to him for her.
Go and see Julanar at the Apothecary and ask her about the Poison and Rakeesh. Speak with Salim also. Leave and enter the Apothecary again to get a different set of dialogue options. This time they tell you that Erasmus has been drugged. Give them the Chocolate Box for them to analyze the poison. At some point during the conversation they’ll give you Magic Seeds.
Return to the Inn and give the Magic Seeds to Ann to help her with her business. That’s all we can do for now so get ready for the next rite.
Rite of Valor
Visit the Famous Adventurer and ask him about the Hydra. He’ll give you a clue as to how to defeat it and suggests you take lots of healing potions. Go to the Adventurer’s Guild and read the Logbook. There’s an old entry from Daedalus about his attempt to construct a flying machine with wood, wax and feathers.
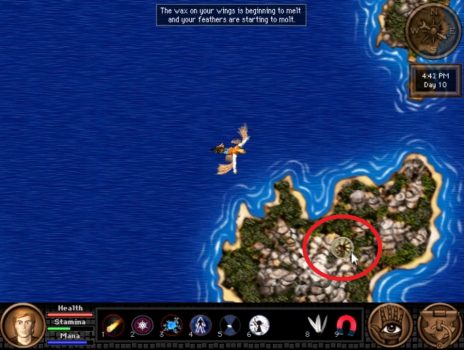
Return to Science Island and speak with Dr. Pretorius about everything. Use Wax and then Feathers on the wooden flying frame behind him. You’ll take the wings out for a fly. Head out to the east and a little to the south until you find Hydra Island.
Use an Amphora to collect some of the sticky sap at the base of the white tree. Continue further into the cave until you see the Hydra. Run up to the Hydra and start attacking it, then back off. Elsa will arrive to help you.
Fighter/Paladin: Fight the Hydra until each of the heads are cut off. Elsa will burn the stumps with her torch.
Wizard: Let Elsa fight the Hydra and cast Flame Dart on the stumps.
Thief: Let Elsa cut off the Hydra heads and then use your Torch on the stumps.
Go up and talk to Elsa after the battle and then loot the Hydra for Hydra Teeth and Hydra Scales. Talk to Elsa and tell her that she can search the cave for her reward.
Elsa will run in and take a Bow. Follow her in and take the Drachmas and Magic Helm. Take a look at the large chest.
Fighter: Open the chest and take the explosion. Make sure you’re at full health.
Wizard: Stand quite a way back and cast Trigger on the chest. Then cast Open.
Paladin: Cast Magic Ward and then open the chest.
Thief: Disarm the Trap and then open it.
Inside the chest you’ll find Drachmas, Magic Chainmail, a Rope and Shrink Scroll. Use the Magnet to teleport back to the Inn.
Head to the Hall of Kings and show the Hydra Teeth to the guard. You’ll be let into the hall and the rite will be complete. You’ll come back the next day to begin the fourth rite.
Rite of Destiny
For the fourth rite you’re required to visit the Island of Delos to face yourself. Go and see Wolfie the merchant and buy the Balloon Painting from him. Go over to the fruit merchant, Marrak, and show him the Balloon Painting. You explain to him that you’re trying to build one. He offers to sell you his Brazier so buy it from him now. Visit the Famous Adventurer and read a book about making a Hot Air Balloon.
Go to Ann and give her the Sheet from the drawer upstairs. She’ll agree to sew it into the right shape but you’ll need to come back the next day to pick it up.
Go to Science Island and take the upstairs exit on the left side. You’ll be outside on a platform. Look at the little monitor to the left and enter the controls, 100, 55 and Closed. The claw will swivel around and pick up the sail boat, dropping it on the platform.
Use the Sheet, Rope, Goo, Brazier and Tinderbox on the sail boat to turn it into a hot air balloon. You’ll float off into the sky.
You’ll need some Hipocrene Water so if you need to stop by Pegasus Peaks and get some more. From here continue to the west and you’ll spot Delos. Get off and first go to the Dryad Grove to the south.

Use the Hipocrene Water on each of the 7 Dryads to wake them up. Watch the dance, it takes a few minutes.
Wizard: Pick up the Magic Wood that the Dryads leave behind.
Leave and walk north to the Oracle. Read the pillar in front of the pool. This is important for the next rite. Pick up the Black Lotus Flower from the pool and drop a Coin into the pool. Sybil will wake up and give you a prophecy. Take the Destiny Disk from the ground and ride the balloon back to town.
Visit the Apothecary and give Salim the Black Lotus Flower.
Wizard: Visit Shakra at the magic shop and show him the Magic Wood. He’ll turn it into a Mage Staff.
Show the Destiny Disk to the guards outside the Hall of Kings to complete the Rite.
Rite of Courage
Go to your room at the Inn and you’ll see someone has left behind a Box of Chocolates on your chair. It’s quite suspicious so take the chocolates and give them to Salim at the Apothecary to examine them.
Visit Pholos, the weapon merchant and the Famous Adventurer for advice about this Rite. Make sure you have 2 Amphorae with you.
Fly or walk northwest to the Dragon Pillar with the skull symbol. There’s a dead body on the ground near the river. Use the Amphora to collect the fouled water near the body, then pour it at the end of the river where it enters through a hole in the cliff wall. If you read the pillar during the last quest you’ll recite the incantation and a door to Hades will appear.
Walk up to the gate and you’ll be stopped by Cerberus, the three-headed dog.
Fighter: Attack the dog and kill it 3 times.
Others: Bribe it with a Gyro, Pepperoni Pizza and Box of Chocolates.
Once inside you can dodge past most of the skeletons. Take the path down to the right and then either jump or levitate to the path down below. Go through the arch.
After coming out of the arch run along to the left and run down the path through a dragon’s skeleton. When you come out head to the right at the bottom of the screen. When you see the whirlpool fill one Amphora up with water. This is Lethe Water. Continue to the right and take water from the river. This is Styx Water.
Paladin: Dip your ring into the water to make the Ring of Truth.
Head back to the left and run around the river on the top side. Head all the way to the right until you find the Hall of Hades. Talk to the Guardian of the Dead and choose to rescue either Erana or Katrina.
Return the way you came and leave Hades. Head back to town and give the Lethe Water to Salim at the Apothecary. Go to the Hall of Kings and show the guard the Styx Water to complete the Rite.
Rite of Peace
Visit the Famous Adventurer for some advice and then go to Science Island. You’ll notice the scientist and Gort are missing. Ride the elevator to the top level and use the panel that is usually behind Gort. Type in the code from the beginning of the game when you completed the science quiz. It changes every time.
The side wall will lift up revealing a secret laboratory. The scientist is there and Gort is being “upgraded”. Leave and visit either Erana or Katrina, depending on who you save. Tell them about the Rite and they’ll give you a Waterbreathing Amulet.
Wizard: Erana will teach you First Aid and Katrina will teach you Dragon Fire.
Go back to the Inn and go to sleep. Elsa will visit you during the night for a talk.
Thief: Steal the sheet from your bed and sleep another night at the Inn. Elsa will take you to Minos island. Sneak past the front gate and use your Blackjack on the goons. Use the grapnel on the dead tree to climb up onto the ledge. Sneak over to the right, jump over the wall and use the blackjack on the archer. Pick the lock on the door and enter. Kill the 3 Goons and take the left door on the upper lever to enter the treasure room. take the Winged Lion Statue from the table. Use the grapnel to get up to the left alcove and use your sheet to take the Magic Statue. Disarm all the traps on the 6 alcoves and loot all the chests. The far right alcove has the Blackbird. When you’re done use the Magnet to return home.
If you have an Imitation Blackbird from a previous game then you can go straight to Ferrari at the Dead Parrot Inn. If not show the Blackbird to Wolfie and he’ll make an imitation. Give Ferrari the real Blackbird and in exchange he’ll give you the Deed to the Gnome Inn.
At night go to the mansion next to the Arena. Use the grapnel three times to get up to the roof. Jump over to Ferrari’s house. Sneak to the middle window and use oil on the bars. Open the window, sneak downstairs and take the Amphora from the table. Behind the paining you’ll find a safe. Disarm it and search inside for 1000 Drachmas. Push the table towards the door and climb on it. Swap the Imitation Blackbird for the real Blackbird. Climb back out and teleport to the Inn. Go to the Thieves’ Guild and show Arestes the Blackbird. You’ll win the Chief Thief Contest.
Fly over to the southwest until you see the island with a shell symbol next to it. Land on the island and walk over to Atlantis.
Fighter: Use the magic spear to force open the gate and then fight the 2 Tritons. Swim through the tunnel, and make your way to the tower. Kill the Dragonfish and Hippolyta will surrender.
Paladin: Use the magic spear to pry open the gate and then cast Awe or Peace on the 2 Tritons. Swim behind the guards and press the middle panel to open it. You’ll swim through. Swim down and to the right. Hug the left wall and swim towards the tower. Force open the secret door and enter the throne room.
Wizard: Cast Open on the gate and then Calm on the 2 Tritons. Swim through the tunnel. Swim behind the guards and open the panel in the center. You’ll swim through to the other side. Swim down and over to the right. Then towards the left side of the tower. Cast open on the center panel to open the secret door to the throne room.
Thief: Use Oil on the gate hinge twice and then the mystic magnet on it to pull it out. Fight or avoid the 2 Tritons and swim through the tunnel. Swim behind the guards and click on the center panel to open it. You’ll swim through. Swim down and to the right, then hug the left wall and swim towards the tower. Use the toolkit on the secret door at the base of the tower and go through to the throne room.
Once inside the throne room talk to Hippolyta and tell her everything. She’ll agree to an alliance and give you the Peace Statue. Fly back to Silmaria and show the Peace Statue to the guard outside the Hall of Kings.
Rite of Justice
Give the Peace Statue to Ferrari at the Dead Parrot Inn.
Fighter/Paladin/Wizard: He’ll give you the Deed to Gnome Inn. Return to the Inn and give this to Ann.
Sleep in the Inn and Elsa will come for a visit. If you are courting her now is the time to give her Hera’s Ring. If not go and propose to whoever else you like.
Visit the Apothecary and stock up on any potions that you think you might need. At night time walk from the Dead Parrot Inn towards the Adventurer’s Guild and you’ll be ambushed by the Assassin.
Kill him and Toros will run out of the Guild and save you after you’ve been poisoned. You’ll talk to Logos about how to deal with Minos.
Paladin: Say you’ll use the Ring of Truth. Make sure you have it equipped.
Others: Any option is fine.
Sleep at the Inn and you’ll be summoned to the Hall of Kings in the morning.
Paladin: Accuse Minos and he’ll lie. The Ring of Truth will glow.
Others: Any option is fine.
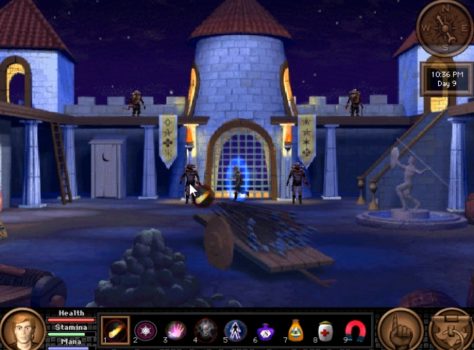
You’ll be taken to Minos Island. Make your way towards the gate, killing the Goons as you go. Break down or cast Open on the gate and go inside.
Kill all the Goons in the courtyard and open the front door. Kill more Goons, head upstairs and take the door to the left to the treasure room.
Pick up the Toolkit from the desk and free Elsa from the far right alcove. She’ll help with the fight. Kill the Goons and the Minotaur. After the fight Minos will jump off from the top walkway.
Take the Axe from the Minotaur and open the back left alcove for lots of potions. Examine the body of Minos. Once you do this Erana will appear and you’ll be teleported away to deal with the Dragon.
Final Battle
Talk to Gort and Toro and tell them to help fix the pillar. Help them push the pillar back up so the Dragon can be hurt. Give Gort and Toro a Healing Potion to help keep them alive. Give Toro the Axe so he’s more effective in battle. Use Fire Proofing Oil on yourself.
Run up to the Dragon and do as much damage as you can. You shouldn’t need to sacrifice anyone but there is the option of sacrificing yourself or someone else. If you have married Erana and tell her you’ll sacrifice yourself she’ll be upset and Gort will agree to sacrifice himself instead.
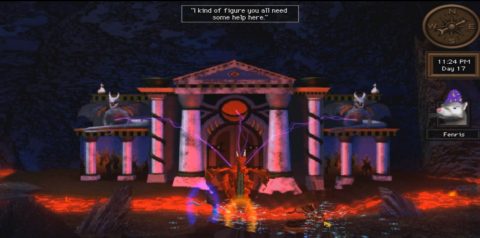
Once the Dragon is down to about half health the second phase will begin. The dragon flies around the room breathing fire. Wait for it to land or come close and get in a few hits. You’ll need to damage it quickly or it will get away. Hopefully you’ll win the battle and save Silmaria!
Congratulations on completing Quest for Glory 5: Dragon Fire, the final game in the Quest for Glory series. If you enjoyed this game make sure you check out the other installments in the series, starting with Quest for Glory 1.