Bard’s Tale 2: The Destiny Knight
 Bard’s Tale 2: The Destiny Knight begins when a wizard by the name of Saradon seeks you out because of your fame in defeating Mangar in The Bard’s Tale.
An evil even greater than Mangar threatens the land. The Archmage Lagoth Zanta has broken the Destiny Wand and hidden them throughout the land. You must recover the pieces and reforge them. Only then can Lagoth Zanta be defeated.
Character Creation
Your party can be imported from the previous game, keeping their spells, experience and most of their items. You can also begin with new characters but this will significantly increase the difficulty in the beginning.
Now that you have your party of heroes it’s time to venture out into the realm. This time you’ll have multiple cities to explore, as well as numerous dungeons and castles. You begin in the city of Tangramayne.
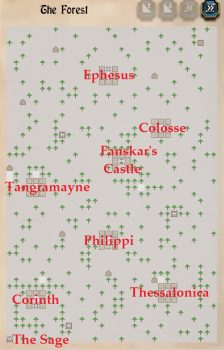
The region is made up of 6 cities spread throughout the forest. You’ll find a few other locations dotted around the map. Aside from the cities you’ll also want to visit the Sage at 0N 0 E. He’ll give you useful advice throughout your adventures.
Tangramayne

You’ll arrive at Tangramayne through the gate on the western side. One of the first things you’ll want to do is visit the Review Board and change the class of your spellcasters to Archmages. I’m assuming you have an experienced party who already have all the spells from the previous game.
Visit Garthe’s if you need to buy or sell equipment and then go to the house on the far eastern side, circled in red. The princess was last seen in the city but has gone missing. Perhaps this is where you’ll find her. Agree to go down into the dungeons.
Dark Domain
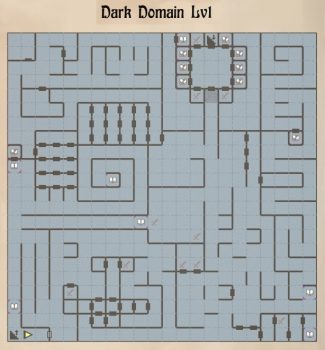
There are no required items or encounters on the first level of the Dark Domain. Explore as much of it as you want and then head down the stairs at 21N 14E.
The portal down to the net level can be found in the top right corner (N21 E21), but before going there you’ll need to recruit the Winged Creature at N5 12E. This creature is needed to get past a chasm on level 4. You’ll also find a Medusa in the center of the dark room but this is an optional encounter.
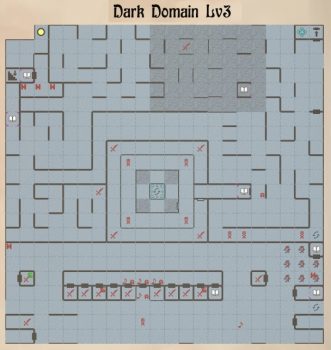
As soon as you take the portal down it will look like you’re trapped. Step to the west once, 21N 20E, and you’ll be teleported to the center of the map, N10 E 10. Go through the darkness at the top of the map and find the way to wrap around to the southern area. From here enter the small room N3 E13 and answer the question “Look at the spells of the Sorcerous kind; Who’s the Master of the Mind?” with “Mangar”
A door will appear in the northwest corner at N19 E1 so that you can make your way through to the stairs leading down to level 4.
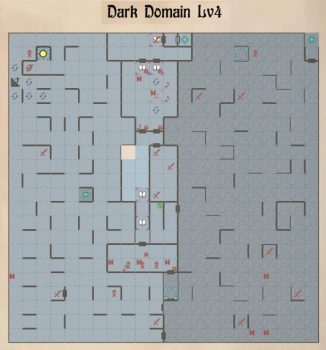
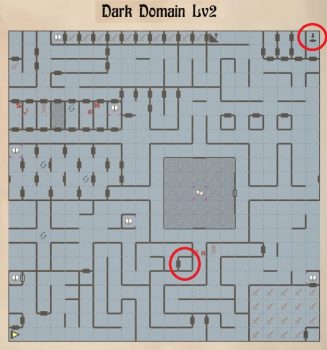
The stairs will drop you straight onto a spinner. You need to find your way to the dark eastern side of the map by going through one of the doors to the south, N0 E10, or N2 E10.
From here make your way through the darkness to the teleporter in the very northeast corner, N21 E21. This takes you to N3 E11 where you’ll need to make your way to the north.
The deep chasm at N10 E9 can only be crossed if you let the Winged Creature on level 2 join your party. At N19 two huge double doors will block your path. To open the doors your Bard will need to sing either Seeker’s Ballad or Watchwood Melody.
At N21 E10 you’ll enter the Throne Room of the Dark Lord. He’ll attack your party, along with 3 Daemons. Take them out and then walk to the east once to find the Princess. Let her join your party and then either Apport Arcane or make your way back to the dungeon entrance where the Princess will find her own way back to the King.
You’ll get a lot of experience for rescuing the Princess so head to the Review Board and level up. When you’re done leave the city and make your way through the forest to the northernmost city of Ephesus.
Ephesus
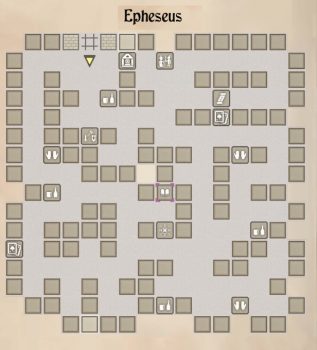
Explore the city of Ephesus to find all the important locations. If you spoke with the Innkeepers in Tangramayne you may have been given a hint to visit the Scarlet Bard in the Greysword Inn on the south end of Ephesus. When you go inside the Scarlet Bard will teach your Bard new songs for a modest fee.
The next dungeon, The Tombs, can be found by visiting the Temple of Darkness at the location N7 E8. Go inside and take the stairs down to the Tombs.
The Tombs
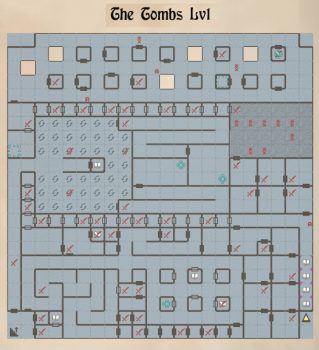
From the entrance stairs at N0 E0 make your way north and then east to one of the teleporters at N12 E12 or N11 E15. Both of them take you to N13 E0. You can explore the entire level for more clues if you want but if you want to go straight to the next level take the teleporter at N20 E19. This takes you to Level 2 of the Tombs.
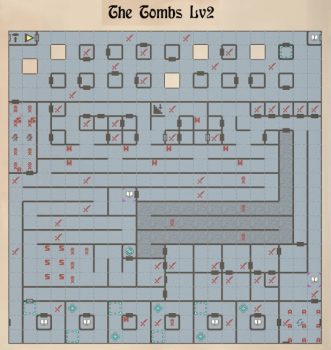
After taking the teleporter from Level 1 you’ll appear on the same square just one level down. Make your way to the western side and go through to the door to the south, through the room of traps. From here you can go straight to the stairs down at N16 E10 but you might want to visit the Old Man at N10 E8 who will sell you a Master Key for 50,000 gold pieces. Equip the Master Key and spinners will no longer affect you. Take the stairs down to the final level.
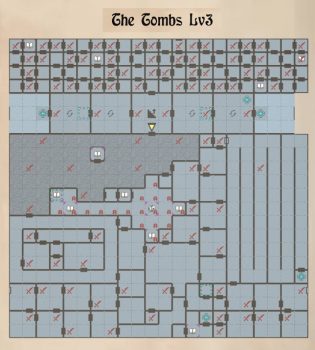
Level 3 is where we’ll find the first section of the Destiny Wand but it’s a much more difficult map to navigate.
From the stairs go north 2, west 1, north 3, east 2, south 1, east 1, north 2 and east 1 to the Old Man at N0 E13. He’ll ask you a question “The name of it is the staff of…” Answer him with “Old” to be let through.
From the Old Man go east 1 and north 1 into the teleporter. You’ll be teleporter 2 squares to the north to N3 E14. From here make your way west until you can go through the secret door at N3 E0 that wraps around to the eastern side of the map.
Continue west to the third room and take the door to the north. Follow the long winding passage to a teleporter which takes you to N10 E3. Make sure your party is fully healed before going through as this is the first of 7 Death Snares.
When you enter a cloudy face will say “Your time draws to a close, mortals. Show the answer to me, or perish.” First go to N11 E10 and let the Old Man join your party. Place him at the back. Go south to N7 E10 and fight the Toxic Giant. It drops a Torch. Make sure you pick it up and let the Old Man equip it. Have all your parties drink from the poisoned fountain at N9 E12.
Quickly run back to N10 E3 where you entered the Death Snare and complete this challenge. A door will open at N10 E9. Go through it to the west for the First Wand Segment. From here you should be able to Apport Arcane out of the dungeon or walk two squares west to escape the snare.
Do anything else you need to do in the city of Ephesus, like visiting the Review Board and selling off any useless items, then leave the city and make your way south to Fanskar’s Castle.
Fanskar’s Castle
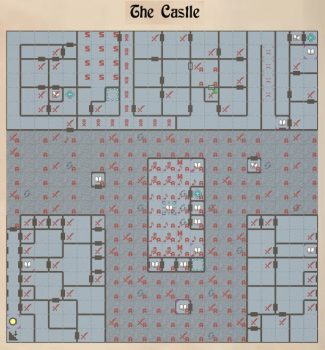
From the entrance in the southwest corner head north to the wall. Follow the wall along in the darkness 4 tiles to the east and go through the door to the north. From here make your way through the rooms to the teleporter at 17N 4E. This takes a 3 tiles to the east.
Head around to Fanskar’s Quarters and first find the first word of the Dreamspell at N20 E21. Then head around to the small room to the north to face Fanskar himself at 21N 20E. After defeating him walk east once to be teleported into the second Death Snare. A voice will say “Welcome, mortals! Choose one of three doors, but only 1 leads to the segment. The other two bring instant death…”
If you go to the corners of this room Old Men in white and black will tell you to choose the right door. They are both lying so choose the left door and you’ll be teleported to N5 E13. Walk west 3 tiles to find the Second Wand Segment. Either Apport Arcane to the stairs or make your way through the dark room and leave the Castle.
Philippi
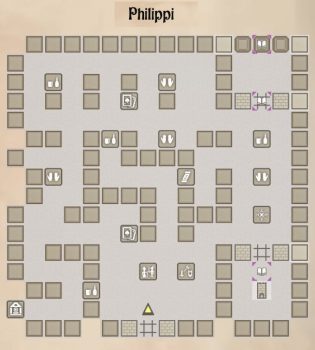
From the Castle start walking to the south and it shouldn’t be long before you spot Philippi. Head inside and walk around to find all the points of interest. Dargoth’s Tower is through the gate in the southeast corner of the city. This is a 5 level dungeon so get ready for lots of exploring. Before going to the tower you may want to explore the workshop in the northeast corner of the city.
Saradon’s Workshop
If you remember Saradon was the guy who asked you for help in the beginning of the game. The gate to his workshop is locked but you can find the key by exploring the forest and going to Saradon’s Last Stand at N45 E29. You’ll find a Wardstone that will let you through the gate.
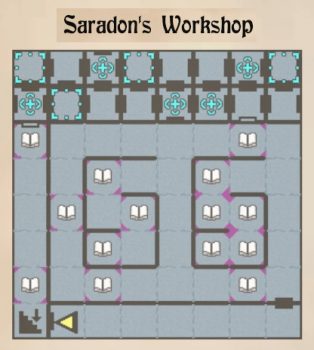
Make your way through the small teleporter maze and then go to N1 E6 for the Harmonic Staff. This restores all spell points when used. It will come in very handy for the final battle. When you’re done exploring head out to the city and go to the tower.
Dargoth’s Tower
There’s nothing here you need so just make your way north to the second intersection and then east to the third building. Inside, at N4 E12 you’ll find the teleporter that takes you to N17 E21. Walk north once for the stairs up.
This level has a large building in the center filled with tiny rooms. Make your way through them to the teleporter in the corner at N5 E16. This takes you to N1 E14. Walk west until you reach the second teleporter which takes you up to the building with the stairs. Make your way through the rooms and take the stairs up at N20 E13.

From the stairs we’ll be taking a detour for the next word of the dreamspell. Go north and you’ll wrap around to the south side. Take the teleporter at 3N 19E to 8N 19E. From here walk around to the small room at N8 E13 for the next word of the dreamspell, Disrupt.
Go through the teleporter at N5 E17 to N10 E17 and go through the next teleporter in the small room at N13 E17. This takes you to N13 E11. Make your way north to the spell replenishing hallway.
Head west along the winding hallway and then make your way down to N6 E2. A magic mouth will ask you “Speak the three, in sequence:” The correct answer is “earth, compassed, fountain“. After you answer correctly the portal at N9 E2 to level 4 will open. Go through to the next level.
This is a much simpler level. From the portal at N9 E2 make your way up to the stairs at N19 E18. There are teleporters dotted around the level that won’t take you anywhere important. Try to avoid them and make your way through the dark room to the stairs.
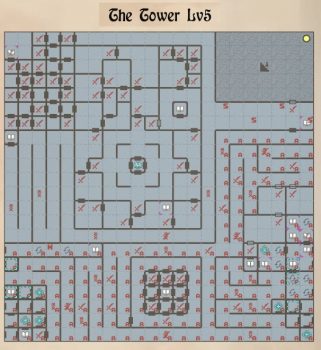
This is the final level of the tower and we’re close to finding the next wand fragment. when you emerge from the stairs you’ll be in a dark room at N19 E18.
First navigate through the maze to Dargoth at N20 E0. Once he’s been defeated head to the center of the level, N12 E9, where you’ll be asked to “Speak the ten in sequence and find the Death Snare”. The answer is ” water, lie, slave, gold, hate, rooster, large, early, bard, women”. Once you get it correct you’ll be teleported to N5 E20 and the hunt for the Wand Segment will begin.
To be honest I just wandered around until I found the wand segment. You should have time to explore all the rooms before the time runs out. From the point you teleport into the snare go E, N, to the mage with a message and then N to kill the 2 Web Dragons. Then W, N for a message that sometimes you need to hear messages multiple times.
I don’t believe you need to go back to hear the message at N6 E6 multiple times. All I needed was the “Dagger!” which can be found at N0 E1. You’ll need to answer the statue who asks “Give me your battlecry, or die.” Answer with “havok” and you’ll be given the dagger.
In this maze you will get teleported around a little and the doors sometimes appear and disappear making this quite confusing. Once you have the dagger you’ll need to make your way to N5 E18. Then west once for Third Wand Segment. Once you have it apport arcane back to the start of the tower and leave.
Thessalonica
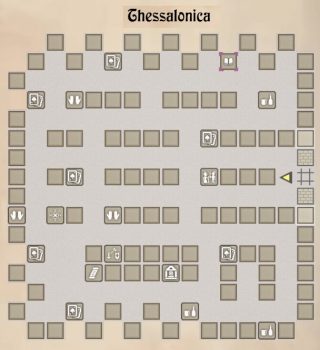
Make your way through the forest to the southeast town of Thessalonica at N7 E24. Once inside have a look around and then make your way to the Maze of Dread. The entrance can be found at N14 E11.
Maze of Dread
The Maze of Dread is far simpler than some other dungeons. There are stairs down at N21 E21, two portals down at N16 E3 and N10 E21 and an elevator that will take you to any level of the maze at N1 E21.

If you defeated all the statues on Level 2 of Dargoth’s Tower you can go to N15 E10 for a riddle. Answer with “der”, which is red backwards, and you’ll be rewarded with the Sword of Zar. If not you can just go to N1 E21 and take the lift down to level 3.
From the lift at N1 E21 make your way through the maze to the teleporter at N8 E17. You’ll be teleported into the Death Snare at N16 E4 and have a limited time to complete it.
Go to N19 E2 and read the message, “Though seeming of little value, repetitiveness is definitely Endurable. At least up to five times… Then it just becomes insanity.”
The Master Alchemist can be found at N21 E6. Visit him and he’ll give you a Vial. Take it to the Magic Mouth at N17 E7 and answer with “endurable”. Repeat this 5 times and on the fifth time the magic mouth you’ll be able to go through the door at N19 E10 for the Fourth Wand Segment.
Corinth
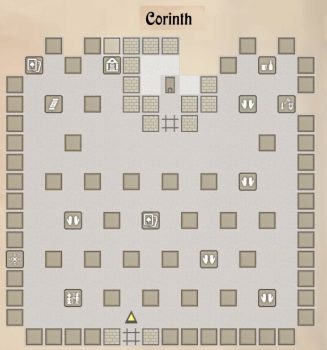
Corinth is the next town we’re heading to but you’ll want to explore the forest and find the golem Kazdek at N19 E25. Wake him up and say his name “Kazdek”. He’ll give you an Item of Kazdek. You’ll need this later. Make your way down to the southwest town of Corinth. The fortress is impossible to miss and is in the northern section of town.
Oscon’s Fortress
Before going into the fortress make sure you only have 4 characters in your party. Any more and you won’t be able to complete the Death Snare. Leave your least useful members at the Adventurer’s Guild and continue on without them.
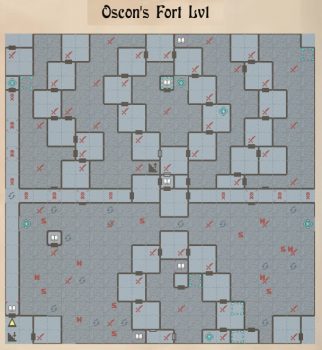
First you’ll need to get to N7 E3 to answer the magic mouth with “Fire, Krill, Silence”. You’ll be told the word is “Still”. To get there however you’ll need to phase through the wall in the corridor north of the starting stairs or make your way around there naturally.
I recommend just phasing through the wall, going to N7 E3 for the word “Still”, then phasing through the wall by the stairs at N12 E10 and heading up to the next level.
There are plenty of teleporters on this level that will teleport you from section to section. You can always just phase door through the walls to make life a bit easier.
From the stairs quickly run along the corridor to the north and go throug the teleporter at N9 E16 to N11 E6. For the rest of the teleporters:
Teleporter 2 at N6 E6 teleports you to N0 E6
Teleporter 3 at N4 E0 teleports you to N4 E15
Teleporter 4 at N5 E15 teleports you to N17 E15
Teleporter 5 at N17 E21 teleports you to N17 E6
Teleporter 6 at N12 E0 teleports you to N6 E15
You’ll want to stop by N16 E19 for the magic mouth. It will give you the next word of the dreamspell “Strike”.
At N20 E21 you’ll meet an old man who will ask you for the name of the Last Destroyer. Answer him with “Dervak” and you’ll have to fight the Last Destroyer. Once you defeat him stairs will appear at N21 E0. Head on up to the next level.
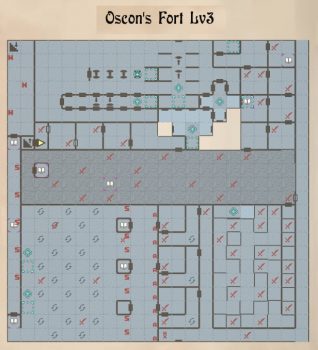
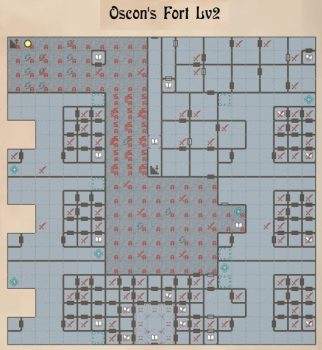
From the stairs run all the way south, then east and make your way around to the magic mouth at N12 E2. Answer with the word “Still” and the stairs will appear at N14 E1. Go through for the final level of the fortress.
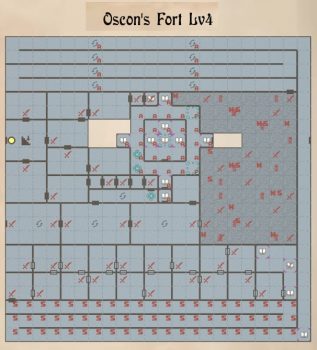
From the stairs make your way around to the teleporter at N10 E10. This takes you to the Death Snare at N14 E11.
To find the wand segment this time you’ll need to have the three statues join your party. They will only join if you answer their names correctly. The one at N14 E8 is called Paper, the one at N14 E14 is called Scissor and the one at N11 E11 is called Rock.
Place the three statues in the front of your party with Rock in the first position, Paper in the second and Scissor in the third. Go to the magic mouth at N17 E11 and it will open the door to the Fifth Wand Segment at N10 E11.
Make sure you pick up any party members that you left behind at the Adventurer’s Guild and then head out into the Wilderness to find the Grey Crypt.
Grey Crypt
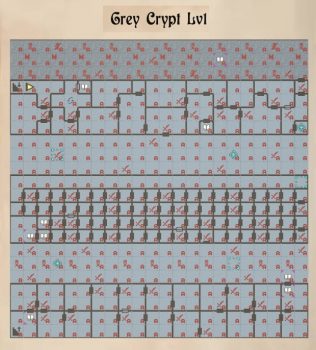
The Grey Crypt is found in the forest at N31 E8. To enter say the name of the crypt “Grey”. The crypt is entirely anti magic but you can use magic items, including segments of the wand.
From the stairs in the southwest corner make your way to the teleporter at N5 E3, then the teleporter at N15 E21 and then the Sphinx at N7 E1. Answer the question with “wize one”. The stairs down will appear at N18 E10.

First make your way to the magic mouth with the final word of the dreamspell, Shield. Then go to the teleporter at N6 E0. This teleports you into the Death Snare at N8 E11.
If you don’t have the Master Key equipped go to N0 E13 to turn off the spinners. Then you’ll need to perform a sequence 3 times.
Visit the Grey Mage at N4 E21 and go to room #1 (N2 E14). Go to the Blue Mage and then to room #2 ( N6 E14). Go to the Grey Mage and then to room #3 (N2 E18). Go to the Blue Mage and then to room #4 (N6 E18).
Repeat that sequence 3 times and you’ll be teleported out of the Grey Crypt with the Sixth Wand Segment.
Colosse
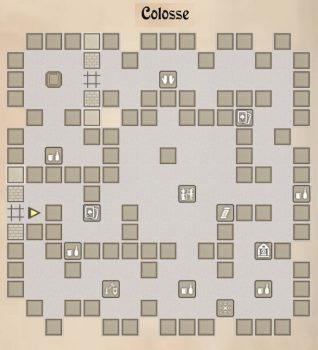
Colosse can be found to the northeast of Fanskar’s Castle. The Destiny Stone dungeon is found in the northwest corner. The Master Key will get you through the gate, then you’ll need to answer the Archmage with “Freeze” and then “please” to get inside the dungeon.
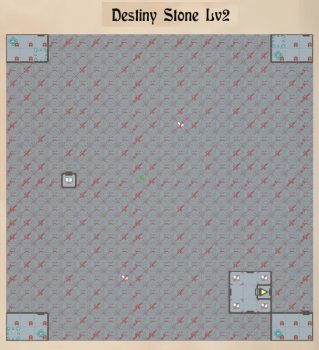
Destiny Stone
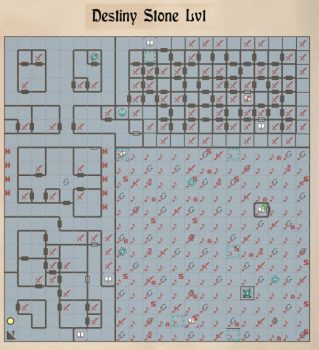
From the entrance head up to the teleporter at N20 E6. This takes you to N20 E10. From here make your way around to the next teleporter at N16 E8. This takes you a few tiles south to N13 E8.
You’ll first want to stop off to get the dreamspell so head to N9 E18 and answer the magic mouth with the words “shield, mallet, heal, strike and disrupt. The Dreamspell will be taught to your Archmage. If you have more than one Archmage leave and return to teach them all the spell.
The Dreamspell can be used in combat to turn illusionary monsters into real monsters, revive and heal all party members, cast Mangar’s Mallet on all enemies, reduce party members AC by 20 and give each party member and additional 8 melee attacks.
Head down to N3 E17 for the stairs down to the next level.
There’s no need to explore this level. Examine the statue at N4 E18 and defeat it to reveal the door to the teleporter at N3 E18. This takes you to level 3.
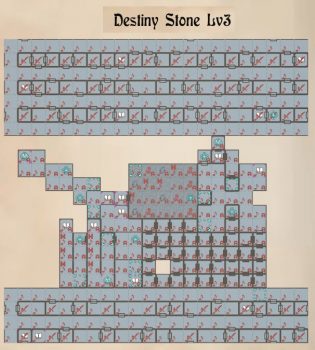
From the start make your way to the teleporter at N16 E19. This takes you to the Death Snare at N4 E9.
No makey your way to the northwest while avoiding the teleports. Head to N12 E9 and answer the magic mouth with anything because you don’t know the answer yet. You’ll be teleported to N12 E9. Go S2 and W, then answer with “Zen Master”. The Zen Master will join your party. Make sure he’s at the first position.
Go east to the teleporter at N10 E13 and you’ll be teleported one square east. Go S, E, N, E2, N2 and E. Answer the magic mouth with “gale”. You’ll be given a Ring. Equip it on the Zen Master.
Go south to the start of the maze at N7 E18. From here you’ll need to follow the instructions to get through the maze to the teleporter.
First Maze Run: S3, W1, N1. W4, N1, E4, N1, W1, N1. Then go north to be teleported back to N4 E9.
Make your way northwest to the magic mouth again and this time answer with “Storm Fists”. Make your way to the start of the maze for the second sequence. You’ll need to do all 7 sequences to get the final wand segment.
Second Maze Run: S3, W6, N2, W1, N1, E2, S2, E2, N1, W1, N1, E2, N1.
Third Maze Run: W1, S1, E1, S2, W8, N4, E3, S2, E3, N2.
Fourth Maze Run: W1, S1, W2, N1, E1, N1.
Fifth Maze Run: S3, W5, N1, E4, N1, W4, N1, E3, N1.
Sixth Maze Run: S3, W1, N2, W1, S2, W4, N1, E3, N2, E1, N1.
Seventh Maze Run: S1, W6, S2, W2, N3, E6, N1.
The seventh time you’ll be teleported north to N11 E16. Go north, north and west, then answer with “arkast”. You’ll be given the Seventh Wand Segment and a message telling you to seek Lagoth Zanta at the Sage’s Hut.
Lagoth Zanta
In the Forest make your way to the Temple of Narn at N2 E9. Select one of your Archmages to be transformed into the Destiny Knight. From now on they won’t die when they run out of hit pionts, instead they’ll lose 2 magic points. They’ll only die if they run out of both health and magic points.
Make your way to the Sage’s Hut and confront Lagoth Zanta. He’ll be with 60 of his bodyguards. To defeat him cast the Dreamspell with your Archmages. The Destiny Knight will revive everyone each turn if they get killed.
If you have someone who can critical hit with a bow, like a hunter, have him shoot Lagoth from a distance and get a one-hit critical kill. The bodyguards will take more time to whittle down.
When you get low on spell points use the Harmonic Staff to restore your spell points to full. Continue with the Dreamspell until all enemies are defeated.
Congratulations on completing Bard’s Tale 2: The Destiny Knight! You’ll be taken back to the Adventurer’s Guild in Tangramayne where you can export your party for playing Bard’s Tale 3: Thief of Fate. I recommend doing a full power transfer.