The Bard’s Tale: Tales of the Unknown
 The Bard’s Tale: Tales of the Unknown is the first part of The Bard’s Tale Trilogy which was remastered by inXile Entertainment in 2018. It’s a classis RPG and one of the godfathers of the genre. You create your own party of heroes and send them out to adventure through all three installments of this great trilogy.
The remastered version remains faithful to the original with a better UI, great music and much improved graphics. The XP requirements have been reduced by half in the remastered version and a map is automatically generated as you walk the streets and dungeons. You can turn off these features and play just as the original game intended with the Legacy Mode.
Character Creation
At the Adventurer’s Guild you’ll have the option of creating a new party. A full party consists of 7 members but you might want to leave one slot free for wandering monsters who may want to join your party or for conjured characters.
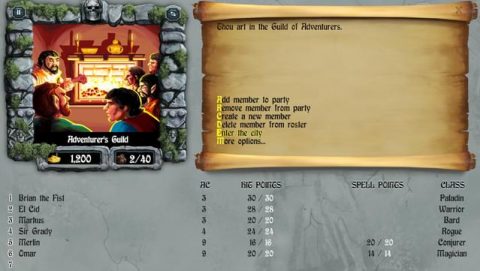
Attribute stats over 14 give bonuses depending on the attribute and class. Intelligence gives magic users bonus spell points, Strength gives fighters extra damage in combat, dexterity gives fighters bonus armor protection and Constitution gives everyone extra health points when they level up. Luck is good for Rogues and may help them survive if they set off a trap.
Fighters will do well in the beginning stages of the game but for late game you’ll want at least 2 and probably 3 magic users. You’ll only have the option of creating a Conjurer or Magician at the start of the game. Once they have a few levels you’ll be able to move them over to the Sorcerer or Wizard class.
Skara Brae
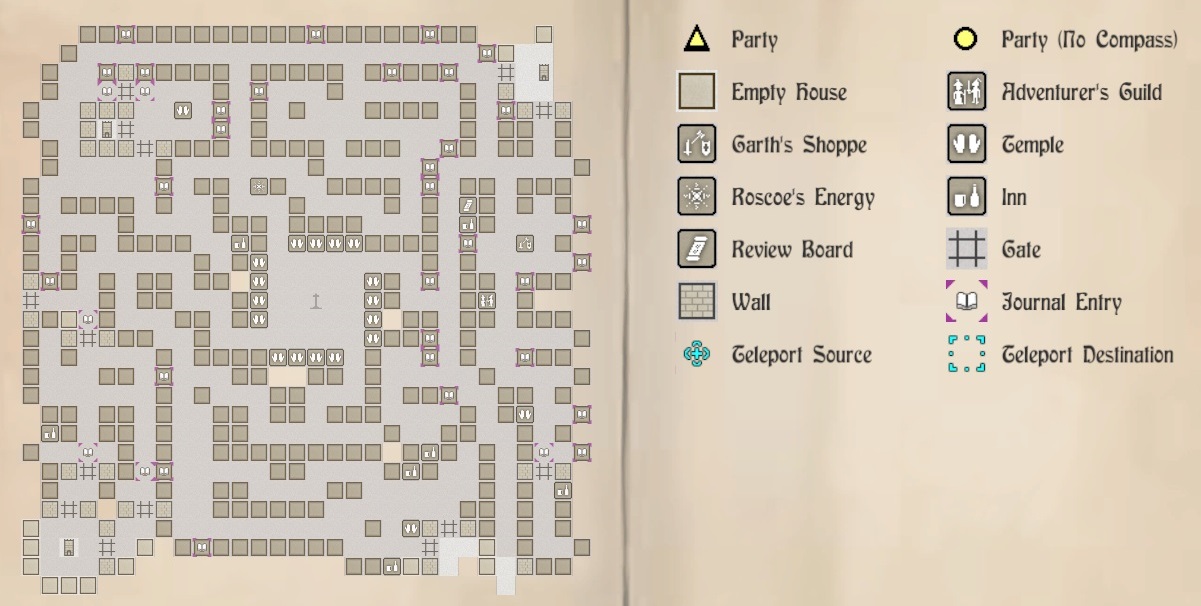
You begin in the Adventurer’s Guild on the eastern side of Skara Brae. Garthe’s Shoppe is just to the north where you can buy weapons and equipment. A Temple is to the south where you can heal your party and revive them if necessary. As you wander around you’ll find roaming enemies. Choose to fight them if you think you can win the battle. If there’s too many attempt to flee.
The quickest way to level up is to find 2 houses opposite each other. Every time you enter there’s a chance to meet a wandering enemy. Moving in and out of two houses will give you the best chance of finding enemies quickly.
Occasionally monsters will want to join your party. If you have the 7th slot open you can accept them to your team. They’ll join on the front lines, taking up the number one position.
Take note of how far away enemies are when you encounter them. Most will be within melee range, 10′. Others will be further away and can only be hit by long range spells or arrows. You may want to advance your party until you can engage in melee combat. Only the first 4 members can attack, and be hit, in melee combat.
Once you level up you’ll see a yellow arrow by the party members name. During the day make your way to the Review Board, one street further west from the Adventurer’s Guild, where you can level up your characters.
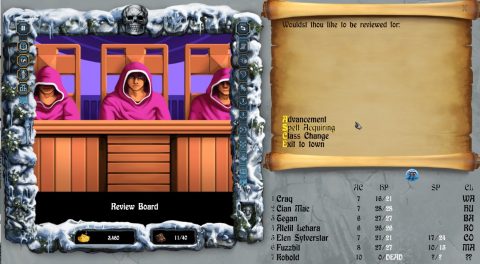
You’ll get a permanent boost to one main stat, up to a maximum of 18, and also an increase to HP and other relevant stats depending on the class.
You should have some money by now so go to Garthe’s Shoppe and buy all the best weapons and armor that your characters can use. Make sure you have some torches because we’ll be delving into the dungeons in a moment.
Wine Cellar & Sewers
From the Adventurer’s Guild go south to the wall, east twice and south to the Samurai Statue. Kill it and open the gate behind. Enter the Tavern and choose to drink a Wine. You’ll be taken to the wine cellar below.

Use a spell to illuminate the area or use a Torch or Lamp. You’ll also want to cast Kiel’s Magic Compass so you know which way you’re facing. Explore the area and then head down the stairs to the north.
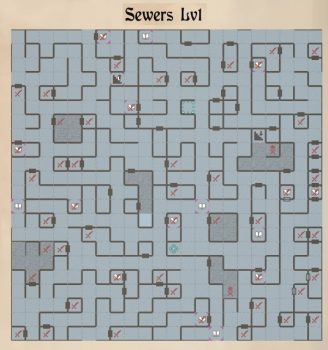
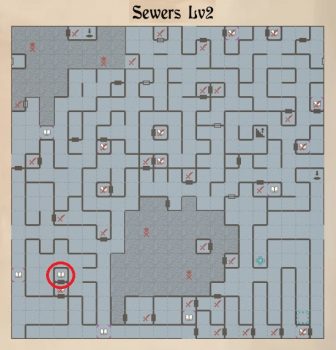
Your goal for the Sewers is to level up your characters as much as possible and make it down to Level 2 where you’ll find the name of the Mad God, “Tarjan”, scribbled on the wall. The location is circled in red in the map above.
Explore the Sewers as much as you want. Go back up to heal at a temple when you need to and visit the Review Board when your characters have enough experience to gain a level. Before going to the Catacombs you’ll want to be at least level 7+.
Catacombs
Back in the city head to the central temple square. Enter one of the temples on the eastern side and the priest will ask if you know the name. Say “Tarjan” and he’ll let you down to the Catacombs below.
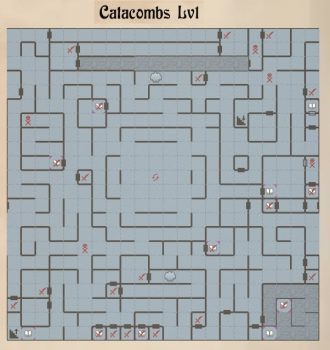
You’ll level up much more quickly in the Catacombs but the enemies are much tougher and there are more traps. The first goal is to level up your Conjurer to level 13. This will give him the Apport Arcane spell that teleports your party to just about any location within a dungeon.
If you find a Fire Horn give it to your Bard. Equip it and use it in combat for a spell that does massive damage to an entire group of enemies. Once you have levelled up make your way down to Level 2 and Level 3. You can’t teleport directly to level 3 but you can teleport to the stairs leading down to level 3.
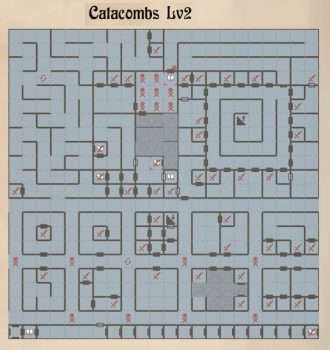
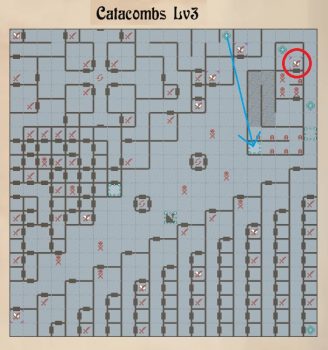
Once on level 3 make your way up to the teleporter to the north. This takes you to the interior of the building in the northeast. Make your way past the anti-magic, darkness and traps to the Spectre, circled in red on the map. Once you’ve killed it you’ll pick up the Eye. You’ll need this for the next dungeon.
Harkyn’s Castle
The Eye is needed to activate the statue at the top of Harkyn’s Castle. This castle has three levels and at the end of it you’ll be immediately teleported to Kylearan’s Tower.
Make your way to the northwest corner of Skara Brae where you’ll find the gates leading to the castle entrance. Kill the statues and then enter.
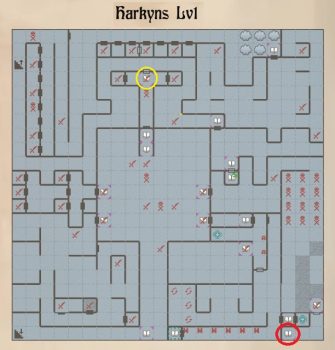
Your first task will be to find the Crystal Sword located in the southeast corner of the first dungeon. To get there you’ll need to kill a powerful Jabberwock along the way. Once you know the location of the Crystal Sword (Red Circle) you can Apport Arcane right on top of it.
You’ll want a Crystal Sword for each of your front line fighters. Once you have one store it in the bank storage slots. Go back to Harkyn’s Castle and get a second one. Repeat the process to get as many swords as you need.
To find the stairs you’ll need to head east from the start and then north to the throne. Have your Bard sit on the throne and a secret door will open to the north. Make your way around to the northwest to the stairs leading up.
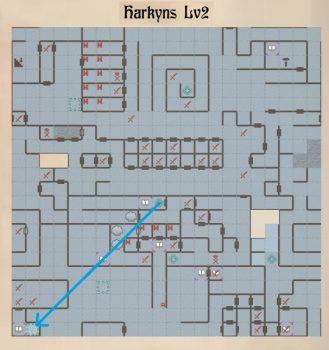
From the stairs in the northwest make your way towards the teleporter in the center of the level. You’ll need to solve a riddle or fight to get access to it. You’ll be sent down to the southwest corner of the level. Walk west to find the Silver Square.
Once you have the square you only need to find the portal up to the next level. It can be found in the northeast corner of the level.
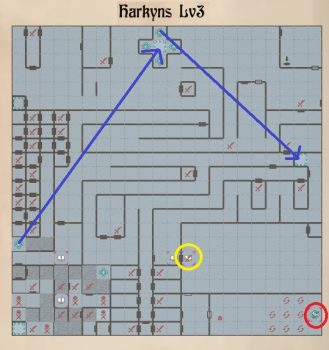
There’s nothing to do here except find the exit to Kylearan’s Tower. From the portal in the northeast make your way to the teleporter on the western side. This takes you to a room in the north. Walk north to the teleporter to be taken to the eastern side.
Make your way around to the 4 groups of 99 Berserkers (Yellow Circle) and take them out using a combination of the Bard’s Horn and Mind Blades from your mages. Once you kill them you should get around 160,000 XP.
Continue south and east to the Statue of the 15ft tall warrior. Place the eye in it’s socket and it will come to life. Once you’ve killed it you’ll be teleported to the area around Kylearan’s Tower.
Kylearan’s Tower
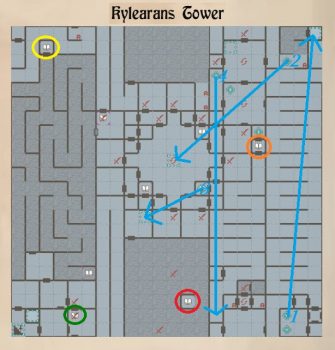
This is a twisty level with lots of teleporters and darkness. From the stairs go west to the first teleporter. This takes you to the northeast corner of the level.
Go through the second teleporter to the center of the map and then the third to a point slightly south. Walk south and enter the room marked with the Red Circle. Answer the riddle with “Sinister”. Continue south and follow the path around through the darkenss to the Yellow Circle where you’ll find the Silver Triangle.
Head south and then through the door just before the Green Circle which marks the battle with a Crystal Golem. You can only kill it with Crystal Swords so make sure you have them equipped.
Continue through the door to the south which takes you back up to the north of the level. Head west and then through the twisty passages until you arrive at teleporter 4. Go through it and then north to the Onyx Key (Orange Circle). Step north once more to be teleported back to the entrance.
With that done you have everything you need to face Mangar himself but you may want to level up your characters before proceeding.
Mangar’s Tower
To get to Mangar’s Tower you’ll need to find the secret entrance in the Sewers. Apport Arcane down to Level 3 and take the stairs in the northeast quadrant which take you up to just outside Mangar’s Tower. If you go out through the gate you won’t be able to get back in again unless you go through the sewers once more.
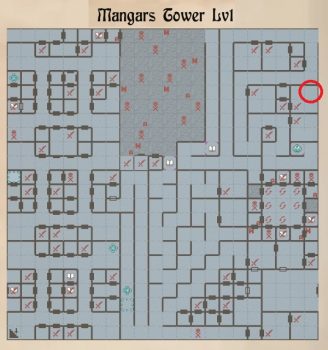
There’s nothing to do on the first level except get some experience and find the Portal up to the second level. Use Apport Arcane to quickly teleport yourself around the map. Make your way to the Portal (Red Circle) which teleports you up to the next level.
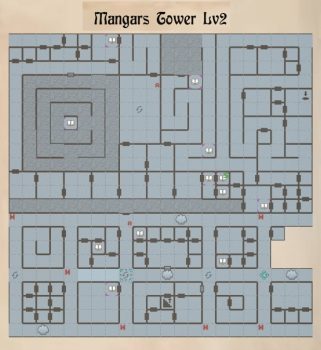
Once again there’s nothing on level 2 except to hunt around for the stairs leading up. They can be found in a room on the southern side. You can Apport Arcane around the level to explore more quickly or head straight to the stairs. From level 3 onwards the Apport Arcane spell won’t work. You’ll need to walk the rest of the way.
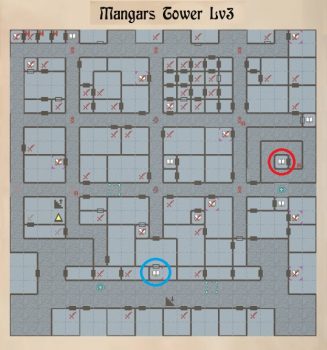
All the corridors on this level are filled with darkness and some of them have anti-magic. The first person you want to visit is the Keymaster (Red Circle), who’s in the center of spiral of darkness. Buy the Master Key from him for 50,000 Gold and you’ll be able to enter Mangar’s Tower from the front gate in future.
From there make your way to the Magic Mouth shown with the Blue Circle. The answer to the riddle is “Lie”, “With”, “Passion”, “And”, “Be”, “Forever”, “Damned”. Make sure you spell each word correctly and press enter after each word. The stairs heading up to the next level will appear in a room towards the western middle section of the map.
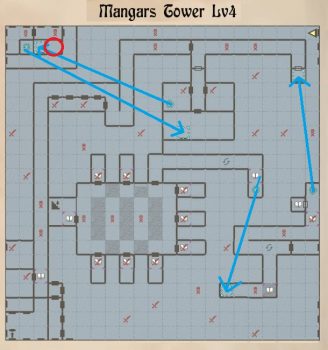
From the stairs make your way through the large room to the northern passage that leads to the first teleporter. Walk around the corridors towards the second teleporter. Just before you get to it you’ll encounter 2 sleeping dragons. If your Bard is playing a song they’ll continue sleeping. Otherwise they’ll wake up and you’ll have to fight 2 Red Dragons.
Take the second teleporter and then the third. Walk one step to the east and all the walls on this level will turn into doors.
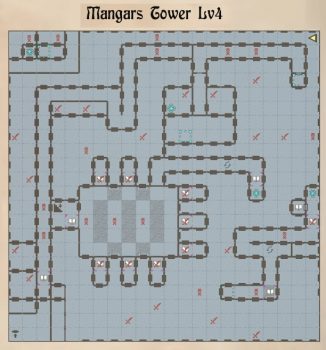
Take the fourth teleporter and then make your way down to the portal in the southwest corner. This takes you up to the fifth level of Mangar’s Tower.
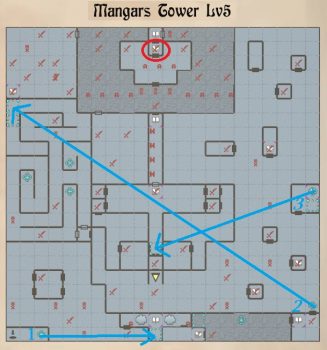
From the portal in the southwest corner take the first teleport to the east. Continue east and then north through the door to teleporter 2. This will take you up to the northwest. Make your way through the corridors and then through the large room to the east.
Enter the square room and stand on the square with teleporter 3. There’s a pool of boiling liquid here. Choose to jump in and you’ll be teleported to the center of the map. Make your way north, kill the Spectres and continue north through the harming corridor. At the end you’ll place the 3 symbols to open the door to the north.
There’s darkness and anti-magic here so don’t expect to keep your spells for long. Walk north to the Red Circle marked on the map for a battle with Mangar. Most of my party were around level 23.
Mangar begins 50′ back and has Demon Lords and Vampire Lords in front of him. He’ll also summon new enemies as you fight. I found it easiest to have my Hunter shoot Zen Arrows at Mangar from a distance. My mages and melee fighters could then deal with the demons and vampires. After a few rounds Mangar will fall to the arrows and you can mop up any remaining monsters.
For defeating Mangar you’ll be rewarded with 300,000 XP and 300,000 Gold. Go back to the Review Board and level up all your characters. Grab any items you may have stored at the bank and head back to the Adventurer’s Guild. From here you can take your party to the next game, Bard’s Tale 2: The Destiny Knight.