Conquest of the Underworld
Back to Heroes Chronicles
Tarnum is sent by his ancestors to help Queen Allison Gryphonheart. Her father’s soul resides in the depths of the Underworld and must be rescued. Tarnum will be taking up the role of a Knight for this campaign and you’ll be facing the Inferno and Necroplis factions.
Cerberus Gate

For the first mission you’ll be limited to level 6 and can choose either the Equestrian’s Gloves or Boots of Speed as your starting bonus.
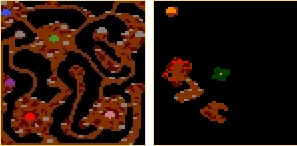
Your Castle is in the southwest corner and you’ll have the Cleric Cuthbert as a starting hero to help you out. The enemies each have one Inferno town. All towns are limited to fourth or third tier creatures.
There’s a quest guard to the east that requires 11 Royal Griffins to get past. On the other side you’ll find the Red Keymaster Tent. Once you’ve tagged that you can go through the Red Border Guard and enter the purple player’s land.
Make sure you visit the Seers Hut west of the Inferno. Once you’ve reached Level 6 you’ll be rewarded with +6 Knowledge.
Around here you’ll be able to buy 7 Wights. Take them to the quest guard in the south eastern corner to get access to the Purple Keymaster Tent. Then head to the northwest and go through the Purple Border Guard. Take out the Archdevils underground to get access to the next scenario.
The Boatman

The Boatman takes place on a medium map and you can choose +1 Attack or +1 Defence as a starting bonus. To win you must find the Orb of Inhibition.
You start with a Castle to the northwest and your two strongest heroes from the previous scenario. The four enemy players will each start out with one Inferno.
From the starting Castle head east and take out the Purple and then Green player. From there head south to Orange. With the main enemies out of the way you’re free to explore the map.
Go to the southwest corner and trade 50 Gogs for the Surcoat of Counterpoise. Trade the Surcout of Counterpoise to the quest guard near the purple Inferno to get access to the Red Keymaster Tent.
In the northwestern corner you can trade 5843 gold for the Shackles of War. Make sure you get them as you’ll need the shackles to trade for an Archangel at a Seeer’s hut in the southeastern corner. Keep the Archangel alive as you’ll need it for the end of the scenario.
With the Archangel and Red Key you can go through th border guard and quest guard leading to Xyron and the Orb of Inhibition.
When you find the Helm of Chaos you can trade it to the Seer south of the green Inferno town for +5 Knowledge. Also, the Helm of Heavenly Enlightenment can be found in the southwestern corner. This carries over to the next scenario.
Truth Within Nightmares

Choose +1 Attack or +1 Defence as your starting bonus. For this mission you must defeat Sandro and your heroes are limited to level 18.
You begin with a Castle in the southeast. Both purple and orange have 2 Necropolises each with purple having one underground.
Once you’ve explored the surrounding area find the path leading north where you’ll come across the Green Keymaster Tent. A little further north you’ll find the Sword of Judgement protected by Manticores. It increases all your stats by +5 and will carry over to the next scenario.
From here go east to find a Purple Necropolis or west to find the Orange Necropolis. When you find the Hourglass of the Evil Hour give it to the Seer in the northwest for +6 Knowledge.
Down to the southwest you’ll find the Green Border Guard and a two-way portal it. This leads to another portal that then leads to Sandro. Take him out to complete the mission.
Twisted Tunnels

For this mission you can choose between +1 Spellpower and +1 Knowledge as your starting bonus. You must defeat all enemies and towns on this small map.
You begin with a Castle in the northwest that will quickly be taken over by green. Your heroes will be closer to the central neutral Castle which they can reach by heading east for a day.
Watch out for ambushes in this mission. Don’t send out a hero you want to keep without giving them an army. It’s probably easiest to go north to the Green Dungeon and then east to your old Castle. Then you can quickly build an army to defeat Purple and Blue.
Make sure you look for the Lion’s Shield of Courage in the northwest corner. It increases all your primary skills by +4 and carries over to the next scenario.
Jorm’s Ambush

The fifth mission is played on a small map with a surface and underground area. You can choose as a starting bonus +1 Knowledge or +1 Spellpower. Your goal is to find the Spirit of Oppression.
You begin with a Castle in the northern side of the overworld. To the south is a Purple Inferno and Purple also has a Necropolis in the underground. The one Teal Dungeon can be found on the southern edge of the Underground.
The Spirit of Oppression can be found in the northeastern corner of the underground. Before it you’ll come across three border gates. The red one takes you to the Celestial Necklace, the blue one to a Tree of Knowledge and the green one to the Spirit of Oppression.
From the surface take the tunnel to the underground in the southeast. Open the quest guard in the southwestern corner of the underground so you can tag the Green Keymaster’s Tent. You can then pick up the Spirit of Oppression.
Old Wounds

Old Wounds is played on a large map with an island to the north where the Pendant of Second Sight can be found. You must find this pendant to win the scenario. As a starting bonus you can choose either a City Hall or Citadel in your Castle.
You’ll have 3 opponents in this scenario, the Teal enemy with an Inferno and Dungeon to the south and a Dungeon in the northeast, Purple with one Dungeon in the east and one on the island, and Orange with a Dungeon to the north and one in an unreachable underground area.
To the east and north you’ll find 3 neutral Castles and 4 neutral Infernos. Grab them as quickly as possible to improve your economy and build an army.
The Pendant of Second Sight can be found on the island. There’s Shipyards on the western and eastern shores. Once on the island you can open the quest guard for 50,000 Gold. The other quest guard only opens for Tarnum. Once through you can grab the pendant and complete the scenario.
The Queen’s Command

To complete this scenario you must defeat all your enemies. As a starting bonus you can choose the Endless Sack of Gold or Expert Estates.
You begin with an Inferno to the north of the surface with a Purple Inferno to the south. To reach it you’ll need to make your way through a Garrison filled with Castle units.
To the west of your starting Inferno you’ll find the Armor of Wonder, the last piece of the Angelic Alliance. Once you’ve defeated Purple head underground to take out Blue, Green and Orange. This is a small map so you’ll explore and find your enemies quickly.
Never Deal with a Demon
For the final scenario you must defeat all enemy towns and heroes. You begin with 20 Royal Griffins or 25 Marksmen and a Castle in the southwest corner of the surface area.
You Captains from the previous scnarios are dead but you’ll be joined by Knight Trynn and Cleric Norvan. They can be found in an underground chamber that can only be accessed by Tarnum. They are both level 30 and have access to units so you’ll want to rescue them as quickly as possible.
Head north to the Black Keymaster’s Tent and open the way in the northeast to Mensor’s Prison. He’s a level 30 Knight and has a formidable army with him.
The two-way monolith to the northwest leads to the underground area where Trynn and Norvan are stuck.
Once you are ready you’ll need to defeat Deezelisk and the other enemies. Visit the Green Keymaster’s Tent north of the Green Inferno. Open the Green Border Guard to the northeast, go through the monolith and tag the Red Keymaster’s Tent. Visit the Pink enemy in the southeast and open the quest guard. From there take the subterranean gate to Deezelisk.
Next: Masters of the Elements
Back: Warlords of the Wasteland