Level 2
Back to Ultima Underworld Walkthrough
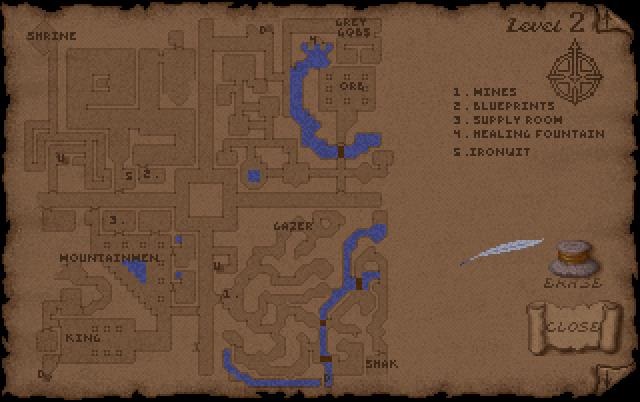
Ultima Underworld Level 2
The second level of the Abyss consists of the realm of Mountainmen and a hostile Grey Goblin group. The first thing you’ll want to do is seek out the King of the Mountainmen, Goldthirst, as he’ll have a quest for you. Whatever you do don’t call him a dwarf!
Red Gem Key
Kill the spider in the passageway just south of the center which leads to the stairs to the first level to get the Red Gem Key. This key opens all the locked doors in the Mountainmen Area.
Monster in the Mines
After speaking with the King he’ll tell you about a monster inhabiting the mines. It’s a gazer. Head into the northern part of the mines. You’ll need to break some rocks to get access and kill the gazer. Return to the King and he’ll give you the Gem Cutter of Great Coulness which you’ll need to keep for later.
Give Goldthirst a gift worth at least 5 gold coins and he’ll reveal the secret password to get access to his treasury, Deco Morono. The treasure is guarded by an Earth Golem and you’ll need a flying spell to be able to get out of there but you can at least take a look.
In the Mountainman area you’ll also find Corby in one of the rooms. He has a lot of information to share with you about the Talismans.
Finding Shak
To the southern part of the mines you’ll find Shak who can repair equipment and identify items for you. He’ll also have information about two of the Talismans, the Sword o’ Justice, which was broken into two pieces and the Shield of Valor. Later in the game Shak you’ll have to come back here so Shak can repair a special item for you.
The Shrine
If you want to level up the Shrine is located to the far northwest of this area.
Ironwit’s Blueprints
Ironwit has lost his blueprints. He also seems a little out of his mind but it is worthwhile taking the time to get his blueprints back.
Speak with him and he’ll give you some confusing instructions about where they’re located. Walk north down the walkway past Ironwit and take a right at the end. Take the first left and jump across to the room to the right with the gold pathway. From the door to the left you’ll be attacked by four or five slugs.
Kill the slugs and follow the path to the other side of the room where you’ll find the Key with Yellow Gems. Now head back the way you came to the west, past the path leading to Ironwit. Follow the raised pathway around as it descends to a door. Use the Key with Yellow Gems to unlock it.
Inside are two potions, a green potion and a red potion. The green potion is the flying potion and the red potion will poison you. You can explore the lower area around here if you wish. There are a few items laying about and some pretty tough headless to deal with.
Walk back up the raised path and this time continue all the way to the east. Turn towards the south and use the flying potion (green potion) to fly across the gap. Follow the path, open the door with the Key with Yellow Gems to find the Uus Stone and the Blueprints. Take the Blueprints back to Ironwit for another flying potion as your reward.
Grey Goblins
There’s a group of hostile Grey Goblins to the northwest if you want to test your attacking skills.
Healing Fountain
Visit the Healing Fountain in the water to the north to restore your health.
Orb
To get through the portcullis on the other side of the bridge use a pole to flick the switch. Inside are some skeletons and the Orb which will show you a secret area on this level that you can’t reach yet. You’ll also find a long sword, Hur Stone, Mani Stone and an excellent mace.
Heading Down
Once you’ve finished exploring this area you can take the stairs down in the King’s Chamber to the southeast, take the stairs in the north or take a ride through the drain in the south which leads to the third level.
Next Part: Level 3 (Lizardmen)