Level 4
Back to Ultima Underworld Walkthrough
Ultima Underworld Level 4
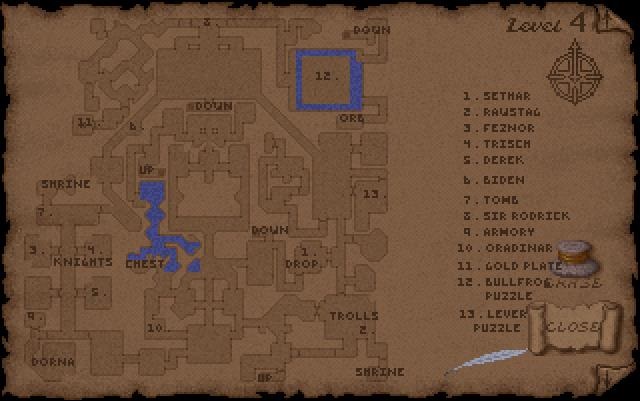
Down on level 4 of the Abyss you’ll come across the peaceful Trolls to the east and the Knights of the Order of Crux Ansata to the west. All of the knights are friendly except one, Sir Rodrick, who hides out in the northern part of the level.
The Trolls
To the east you’ll find the trolls and one troll in particular you must speak with, Sethar Strongarm. He has a sweet spot for rotworm stew. To make the stew make sure you have the port, green mushroom, rotworm and a bowl in your inventory and then click on the Recipe. Give the rotworm stew to Sethar in exchange for some dragon scales. You’ll need this later on to make dragon armor. If you don’t yet have the recipe speak with Lunago, the green goblin on Level 1.
There’s a pit at the back of Sethar’s area. Drop down to find the An stone and the Sanct stone. These two together form the curse spell, An Sanct. You can get out of this pit by finding the secret door.
The Writ of Lorne is in the far south east. Behind a door protected by Rawstag. He has the key but won’t give it to you until you give him something important. Speak to Lakshi about ‘Rawstag’ and he’ll give you a clue as to what he likes. Give a red gem to Rawstag and he’ll give you the key to the door behind him. Inside you’ll find the Writ of Lorne, one of the items belonging to the Knights of the Crux Ansata.
The Knights
To the south west of this level you’ll find the Knights of the Crux Ansata. Speak with Dorna to the south and ask to join the order. Use modesty when answering his questions and you will be fine. Drink from the cup that he gives you and let him know you where afraid. You’ll be accepted as an Esquire and given the task of finding the Writ of Lorne which is in the room behind Rawstag.
To become a full knight you’ll need to bring back the Golden Plate but you can already speak with all the other knights and they will tell you specific mantras to increase various fighting skills. The Golden Plate is found through a secret door in a maze in the northwest of the level. Before you can reach it you’ll need to defeat Sir Rodrick, the Chaos Knight.

Now that you know the fighting mantras head to the Shrine to the north of the Knights and level up your specific weapon skills. Speak with Biden along the way who is hiding from Rodrick. Tell him you will defeat the knight. Kill Rodrick, find the Golden Plate and take it back to Dorna.
To get through the door leading to the Golden Plate you’ll need to flip the silver and gold levers in the right order. The clue is on the tombs of Sir Lionier and Sir Avirill. The sequence is Silver, Gold, Gold, Silver, Silver, Gold.
Once you’ve defeated Rodrick go back to Dorna and he’ll give you the Standard of Honor.
In return for finding the Golden Plate you’ll be granted full membership into the Knights of Crux Ansata and given access to their armory where you’ll find Excellent Plate Armor.
Speak with Derek and give him the Gem Cutter of Great Coulness that you recieved from Goldthirst on Level 2 for defeating the Gazer. He’ll give you a clue to getting the Ring of Humility down on Level 5.
The Knight Trisch is in a room just north of Derek and will tell you about a crazy man who’s been stealing all of the light sources. You met him on Level 3. His name is Zak. Apparently Zak stole one of the Talismans, the Taper of Sacrifice, so you can go back to Zak and trade him for it.
Oradinar knows where the best fishing spot is, just north of him, and he’ll even let you borrow his fishing rod. You’ll need plenty of fish for a quest on the next level.
Bullfrog Puzzle
The Bullfrog Puzzle, point 12 on the map, will give you access to stairs leading down to the tombs on the next level down and also another Orb.
The south-east area of the puzzle has two switches and two buttons. The switches determine which area of land is raised or lowered and the top button raises the land and the bottom button lowers the land. The left switch is the row and the right switch is the column. The Magic Wand near here will reset the puzzle. If you drop it on the ground it will disappear.
Play around with the switches and buttons until you can jump across to the heights in the north east. There was a clue about the heights in the north having a hidden counterpart in the south. There is an illusory wall in the south east that you can jump across to. This is where you’ll find the Orb and a Wand of Fireball with 8 charges.
The Bullfrog Puzzle is an optional extra and doesn’t need to be completed. You’ll be able to get to the tombs down on level 5 by another path if you don’t want to complete this puzzle.
Next Part: Level 5 (Ghouls and Tombs)