Episode 1: Escape from Wolfenstein
Back to Wolfenstein 3D
Episode 1 takes place in Castle Wolfenstein. You were captured as you tried to find the plans for Operation Eisenfaust. You’ll need to navigate through 10 levels and defeat the final boss, Hans Grosse, before escaping.
Staring points on the maps are circled in Blue and exits are circled in Red. Secrets are circled in Green. You can push these blocks to reveal the secret area behind them.
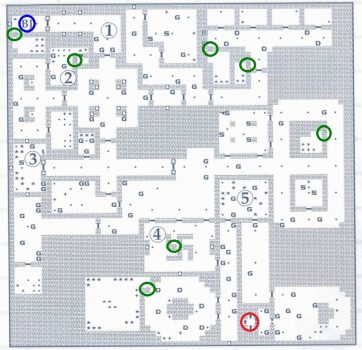
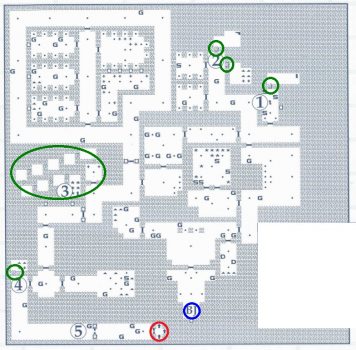
Floor 1
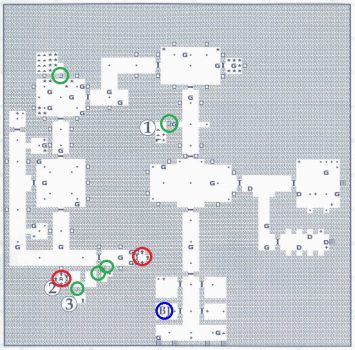
From the start (Blue Circle) make your way up to the first Secret (1) where you’ll find a Machine Gun. The rest of this level will be much easier with a proper weapon. Now head around to the Exit (Red Circle) but open up the secrets leading to the Secret Exit. This takes you to Floor 10.
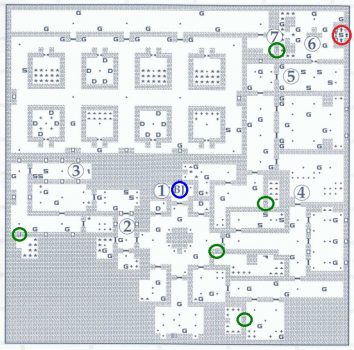
Floor 10
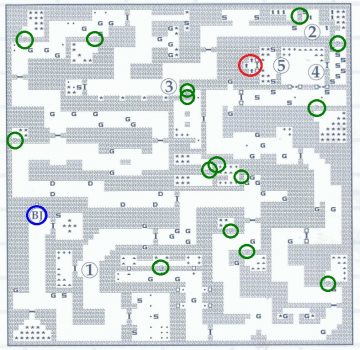
There are lots of secrets on this floor so check the map for the locations. At point #1 you’ll find healing and ammo. The Golden Key can be found at point #2 along with some SS Guards.
Take a shortcut by going through the secret near #3 and you’ll be close to the elevator. There’s a fake elevator here. Behind it you’ll find more SS Guards. Head through to #5 for the real exit.
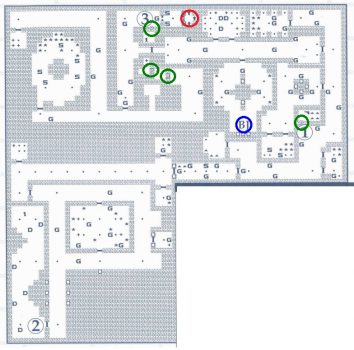
Floor 2
This floor is fairly large but there’s not too many guards to worry about. At #1 you’ll find the Chaingun and the Golden Key can be found at #2.
It’s not necessary to head up to #4 but if you do make sure you unlock the secret for healing and ammo. Back at #3, after making your way down the hallway you’ll find the Exit.
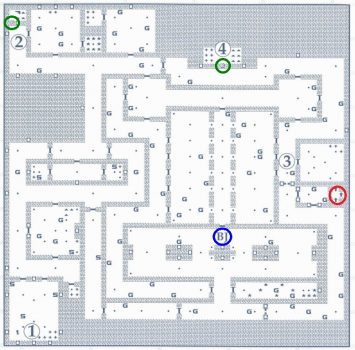
Floor 3
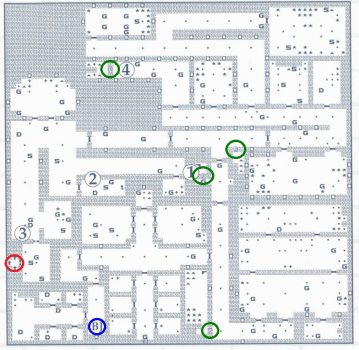
From the start head east and when you reach the long hallway take the third door on the left for the Golden Key at point #1. The long chain of rooms west of #2 are optional so skip them if you just want to get out of here. You’ll find the Exit at #3. If you want all the treasure unlock the 3 secrets at #4.
Floor 4
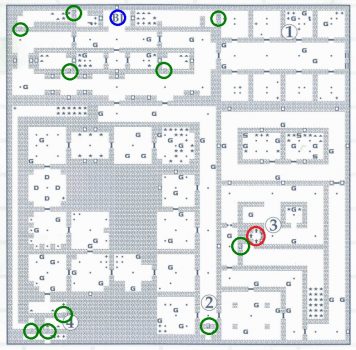
Grab the secret in the starting room and then head out to #1 but watch out for the Guards around the corner. Continue around to #2 where you’ll find a Chaingun, then south to #3 for the Golden Key.
If you need some healing stop by room #4 for a secret with some health, then into room #5 with lots of treasure. Continue down to the southeast corner for the exit.
Floor 5
This is where the levels start to get tougher, especially if you’re playing on the hardest difficulty. You’ll start at point #1. Go south and then west to #2. If you need health open the room immediately to the south for some health packs.
Make your way through the rooms to #3 where you’ll find the Golden Key protected by 3 SS Guards. Head back to the west to room #4 and continue north to room #5 with lots of SS Guards.
Point #6 has the Exit but if you want to explore all of this floor open the secret by #7 to unlock the huge secret area to the northwest.
Floor 6
You’ll be attacked as soon as you enter the level so be prepared. Open the secret at #1 for the Chaingun, then continue down to the southwest corner at #2 for the Golden Key. You’ll need to traverse all the way back up to the north to #3 for the Exit.
Floor 7
From the start clear out the southern portion of the map, picking up the Golden Key in the southwest corner. Far to the north you’ll find the 2 secrets, one with the Chaingun (2) and the other with health and ammo (4). When you’re done exploring come back to #3 for the Exit.
Floor 8
There are 13 secrets on this floor but most of them are grouped together on the western side of the map. From the start head north to the room with the Golden Key (1), then continue to #2 for the two secrets with the Chaingun and ammo/health.
Over at #3 you’ll find most of the secrets. Push through all the walls to find the treasure and a One-Up. Continue down to #4 for the final secret, and then on to #5 for the Exit.
Floor 9
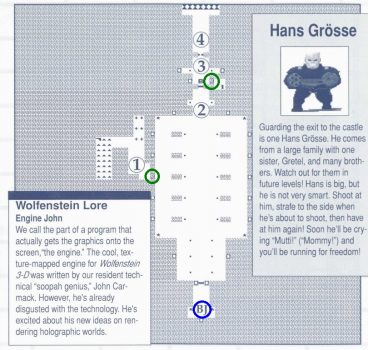
This floor has only one enemy, the boss Hans Grosse. First open up the secret (1), on the western side of the room for health and ammo, then open the door to the north to release the boss.
Hide around a corner and jump out to shoot him. When he takes a stand and starts firing duck back behind cover. Repeat until he’s been defeated. You can also lure him into the secret room with all the health. Simply stand over the health and start firing. Slide over the health when you need a pick-me-up.
The second secret is found in the room where the boss was hiding. Inside you’ll find a One-Up. Continue forwards to #3 and #4 to find freedom.
Next: Episode 2: Operation Eisenfaust
Back: Wolfenstein 3D