Episode 4: A Dark Secret
Back to Wolfenstein 3D
Episode 4 is the first of the Nocturnal Missions trilogy of episodes. It was first sold separately but then incorporated into the main game. You’ve been assigned to stop a mad scientist who works atop a small mountain in Castle Erlangen. Make your way through the maze of levels and take him out.
Floor 1
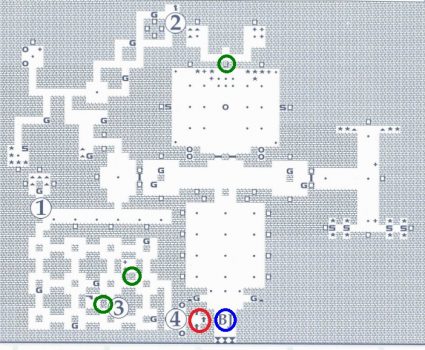
Take out the Guards by the entrance and then head over to room (1) for some easy ammo. Up at (2) you’ll find the Golden Key. You’ll need it after navigating the rooms at (3) and picking up the Chaingun in the secret, to open the door the Exit (4).
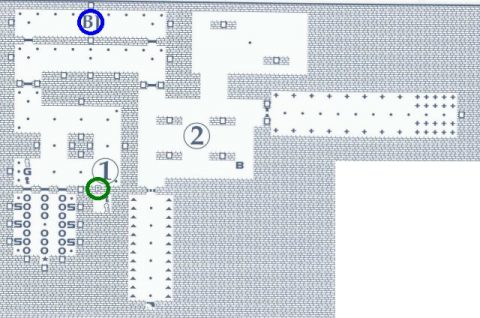
Floor 2
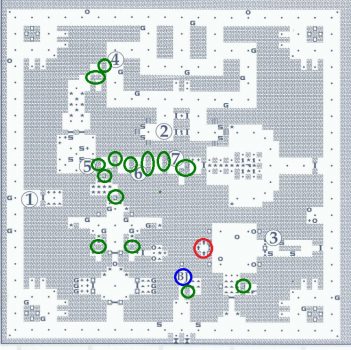
This level is designed like a castle. You begin on the southern side. Open the secret door next to you for some ammo. If you still need more health and ammo head over to the room at (1). Grab the Golden Key (2) and then if you want to end the level quickly go to (3) for the Exit.
A series of secrets starting from (4) will get you health treasure and ammo. At (7) you’ll need to push the first wall to the south and then the one behind it to the east. This reveals the door to the room with the Chaingun and four One-Ups.
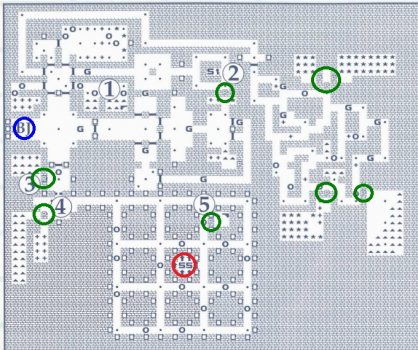
Floor 3
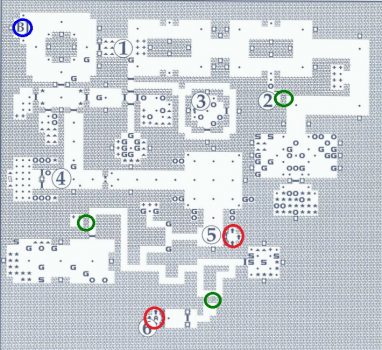
From the start open the door to the east for the ammo and health (1). Make your way to the east and take out the Guards, Officers and SS in the large room. Open up the nearby secret for the Chaingun (2). From here backtrack to (3) for the Golden Key.
Continue on to (4) where you’ll need the Golden Key to open the door. Inside you’ll face half a dozen Officers. Take them out and then take their Silver Key. The regular exit can be found at (5) but if you want to find the secret level carry on through the passages, opening up 2 secrets and taking the secret Exit.
Floor 10
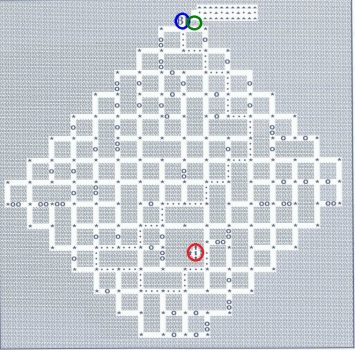
This maze of corridors is filled with Officers. If you make a sound they’ll all come running. It may be better off to sneak past them all by following the dotted line to the Exit. You can open the secret right at the start for ammo.
Floor 4
From the start take the first left and then right for a room with ammo and a Machine Gun (1). Continue over to the east for the Golden Key (2). Just below the start is a secret room with ammo and health (3), then there’s another secret below it where you can choose either health or ammo depending on which way you push the wall (4). The Chaingun can be found at (5) before heading down to the Exit.
Floor 5
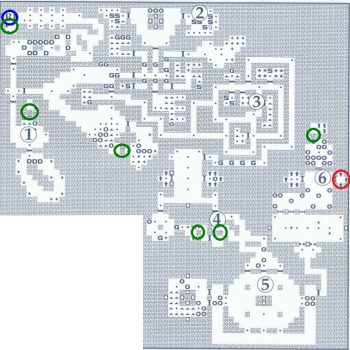
From the start head down the corridor past all the Dogs to the room with a secret wall hiding a One-Up (1). Navigate past the Guards over to the room off SS Guards with the Silver Key (2). If you’re having a tough time stop by the ammo and healing rooms at (3).
As you make your way down to (4) you’ll pass some elevators but these are blocked up with barrels. You’ll need to go down to the large room at (5) and up to the room filled with Officers (6) to get to the real Exit. If you continue north you’ll face a room filled with Officers and a secret room with 3 One-Ups just to the north of them.
Floor 6

From the start you can go either north or south. You’ll find a secret room filled with ammo to the north (1). The thin corridor to the east has lots of alcoves coming off it and they’re filled with Officers. At (2) you’ll find the Golden Key, then go down (3) for the path to the eastern section of the floor.
You’ll need to work hard to bust your way through to the Silver Key at (5) so you may want to stop by (4) along the way for the Chaingun. Then go through the Silver Door and the Gold Door, fight the room full of Officers and take the Exit.
Floor 7
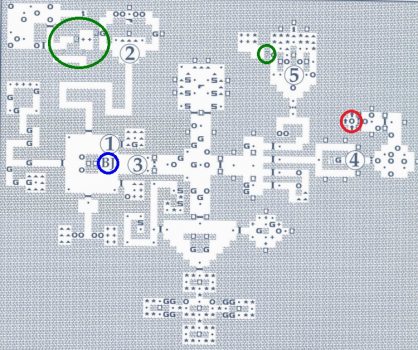
From the start open up the nearby room for ammo (1), then continue north for the Chaingun (2). Open up the secret walls to the west and take out the Officers for the Golden Key. Then come back to the start and open the door at (3).
Fight off the Guards and grab the Silver Key at (4), then go north for the One-Up, ammo and health (5) before taking the Exit.
Floor 8
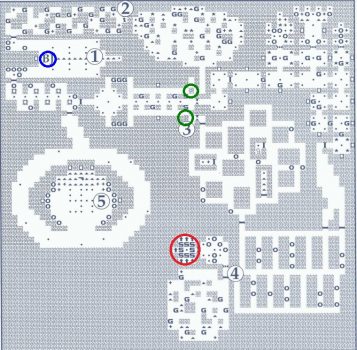
From the start grab the ammo in front of you (1), spin around and take out the Officers in the alcoves. Take the door to the north and carefully make your way through the winding passages to the Golden Key (2).
Now come back and go to the south. If you want the Chaingun stop by the large room at (5), then continue on to (3) where you can push open a secret for a shortcut to the Silver Key.
When you’re done head to the south, taking out the Officers in the thin corridors and then make your way to the Exit (4).
Floor 9
The boss, Otto Griftmacher, is waiting for you in the center room (2). You’ll need to alert him to your presence before getting access to the ammo and health. The keys to these rooms are to the south (1), but if you kill the Guard you’ll alert the room full of SS and Officers.
Otto has a rocket launcher so you want to keep your distance. Poke out around a corner and fire away until he takes aim. Then duck behind the wall until the missile explodes. Repeat until he’s been defeated.