Episode 3: Die, Fuhrer, Die!
Back to Wolfenstein 3D
In Episode 3 you’ll tasked with taking out the main man himself. There’s another 10 levels to get through with some new enemies to face. Luckily there’s no more Mutants to deal with, only regular troopers, and then Fake Hitlers with flame throwers later on in the episode.
Floor 1
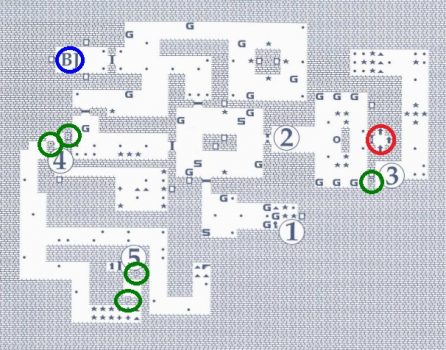
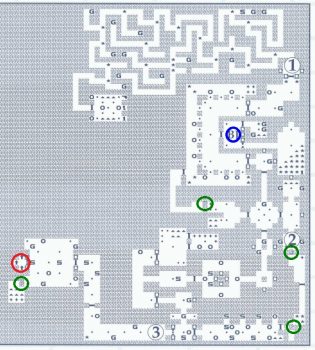
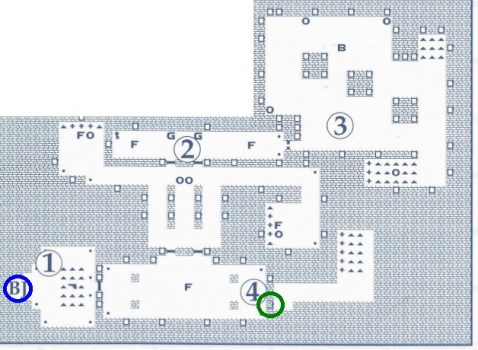
You begin as usual with just a Pistol. Luckily the first level isn’t too difficult. Grab the Golden Key from room (1). You’ll take out a couple of SS Guards along the way. Make sure you pick up their Machine Gun to make life a bit easier. The Exit can be found through door (2) but you may want to explore the rest of the map first.
There’s a secret area in the elevator room (3), with more secrets at (4) and (5) where you’ll find a One-Up and a Machine Gun.
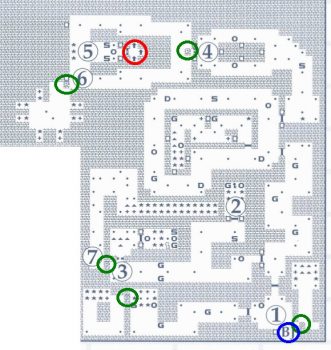
Floor 2

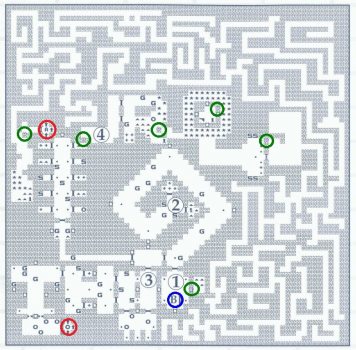
You start in the center and the elevator isn’t too far away at (2). You’ll need to drop down to (1) to pick up the Golden Key but you may want to open up secret (4) for the Chaingun first. To the north you’ll find a secret room (3) with treasure. When you’re done head to the Exit for the next level.
Floor 3

From the start you’re faced with three doors. Start with the door to the right (1) for the Golden Key (2). The door to the left and the center door both lead to the same place (4). Head up to (3) for the Silver Key and then across to the Exit.
Floor 4
Take out the Officer as soon as you enter the level (1). Then head up to (2) for the Golden Key. Use the key to open the door at (3) and go inside for the Silver Key.
Make your way north through the level. At (4) it looks like you’re at a dead-end but press on the wall to open up the exit room. The Exit is at (5) but you may want to stop by (6) and (7) for some useful hidden areas.
Floor 5
From the start take the windy hallway (1) for some optional health and ammo. The secret at (2) has a room full of treasure. Up at (3) you’ll find a couple of Dogs and a SS Guard. To the north you’ll find a maze of rooms leading to the Golden Key (4). Watch out for the SS hiding behind the wall at (5). When you’re done exploring head to (6) and blast your way to the Exit.
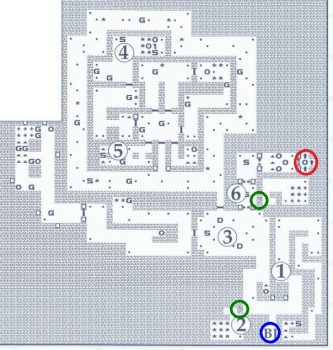
Floor 6
As soon as you leave the starting room you’ll be shot at by Officers from behind the pillars surrounding the room. Make a quick dash through the door to the north (1) and navigate your way through the maze to the Golden Key. This opens the door near the start with some loot.
Now come back and dash through the door to the south. Take the path at (2) and open the secret at the end of the corridor to find the Silver Key. Open the door and you’ll sneak up behind all the Officers and SS Guards. Continue to the west to (3) and fight your way through to the Exit.
Floor 7
From the Start (1) open the secret to replenish your ammo, then follow the wide hallway around to the Golden Key (2). If you’re going for the regular exit take the room at (3) and fight your way through the soldiers to the Exit.
The secret exit will take a bit more work. Make your way north through the long hallway and open up the secret wall at (4). The secret wall in the next room needs to be pushed from the south to the north. If you push it to the east it will block the passage and you won’t be able to get past. no head into the maze and navigate through it to the One-Up. Just north of here is a secret wall you can push up revealing the secret Exit to floor 10.
Floor 10
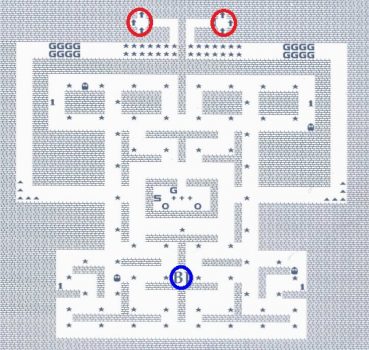
The secret level is a strange one and resembles a 3D game of pacman. From the start you’ll be chased by 4 Ghosts. You can’t kill them and they’ll do damage if they make contact. Navigate through the halls, picking up as much treasure as you want. Then take one of the Exits on the northern side of the map.
Floor 8
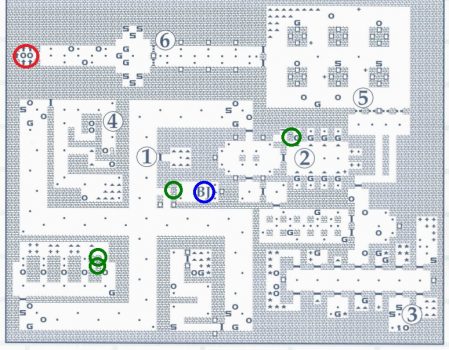
From the start you’ll need to open the secret to get access to the rest of the level. If you need ammo stop by (1) for some clips. Make your way around to (2) and push open the secret for the Chaingun. Continue down to the south and take out the SS for the Golden Key (3).
You’ll need the Silver Key as well so head over to the western side and take out the Officers guarding it. Then head to the west and north to (5). From here navigate past the barrels and take out the horde of soldiers guarding the Exit (6). The barrels make it hard to retreat once you’ve opened the door.
Floor 9
From the start grab the Chaingun and ammo if you need it. In the next room you’ll find the first Fake Hitler with a flamer! Dodge out of the way and take him out. Behind the secret wall at (4) you’ll find more ammo and health.
Open the doors to the north and take out the Officers and Fake Hitlers. Grab the Golden Key and open to door to the boss room. Clear out the Officers first and then run around the corner to the alcove with the ammo and health. Hitler is wearing battle armor at first but this can be blown off by hitting him with enough bullets. Keep dodging and firing at him until he’s been defeated.
Next: Episode 4: A Dark Secret
Back: Episode 2: Operation Eisenfaust