
Forlorn Temple
Back to The Messenger
Autumn Hills
Go through the Portal to Autumn Hills and make your way up to the exit on the eastern side. If you’re here in 16-Bit the 4 Phobekins that you rescued will have build a bridge across to the Forlorn Temple. Make your way across and enter the temple.
Forlorn Temple
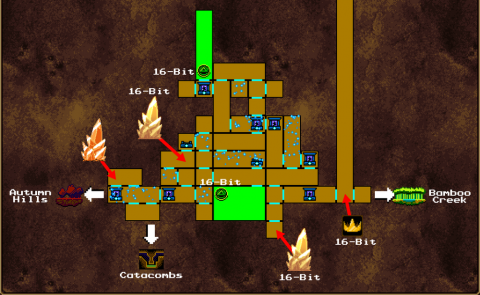
There is just one main path through the Forlorn Temple. We’ll stop off at two locations to grab the final Power Seals. Head to the right for the first Shop and continue to the right.
You can’t go up yet because the path will be blocked in 16-Bit. Instead break the blocks at the bottom and head to the right. Go through the Time Barrier and come back around to this screen in 8-Bit. Head up to the room with the Lever. Hitting the lever will start crushers.
Make your way past and over to the next screen to the left. Go through the Time Barrier and use the Rocket to launch yourself up to the room above. If you miss the Rocket another will appear after a few seconds.
Hit the next Lever up past the two spiked balls to open the barrier and go through.

Continue making your way around to the next Checkpoint. To the right go into the circular Time barrier and then head up. Navigate around the room with the moving platforms and Wizards and drop down to the next room.
Hit the Lever and then run past the crushers to make your way down. Continue to the right and use the rope dart to make your way past the long room with the spiked floor. First head up for the Time Barrier. The time should be in 16-Bit. Drop down and you’ll be able to drop down again.
Use the Rockets and the Levers to navigate your way over to the left. At the end you’ll find Power Seal #44.
Head back the upper path and then go up to the previous room. Continue up and use the Time Barrier to change the time to 8-Bit.
Run across the floor while avoiding the moving spikes and hit the Levers to open the barriers along the way.
Continue across to the right and up to the next shop. Use Use the Time Barrier and head across to the left for a section with Rockets. Go up and then left of the next Shop. Use the lamps to Cloud Step off the screen above. You’ll be taken to a secret area.
Use the Rockets to make your way around so you can hit the Lever. This opens the barrier to the Power Seal. Take a Rocket back up and glide down. Jump up to the room with Power Seal #45. This is the last power seal for the game.
Drop down and enter the Shop. You’ll be able to open the Chest and start using the Windmill Shurikens. You can fire three of them at a time and jump to avoid catching them for more damage.
Use the lamps to take the exit up to the left. Make your way along the only path available and eventually you’ll meet the final boss of this area.
Barma’thazel Boss Fight

This boss fight is very easy. Simply avoid the fireballs and wait for the Rocket to appear. Ride the rocket up while avoiding the fireballs until you hit the demon. As you’re floating down get off as many strikes as you can against him.
Repeat this a few times until he transforms into a giant eye. Use the rocket to dodge his attacks. Once you’ve dodged enough of them the rocket will break through the window at the top and the demon will melt in the sunlight.
The Demon King’s Crown will float down and you’ll automatically grab it. This can be used to open the portal to the Corrupted Future.
The path to the right leads to Bamboo Creek. Instead go to the left and enter the shop. Take the exit back to the Tower of Time HQ.
Back: Key of Symbiosis Next: Key of Courage
