Temple of Lathander Level 1
Back to Eye of the Beholder 3
Temple of Lathander Level 1
The Temple of Lathander has been desecrated. You will need to repair the temple and bring it back to its former glory. Initially there are no enemies on this level but gradually Living Mucks and Shades will appear as you explore.
The Shades have a powerful attack and are 60% resistant to magic but apart from that they’re fairly easy to kill. The Mucks can destroy metal weapons and are immune to acid, lightning and poison. Fire spells do half damage so attack with cold-based spells if possible.
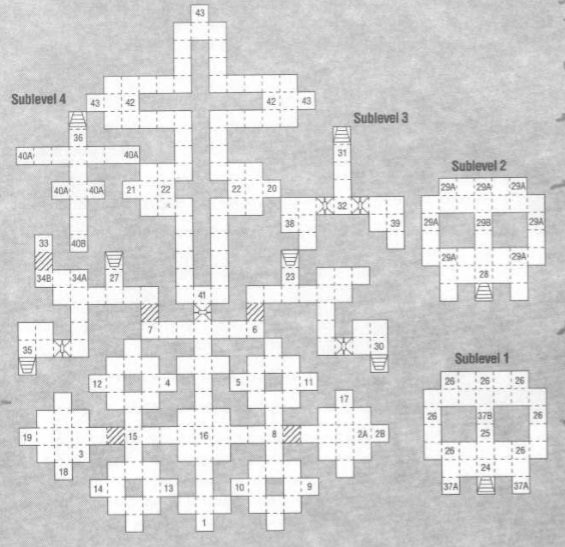
1) Stairs down to Temple Quarter Ruins location 17.
2A-B) At 2A you’ll find the Broken Arm of a statue. Place it back on the statue at 2B and Lathander will appear. From now on your party will be healed whenever you touch one of the statues.
3) Longsword +4 and four Bags of Incense.
4) Place a Gold Cup on the altar and the north wall will disappear. The gold cup can be found at location 18.
5) Burn some incense in the censer and the wall at location 6 disappears.
6) This wall disappears when you burn incense in the censer at location 5.
7) Place a Gold Cup on the altar and the north wall will disappear.
8) The wall to the east disappears when you place a Ration on the altar at 9.
9) Place a Ration on the altar and the wall to the east of 8 will disappear.
10) The plaque on the west wall reads “Famine is driven back by the generous.”
11) The plaque on the east wall reads “Pestilence is subdued with a waft of sweet air.”
12) The plaque on the west wall reads “Drought is dispelled with a drink of clear water.”
13) The plaque on the east wall reads “War is averted by forsaking the sword.”
14) Place any sword on the altar and the wall to the west of location 15 will disappear.
15) The west wall disappears when you place any sword on the alter at location 14.
16) The Holy Fountain of Lathander. When you repair the fountain by adding it’s spout you’ll be able to touch a fountain and gain the Prayer spell.
17) The Spout for the Holy Fountain at location 16.
18) A Golden Cup. Place it on the alter at location 4.
19) A Statue of Lathander.
20) The stairs here first lead down to the Pit of Despair. If you go down you’ll be trapped there forever. When you place Holy Symbols on the altars at 43 in place of the cursed symbols the stairs will change direction and lead up to the Temple of Lathander Level 2 location 1.
21) Same as above. Once the Holy Symbols have been replaced the stairs will lead up to Temple of Lathander Level 2 location 2.
22) The plaque on the wall reads “Into the pit of despair you are cast, while the curse of night still lasts.”
23) Stairs down to Sublevel 1 location 24.
24) Stairs up to location 23.
25) Here you’ll find Tabitha, a Paladin. She’s willing to help the party if you want her. She’s level 10, has the highest Strength of all the NPCs and starts with 92 hit points.
26) Tombs of the heroes of Myth Drannor.
27) Stairs down to Sublevel 2 location 28.
28) Stairs up to location 27.
29A-B) Tombs to the heroes of Myth Drannor. All of the tombs are open. Close them all and a Holy Symbol will appear at 29B.
30) Stairs down to Sublevel 3 location 31.
31) Stairs up to location 30.
32) Use the Fire Key in the lock to open the doors to the east and west.
33) A Fire Key is in the niche.
34A-B) Pressing the Button at 34A removes the wall at 34B.
35) Stairs down to Sublevel 4 location 36.
36) A plaque on the wall says “The Morninglords shield you from the night.” The stairs lead up to location 35.
37A-B) Burn incense in the alcoves at 37A and a Holy Symbol will appear at 37B.
38) Four Shields.
39) A Mace +4, an Arrow +2 and two Bags of Incense.
40A-B) Place a Shield on each of the Pressure Plates ate 40A and aa Holy Symbol will appear at 40B. Putting anything else on the Pressure Plates will cause a fireball to shoot the party.
41) The plaque says “Surely goodness shall replace the evil which lurks in our midst.”
42) The plaque says “The virtuous light of dawn drives back the night.”
43) Cursed Holy Symbols rest on each of the three altars. When you replace them with Holy Symbols the stairs going down to the Pit of Despair at locations 20 and 21 will go up to the Temple of Lathander Level 2 instead.
Back: Temple Quarter Ruins Next: Lathander Level 2