Warriors Tomb Level 1
Back to Eye of the Beholder 3
Warriors Tomb level 1
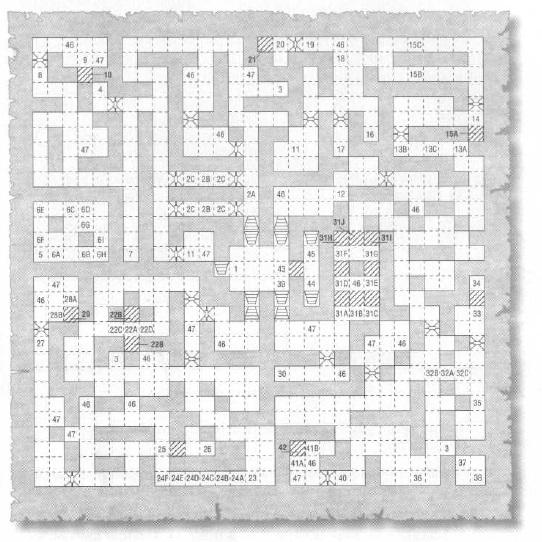
Two challenging enemies are found on the first level of the Warrior’s Tomb. The first are the Swordwraiths. They do little damage but drain your strength instead. Avoid being hit by them at all costs. You’ll need magic weapons with at least 2+ to hit these creatures. Undead Beasts have tons of hit points and take reduced damage from edged weapons and are immune to fire. Use Lightning Bolts and blunt weapons to kill them.
To get through this level you need to find the four Bone Levers and leave them in the down position. The levers are found at locations 10, 21, 29 and 42. When they are all down the wall at 43 opens, revealing the stairs to the next level.
1) Stairs down to Burial Glen location 5.
2A-C) The plaque at 2A reads “Pray for the dead.” When you step at 2B walls will appear at 2C, trapping you in. Cast Prayer to remove the walls at 2C so you can escape.
3) There’s an open crypt on the wall that spawns Swordwraiths. Closing the crypt will stop them spawning.
4) A pit. Dropping down it takes you to location 5.
5) This is where you land when you drop down the pit at location 4.
6A-I) Fireballs shoot from the walls at 6A to 6F. Pulling the Lever at 6G will deactivate the fireballs, activate the teleporter at 6H and makes a Holy Key appear at 6I. Stepping into the teleporter at 6H takes you to location 7.
7) Destination of teleporter at 6H.
8) Use the Holy Key to unlock the door to the north.
9) A Dagger +3 lies on the floor. Push the Secret Button on the wall to open up an alcove to the south.
10) Pull the Bone Lever down. When all four Bone Levers are down (Locations 10, 21, 29 and 42) the passage at location 43 will open. There’s also a plaque here which gives you a clue about Captain Fflar.
11) Cleric Scroll of Raise Dead, Potion of Healing and two Rations.
12) Potion of Giant Strength.
13A-C) When you step on the pressure plate at 13A a spiked wall moves towards you from 13B. Quickly flip the lever at 13C to deactivate the trap.
14) The hidden button opens up an alcove to the south at 15A.
15A-C) Pulling the lever down at 15A deactivates the invisible teleporters at 15B and 15C. You’ll need to use either Thieves Picks or a Potion of Giant Strength to operate the lever.
16) A trapped Cleric Scroll of Resist Fire. It explodes damaging the party if you try to pick it up.
17) A Wand of Wall of Force.
18) An Undead Beast. It drops a Holy Key once killed.
19) Use a Holy key to open the door to the west.
20) The hidden button on the wall opens the alcove to the west at 21.
21) Pull the Bone Lever down. When all four Bone Levers are down (Locations 10, 21, 29 and 42) the passage at location 43 will open. There’s also a plaque here which gives you a clue about Captain Fflar.
22A-D) When you step at 22A a wall appears in front of you, either 22C or 22D, and Undead Beasts appear behind you and at 22B.
23) The plaque reads “Not all need weight.”
24A-F) Place items on the second, third and fifth pressure plate (locations 24B, 24C and 24E) or a Fireball will shoot from the wall at 24F.
25) The hidden button on the wall opens up an alcove to the east.
26) A Holy Key and a cursed Short Sword -2 called “Maggot”.
27) Use a Holy Key to open the door to the north.
28A-B) Swordwraiths and an Undead Beast attack from locations 46 and 47. On the floor is a Short Sword +2. Press the Hidden Button at either 28A or28B to reveal a Lever at 29.
29) Pull the Bone Lever down. When all four Bone Levers are down (Locations 10, 21, 29 and 42) the passage at location 43 will open. There’s also a plaque here which gives you a clue about Captain Fflar.
30) Mage Scroll of Protection from Paralysis.
31A-J) This is a complex lever puzzle. When you flip the levers in the right order the passage to the north will open. Flip the levers in this order, 31B, 31D, 31E, 31A, 31C. Go back and flip the levers at 31D and 31E up. Flip the levers down 31F, 31G, 31H and 31I. Then flip the levers up at 31F and 31G. The wall disappears at 31J revealing a passage to the north.
32A-C) When you reach the location at 32A four Swordwraiths and an Undead Beast will appear behind you, either at 32B or 32C depending on which way you’re facing.
33) Pressing the Secret Button opens the wall to the north.
34) A Holy Key.
35) The only way to open this door is to force it open after drinking a Potion of Giant Strength or by using Thieves’ Picks.
36) When you step here a pit opens under you and you’re transported to location 37.
37) You’ll land here when falling down the pit at location 36.
38) This teleporter transports you to location 39.
39) You are teleported here from location 38.
40) Use a Holy Key to open the door to the west.
41A-B) Press one of the Secret Buttons at either 41A or 41B to reveal a secret alcove.
42) Place the Bone Lever in the down position. Once all four bone levers are down the passage at 43 will open.
43) The plaque on the wall reads “Four bones down will show the way.” To open the wall and reveal the passage beyond you need to place the four Bone Levers in the down position. They can be found at locations 10, 21, 29 and 42.
44) Stairs down to Warrior’s Tomb Level 2 location 1.
45) Stairs down to Warrior’s Tomb Level 2 location 9.
46) Swordwraiths.
47) Undead Beasts.
Back: Burial Glen Next: Warriors Tomb Level 2