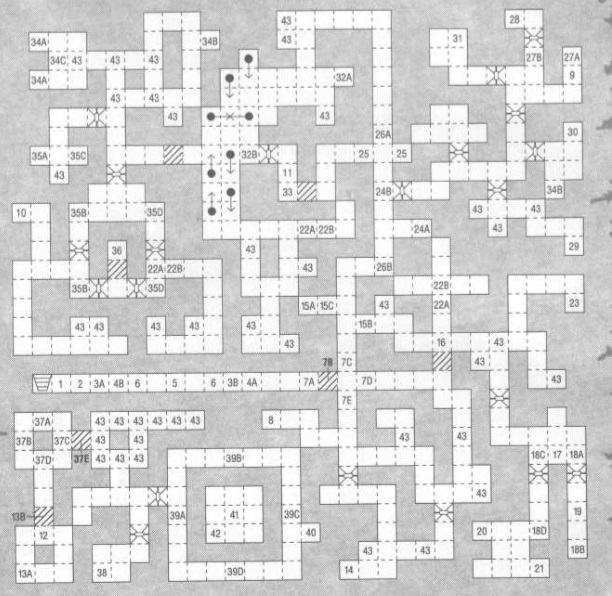
Mages’ Guild Level 3
Back to Eye of the Beholder 3
Mages’ Guild Level 3

Aside from puzzles and traps you’ll find some difficult enemies on this level. The first are Earth Elementals. These tough foes have many hit points and can bash the entire party with a single swing of their fists. You’ll need +2 weapons to damage Earth Elementals. Water Elementals sometimes rise up out of the grates. They are not too difficult to kill but take more damage from blunt weapons.
The level below this one is completely under water. You’ll need to prepare your party for moving under water before opening the grates and dropping down to the fourth level.
1) Stairs up to Mages’ Guild Level 2 location 25.
2) A Grappling Hook is on the floor. It can be used to open some of the grates.
3A-B) When you step at 3A you’ll be teleported to 3B unless a Mage in your party is holding a Red Gem from location 5.
4A-B) When you step at 4A you’ll be teleported to 4B unless a Mage in your party is holding a blue Gem from location 5.
5) The niche in the north wall has a Red Gem and the niche in the south wall has a Blue Gem.
6) The plaque reads “The hand of the learned holds the key.”
7A-E) Pressing the Button at 7A moves the wall at 7B clockwise to 7C. Pressing the Button again moves the wall around to 7C, 7D, 7E and back to 7B.
8) A locked grate. Use a Silver Key from 23 to open the grate. Dropping down it will take you to Mages’ Guild Level 4 location 2.
9) A locked grate. Use a Brass Key from 28 to open the grate. Dropping down it will take you to Mages’ Guild Level 4 location 3.
10) A locked grate. Use a Crystal Key from 34C to open the grate. Dropping down it will take you to Mages’ Guild Level 4 location 4.
11) A locked grate. Use a Brass Key, Silver Key and Crystal Key to unlock the grate and then the Grappling Hook to open it. Dropping down it will take you to Mages’ Guild Level 4 location 1.
12) An unlocked grate. Use the Grappling Hook to open the grate. Dropping down it will take you to Mages’ Guild Level 4 location 5.
13A-B) Press the Secret Button at 13A to open the wall at 13B.
14) A cursed Robe -4, as well as Elven Chainmail +3 and two Arrows +4.
15A-C) Press the Button at 15A to open the gate at 15B. This will also reset the spike trap at 15C. You can throw an item at the Button instead of pressing it.
16) You can only go through this wall from the north.
17) The plaque on the wall reads “Choose the left door and ye shall live longer.”
18-D) Opening or closing the doors at 18A or 18C will shoot fireballs towards you from 18B or 18D.
19) A collection of Mage Scrolls, Power Word Kill, Meteor Storm, Abi Dalzim’s Horrid Wilting, Bigby’s Clenched Fist and Energy Drain.
20) Leather Armor +4, a Short Sword +3 and a Ring of Protection +3.
21) A Torn Parchment. Read it to find out how the evil first came to Myth Drannor.
22A-B) When you step on 22A a Water Elemental will appear at 22B.
23) A Silver Key is in the niche.
24A-B) Flip the lever at 24A to the up position to open the door at 24B.
25) The plaque reads “Be quick or be dead.”
26A-B) Move quickly down this corridor. When you step at 26A a Lightning Bolt is fired from 26B.
27A-B) Press the Button at 27A to open the gate at 27B.
28) A Brass Key is in the niche.
29) A tapestry.
30) If you read the Parchment on the floor you’ll learn about the Lich Acwellan and his desperate search for immortality.
31) A collection of Mage Scrolls, Meteor Swarm, Energy Drain, Time Stop, Power Word kill and a Potion of Speed.
32A-B) Pull the tassel at 32A to open the door at 32B.
33) Use the lever to open the wall to the east.
34A-C) The plaque at 34B reads ” An emerald for each shall yield the key.” Place a Green Gem in each of the niches at 34A and a Crystal Key will appear at 34C.
35A-D) When you push the Button at 35A the door at 35B will open. When you push the Button at 35C the door at 35D will open.
36) A Copper Key is in the niche.
37A-E) Arrows will fly around the room here. To deactivate the trap and open up the passage to the east place a Silver Key in the lock at 37A, a Copper Key at 37B, a Brass Key at 37C and a Crystal Key at 37D. This opens the passage at 37E.
38) Empty room.
39A-D) Various Rings of Protection. You’ll need them to complete the balance puzzle at 40.
40) A scale is here on the wall with two slots either side of it. You need to place rings into the niches so that both sides at up to 0. Use the +3, +1, -2 and -2 rings on one side and the -3, -1, +2 and +2 rings on the other side. When you balance the scales you’ll be teleported to 41.
41) The teleporter at 40 brings you here.
42) The lich Acwellan. When you attack him he’ll cast a mirror image spell to surround you with fake images. Hit them once to destroy the image and kill Acwellan. When he’s defeated you’ll be teleported to the Temple Quarter Ruins location 18.
43) An Earth Elemental.
Back: Mages’ Guild Level 2 Next: Mages’ Guild Level 4


