Mages’ Guild Level 2
Back to Eye of the Beholder 3
Mages’ Guild Level 2
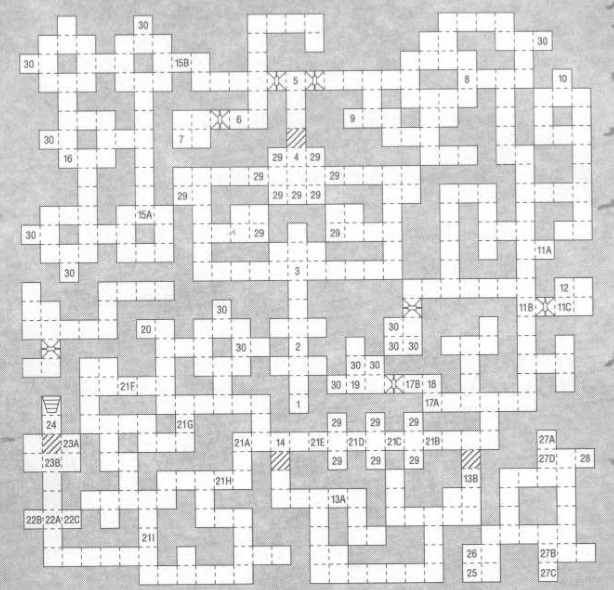
When you first enter this level if you’re holding onto the Ring of Trobriand the Scaladars won’t attack you. Try to kill as many of the Scaladars as you can before giving up the ring to progress forwards. Scaladars take very little damage from edged weapons and are completely resistant to lightning and cold based spells and partially resistant to other spells. Steel Shadows also wander these corridors but they have few hit points and can’t do much damage.
1) The teleporter here takes you to Mages’ Guild Level 1 location 8J.
2) A group of four Steel Shadows.
3) A Sprite called Bug is here and as a powerful Mage can make a good addition to your party.
4) The Scaladars guarding these passages won’t attack while you have the Ring of Tobriand in your inventory. The writing on the wall to the north reads “The way is revealed with the lure of the beasts.” To open the passage to the north place the Ring of Tobriand in the niche. Unfortunately any remaining Scaladars will attack the party.
5) Pulling this tassel will open the doors to the east and west.
6) Pressing the Button will open the door to the west.
7) A Staff +1, two Arrows +2, a Club and four Rocks.
8) Pulling on this tassel will transport the party to location 25.
9) The teleporter at location 26 takes the party here.
10) Leather Armor +4 and two Rations.
11A-C) Pulling the tassel at 11A opens the door at 11B at which point three Steel Shadows will attack from 11C.
12) A Ring of Sustenance, Wand of Flesh to Stone and two Potions of Invisibility.
13A-B) Pressing the Button at 13A will remove the wall to the north at 13B.
14) The Secret Button opens a passage to the south.
15A-B) If you pull the tassel at 15A an illusionary wall will appear at 15B.
16) A Dart of the Hornet’s Nest.
17A-B) Pulling the tassel at 17A opens the door at 17B.
18) The plaque on the wall reads “Weapons laboratory. Entry strictly forbidden.”
19) A Spellbook, four Rocks +4, an Apple and three Potions of Poison.
20) Short Sword +3.
21A-I) Spike traps. If you press the Button at 21A the spike traps at 21B to 21E will be deactivated. This also activates the spike traps at 21F to 21I. Pressing the Button again switches the traps back to their original positions.
22A-C) When you step at 22A all of the metal items in your inventory will be stolen and two Steel Shadows will attack. When you’ve killed them you’ll be able to get your items back.
23A-B) When you pull the tassles at 23A the wall at 23B will disappear, revealing the stairs up at location 24.
24) Stairs down to Mages’ Guild Level 3 location 1.
25) You’ll land here when you pull the tassles at location 8.
26) Stepping into this teleporter takes you location 9.
27A-D) The teleporter at 27A takes the party to 27B. The teleporter at 27C takes the party to 27D.
28) A Dagger +4 named “Ocnor” is in the niche. When you take it out a group of Steel Shadows appear behind you.
29) Scaladar.
30) Steel Shadows.
Back: Mages’ Guild Level 1 Next: Mages’ Guild Level 3