Level 12: Xanthar’s Inner Sanctum
Back to Eye of the Beholder
Level 12: Xanthar’s Inner Sanctum
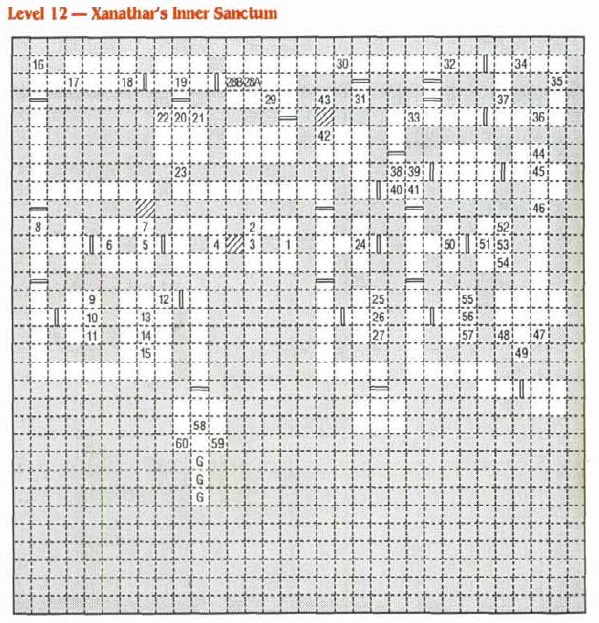
The Beholder Xanathar resides on the 12th level and he’s been waiting for your party. He’s completely resistant to magic but can take damage from magic weapons. Xanathar has constructed Stone Golems to protect him. They are resistant to most spells and have powerful melee attacks.
1) There are no stairs down to this level. You’ll need to use the Portal on Level 11 to get here. This portal requires the Stone Orb to activate and takes you to Level 11 #19.
2) A hole on the west wall reeks of smoke.
3) Pushing the wall ornamentation reveals a hidden passage to the west.
4) A sign on the west wall reads “Turn back, no trespassing.”
5) A regular door, no key required.
6) When you step on this Pressure Plate the door to the east will close. Four Stone Golems patrol this area. One of them will drop a Skull Key when killed.
7) The Button on the east wall opens the passage to the north.
8) This door can only be opened from the other side.
9) Pressing the Button will teleport the party one square east, into the wall. You can ove forwards into the next room or back to where you came from.
10) Pushing the Button teleports you to #26.
11) Pushing the Button teleports you to #57.
12) Use a Skull Key to open this door.
13) There’s a Potion of Healing and Non-Magical Ring on the pedestal. If you try to pick them up other items will be stolen from your inventory. To take the items you need to drop all small items from your inventory before approaching the pedestal.
14) Skull Key.
15) Potion of Healing and Necklace. This trap is the same as the one at #13.
16) Stone Golems are created here when you follow the steps at #17.
17) Stone Golem Generator. Place a Rock, Potion of Strength, and Orb on the pedestals and push the Button in the north wall to make a Stone Golem at #16. This is only useful for gaining XP.
18) This door is only opened from the east.
19) This room can only be entered from the south. The other doors are opened from within this room.
20-22) Place an Orb of Power on the pedestals at #21 and #22 and the pedestals will disappear. Place an Orb of Power on the pedestal at #20 and it will disappear also, revealing a passage behind it.
23) A sign on the west wall reads “Room of the spheres.”
24) When you step on the Pressure Plate the door to the east will close. Open the door to reveal a Button on the east wall. When you press the Button a Wand of Fireballs will appear in the alcovve to the south.
25) When you push the Button you’ll be teleported to #9.
26) When you press the Button on the wall you’ll be teleported on step to the east where you can continue into the next room or walk back to this one.
27) Pushing the Button teleports you to #57.
28A) Three Orbs of Power.
28B) This door is only opened from the other side.
29) A Secret Button on the south wall opens the door to the south.
30) Press the Button on the south wall to open the southern door.
31) Stone Golem.
32) Use a Skull Key to open the door to the south where you’ll find a Wand of Magic Missiles.
33) Use a Skull Key to open the door to the north where you’ll find a Wand of Magic Missiles.
34-37) Rotating shelves that dispense Iron Rations. You can find a maximum of four.
38-41) Stepping on any of these Pressure Plates closes all of the doors to this room.
42) Press the Secret Button on the west wall to open the door to the north.
43) Two Potions of Invisibility.
44) On the north wall is a hole that launches Fireballs to the south.
45) Xanathar! The easiest way to kill Xanathar is with the Wand of Silvias. The dwarves will give it to you when you give them the Dwarven Healing Potion to revive their king. The wand will repel Xanathar. Use it to push him into the Spike Trap at #49.
46) Light beam projectors that set off fireballs from #44. You can avoid this trap if your whole party is invisible.
47-48) One large Eye sits on each pedestal.
49) Light beam projectors and spike trap. This is where you need to push Xanathar to win the game. You can enter this trap if you’re invisible. There are copies of the stone portal keys on the shelf.
50) Stepping on this Pressure Plate closes the door to the east.
51) Stepping on this Pressure Plate closes the door to the west.
52) Push the Button on the east wall to create a shelf on the north wall with a Potion of Speed in it.
53) Pushing the Button causes two Fireballs to fly out of the wall to the south-west and north-west of the party. The fireballs will fly east and then turn towards #53 to hit the party.
54) Pushing the Button on the east wall creates a shelf with the Orb of Power in it in the south wall.
55) Pushing the Button teleports you to #9.
56) Pushing the Button teleports you to #26.
57) Pushing the Button teleports you one square to the east. You can see into the next room but can’t get there so you’ll need to step back.
58) If you are not invisible the eye on the pedestal will trigger the release of three Stone Golems to the south.
59) Potion of Vitality and Potion of Invisibility.
60) Potion of Vitality and Potion of Invisibility.
Back: Level 11: Xanathar’s Outer Sanctum