Peragus II Mining Facility
Administration Level
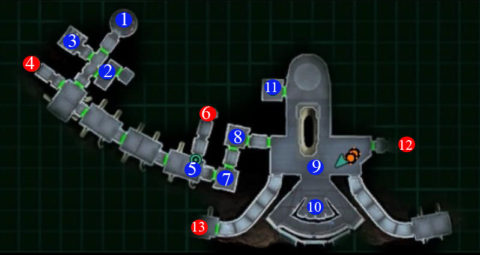
You wake up on the Peragus II in the Medical Bay of the Administration Level. The Peragus facility largely consists of droids so bear that in mind when equipping and levelling up your character. The Morgue and the corridor to the south are blocked so you’ll need to start by investigating the Medical Bay at #2.
1) Medical Bay – The Kolto tanks in the med bay will heal your wounds although there probably won’t be much need as your wounds will heal over time anyway. There’s a Lab Station here that you can use to learn about creating and breaking down items. It can be a handy way to get rid of useless items and turn them into things you may need.
Use the Medical Computer. In the Patient Treatment records you may be able to track who gave the last treatment to the people in the Kolto tanks causing them all to die except for you. From the Medical Bay functions you can unlock the Morgue door and and door to the Medical Storage Room. The Medical Storage room should have some Chemicals and Med Packs.
2) Lab Station – Head over to the Lab Station and search the room for equipment. There’s a Lab Station here that you can use to learn about creating and breaking down items. It can be a handy way to get rid of useless items and turn them into things you may need.
Use the Medical Computer. In the Patient Treatment records you may be able to track who gave the last treatment to the people in the Kolto tanks causing them all to die except for you. From the Medical Bay functions you can unlock the Morgue door and and door to the Medical Storage Room. The Medical Storage room should have some Chemicals and Med Packs.
3) Kreia & the Morgue – There are two corpses lying on the beds. Search the one opposite the entrance for a Plasma Torch which can be used to open the corridor door to the south. When you grab it Kreia will wake up. Later she’ll join as one of your party members.
Leave the room and go south to the damaged door. Equip the Plasma Torch and then bash the door with it to open it. Head through and then open the door to the east. You’ll be attacked by a few Mining Droids. Continue making your way to the east. The exits at #4 and #5 will be sealed for now so skip down to #7.
4) Exit to Dormitories
5) Sealed door
6) Exit to Mining Tunnels
7) Security Room – Search the corpse and the lockers, then use the Security Desk. You can watch all of the logs to start to get an idea of what happened to the facility and have a look at the cameras. Continue to the north.
8) Droid Ambush – Before opening this door Kreia will give you a warning about something dangerous on the other side. It’s not really such a big deal. There are 3 Mining Droids here. Take them down and then search the Footlockers. Inside one of them you’ll find a Stealth Field Generator.
9) Administration Center – There are a few Mining Droids hanging around that will attack you on sight. You can either just kill them or wear the Stealth Field Generator, then use the Console at #10 to shut them down.
10) Administration Computer – Use the console here to shut down the droids if you’re taking the stealthy path and open the Prison door at #11.
11) Atton & Prison Cell – Go into the cell and have a chat with Atton. You can be nice or mean to him depending on your path. After the conversation he’ll join your party. Head back to the Administration Computer.
10) Administration Computer – Use the computer to contact Hangar Bay 25. This will get you in contact with T3-M4.
Hanger Bay
You begin in the Storage Room of the Hangar Bay. Search the room for items then take the west exit. Use the Droid Shock Arm to eliminate the Mining Droids quickly. Follow the ramps down and then open the door leading to the Fuel Depot.
Fuel Depot
Search the Broken Droid for items and then open the door leading through the fuel pipe. Search the Corpse for a Datapad and 3 Sonic Mines. Search the other Broken Droids for Parts and equipment for T3-M4 then head back to the Hangar Bay.
Hangar Bay
Make your way back up the ramps to the Storage Room and place a Deadly Sonic Mine on the eastern door. Inside is another little droid and some extra equipment, including 3 Spikes. Grab everything and then make your way through the southern door to the Hangar Bay with the Ebon Hawk. The doors to the Ebon Hawk are sealed but you can use a Part to repair the Hangar Control console.
From this console you’ll be able to watch a number of logs but the panel is too damaged to communicate with the Administration Level. From the main menu go to Emergency Control Commands and then Run Diagnostic on Damaged Systems with Repair skill. You should be able to re-route the sub-system commands to the terminal in the Fuel Depot.
Now you want to Check Status of Emergency Sub-Systems and then use a Spike to open the Blast Door to the Fuel Depot. Go through the door and continue to the exit to the Fuel Depot.
Fuel Depot
Head down the walkway and take a left at the end. Use the Console. Click on Call up Emergency System Schematics and then Open Emergency Hatch on Peragus Administration Level. You’ll switch back to your main character.
Administration Level
After having a chat with Atton head back to #5. The sealed door should now be open and the path clear to access #6, the Exit to the Mining Tunnels.
Mining Tunnels
Open the container for a Safety Harness, Survey Gear and Peragus Mining Shield. You’ll also be able to find a Miner Uniform down here as well. Open the door to the next area.
The only way to go is to the west. There’s a broken droid here that you can repair for a little extra assistance. Continue around to the east. There are a lot of mining droids here so either use your Stealth Field to dodge around them or force your way through.
Run through the superheated blast tunnel to avoid taking much damage. Continue around and eventually you come to an open section with a walkway in the center.
Use the center console to unlock a bin and bring down the fields in the corner of this room. There are droids behind each of the force fields and a couple of exits behind the fields.
Behind by exploring the exit behind the south west force field. Use your Plasma Torch to break through the door. Grab all the items and then head back to the open area.
This time go to the south. Dodge or disarm the mines and grab the Basic Ionite Edge that you can use to upgrade a weapon later.
Head back and take the exit to the east. Follow it around and take the exit to the Fuel Depot.
Fuel Depot
You’ll enter the Fuel Depot this time from the north. To your left is a strange HK droid. He’s a chatty fellow but also seem suspicious. Ask him about the body on the floor and you’ll discover the the HK droid can emulate his voice.
Go over to the room on the other side of the corridor with the workbench. Search the container for a Sonic Imprint Sensor. Talk to the HK-50 droid once more and trick him into repeating the code in the miner’s voice. You can use this voice code later to open an airlock.
Head out the door to the south and get ready for a difficult fight with some droids. The Ion Grenades work really well against them if you are having difficulty or get close and attack them at melee range.
Continue to the east. Inside one of the rooms is a console where you can playback the voice code to unlock the airlock seal. There are some floating mines along the way. Shoot them from long range or you’ll take damage. Grab the Space Suit from the locker and then take the exit to the Asteroid Exterior.
Asteroid Exterior
This is a simple area. The only danger to avoid is the fuel venting from the side of the asteroid. Stay to the outside of the walkway to avoid taking damage.
Once you’re halfway around the walkway you’ll have a chat with Atton. Turn around and have a look at him inside the facility.
As you continue walking you’ll see the docking of the Harbinger. Continue around to the entrance into the Dormitories.
Dormitories
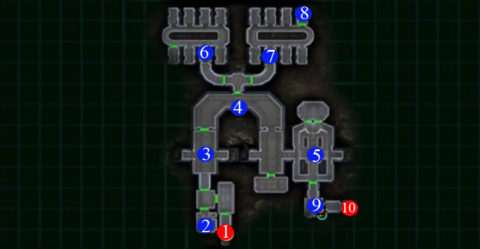
1) Entrance – The entrance to the Dormitory from the Asteroid Exterior.
2) Workbench – use a Plasma Torch to get into this room. If you have a Vibroblade you may be able to upgrade it here.
3) Freeze Turrets – When you enter this area the Turrets will fire on you. They’re easier to destroy then you think but if you’re having trouble use your melee weapons or use the Stealth Field. There’s more Turrets in the corridor on the other side of the Dormitory.
4) Shift Assignment Console – Use the console here and either repair it for 1 Part or slice into it for 1 Spike. Use the camera function and look at the Dormitory West. Use 1 Spike to shut off the ventilation system and clear the gas. Go back to the main menu and end the dormitory emergency lockdown to open the door behind you.
5) Refectory – It may be worth going into the dining area first because you’ll get some information about a secret in the Dormitory. Search all the containers and bodies. You’ll find a Datapad that gives you a clue about a hidden cache of weapons in the dormitories.
6) West Dormitory – Search the dormitory for items and then use the console. There is a code here that you need to work out. You may want to visit the East Dormitory first for more information. If you have enough intelligence you’ll automatically be given the answer. Each dot represents a 1 and a dash represents 10. The code is 7, 5, 13, 17, 3.
7) East Dormitory – Search the dormitory for items and a Datapad.
8) Secret – If you found the miner’s datapad at #5 then you’ll have a clue about this secret. You’ll Demolitions skill and a mine to be able to blow open the door.
9) Console – Here you’ll find out what happened to the last of the miners. Watch the logs and then enter the code. HK-50 has reversed the code so enter it in backwards to open the Turbolift back to the Administration Level.
10) Exit to Administration Level
Administration Level
When you enter at #4 you’ll meet up with Atton and Kreia to form a party. Head back to the command section #9 for a confrontation with HK-50. He can be difficult to take down but use Ion Grenades to make the fight a bit easier. Search the remains for the HK Vocabulator which you’ll use later to repair a HK droid in the Ebon Hawk.
Use the console at #10 and active the communications program to talk with T3-M4. Make your way to #13 to go to the Harbinger Command Deck.
Next Part: The Harbinger
Back to the Knights of the Old Republic 2 Walkthrough


