Telos
Restoration Zone
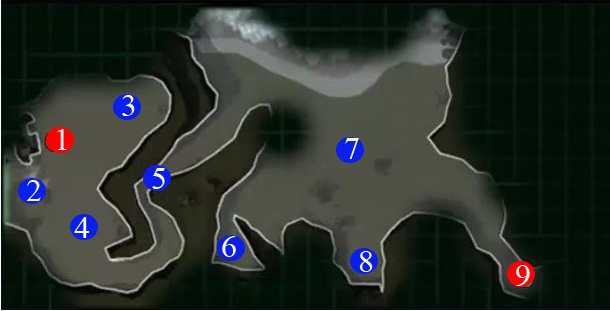
After crash landing on Telos you’ll be met by Bao-Dur who comes to offer assistance. You’re objective is to make your way to the Czerka Site #10. You’ll find a few hidden caches along the way.
1) Shuttle Crash Site – This is where you begin and meet up with Bau-Dur. You’ll need to bring Bao-Dur along, which means you’ll have to leave behind either Atton or Kreia.
2) Hidden Cache #1 – Behind the shuttle is the first hidden cache. Use Bao-Dur to retrieve all of the mines and then search the hidden cache for items. The loot you find is somewhat random so I won’t mention the exact items.
3) Cannoks – These animals represent the local fauna on the planet. They’re fairly tough and aggressive but shouldn’t pose a problem to your party.
4) Mercenary Group #1 – You’ll be spotted by a sentry droid so the mercenaries should be aware of your presence. Focus fire on one mercenary at a time and once they are all killed search the bodies for loot. The landspeeder and swoop bike are locked so you won’t be able to access their computers.
5) Two Criminals – As you work your way around the canyon you’ll meet first another sentry droid and then the two criminals who escaped Citadel Station. Once you kill these two you’ll be able to go back to Citadel Station and tell Lt. Grenn that they’ve been dealt with for your bounty reward.
6) Hidden Cache #2 – Once again retrieve the mines and then search the hidden caches. There are 2 here and should contain some rare items.
7) Mercenary Group #2 – The second mercenary group is a little tougher to deal with. Make sure you’ve buffed up your characters before engaging in battle. Use the Energy Shields to protect your group from blaster fire.
8) Containers – There are some containers here with more loot. You’ll also be able to find some bags and cylinders along the beach so do a loop around this area to find all of the items.
9) Exit to Czerka Site – Once you’ve cleared out this area use Bao-Dur in stealth mode to retrieve all of the mines. Once it’s clear you should be able to take down the turrets and make your way to the Czerka Site.
Czerka Site
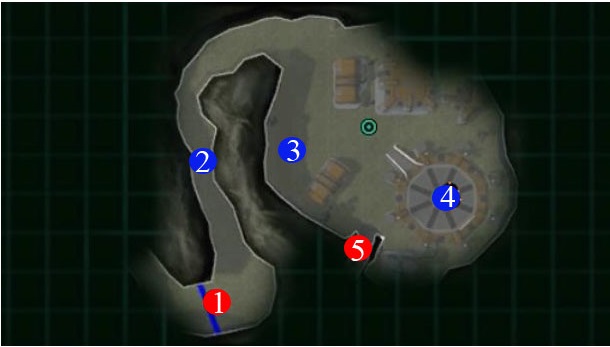
1) Exit to Restoration Zone
2) Mercenary Droidmaster with Warbots – As you make your way through the canyon you’ll come first of all to a Sentry Droid and then a Mercenary with 2 Warbots, hidden behind some mines. The mines shouldn’t do to much damage but you can manually navigate between to avoid taking any damage. The Droidmaster will put on a shield so remember you can use Bao-Dur’s Shield Breaker attack to remove shields. Take out the mercenary and droids before carrying on.
3) Mercenary Groups – There are a few groups of mercenaries in the Czerka Site. Here you’ll find the Mercenary Commander, a Veteran Mercenary and two regular Mercenaries. Try to deal with them one by one and they shouldn’t pose too much of a threat. They tend to use blaster fire so keep up an Energy Shield to avoid taking damage. Use Bao-Dur’s Shield Breaker on the Commander before attacking him with other weapons.
4) Computer Panel – The console is up here on the landing pad, protected by 2 Heavy Turrets and 2 Mercenaries. Battle your way through them and then use the computer panel to access the Shield Network and find a likely location for the Ebon Hawk.
5) Entrance to Underground Base – Deal with any remaining mercenaries and then make your way to the Underground Base.
Old Military Base

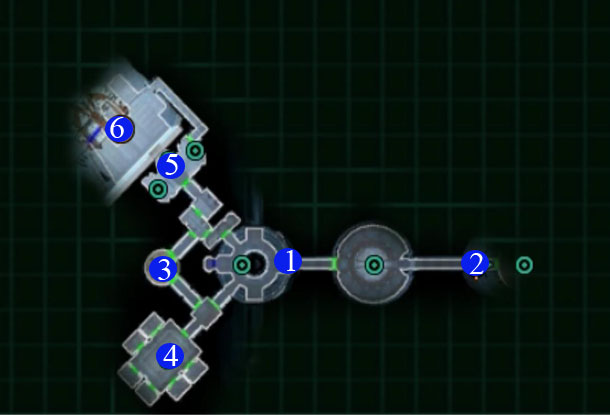
1) Exit to Czerka Site
2) Force Field, Turrets and Gas – Stay away from the vents in the center of the room which spew poison and use Bao-Dur to bash through the force fields. There’s Ion Turrets in the next room, more poison vents and another force field to bash down. There is also a Computer Terminal here where you can download the area schematics and disable all of the Turrets. Continue forwards and take out the Military Droids.
3) Workbench and Lab Station
4) Shuttle Bay – This is your escape but you need to turn on the reactor at #9 and find the ignition codes at #7 before you can get on the shuttle. Once the reactor has been turned on a large Tank Droid will come out of the north door and attack you.
5) Security Control – Use the console to turn off all the gas vents. Search all the lockers in this room for Credits and other useful items.
6) Stranded Czerka Salvage Crew – Just through theses doors is a stranded Twi’lek. Agree to help him and lead him back to the exit for Light Side Points.
7) Droid Charging Room – You’ll have a tough fight when you enter this room with a group of Telos Military Droids ready to engage. Use the Terminal on the southern wall to destroy all of the droids in the southern charging bay. You won’t be able to open the south door yet.
8) HK Droid – There is a damaged HK droid here that you can repair and have follow you around. He won’t follow you around for long before he explodes.
9) Reactor Control – Use the terminal and start the reactor. This will open a door in the Droid Recharging Bay where you’ll find the Ignition Codes and also a door in the Hangar Bay where a Tank Droid will step out. The Turrets behind you will activate as well.
Back to 7) Head back to the Droid Charging Room and open the Security Door to the south. Open the Footlocker in the corner for a Datapad with the Ignition Codes for the Orbital Shuttle.
10) Bay Control – Use the console in this room to unlock the hangar doors. Get your characters buffed up and then run out to take down the Tank Droid. Use the Disable Droid force power if you have it and Ion Grenades to help reduce its health. The Tank Droid will use Flame Throwers if you get too close. If things get really tricky head back to the Bay Control room to heal up.
Take the shuttle to the Polar Plateau. Unfortunately you’ll be spotted by a few HK droids.
Polar Plateau
Apart from the 3 HK droids that are waiting for you there’s not much here except for the entrance to the interior.
The HK droids will have floating mines in front of them and can be quite a challenge to take down. Use force powers and grenades to help you if you need them and focus on taking down one HK droid at a time.
Search the remains and then head into the Polar Plateau Interior.
Secret Academy
1) Turbolift Entrance – After speaking with Atris you’ll be left here with two Handmaiden Sisters. Ask them about everything but leave asking about fighting until you rescue your comrades.
2) Meditation Chamber – Can’t be accessed at this point in time but you’ll come back here before the end of the game.
3) Prison – Rescue your friends. Kreia and Atton will join you and Bau-Dur will head back to the ship. Freeing Kreia will help with the optional battle at #3 because she can heal you up between fights.
4) Challenges with Handmaiden Sisters – You’ll go through a series of 5 optional challenges with the Sisters. In the first challenge you are unarmed and can’t use force powers or any items. The second challenge you can use melee weapons, the third any items or powers you like. The fourth challenge you’ll face off against two Sisters at once and for the fifth challenge five sisters. You don’t gain anything except experience for these challenges.
5) T3-M4 – You can free little T3-M4 here. He’s had his memory download but also managed to get some information from the network here as well.
6) Ebon Hawk – When you are finished in the Secret Academy make your way to the Ebon Hawk to leave the planet.
Ebon Hawk
After the dialogues with various characters finishes you’ll be able to select a new location. There are 4 planets that you need to visit to find all of the Jedi Masters. I chose to go to Nar Shadaa next.
Next: Nar Shaddaa
Back: Knights of the Old Republic 2 Walkthrough