Nar Shaddaa
Refugee Landing Pad
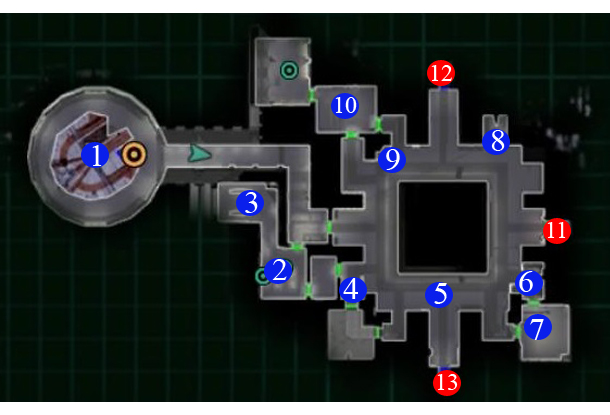
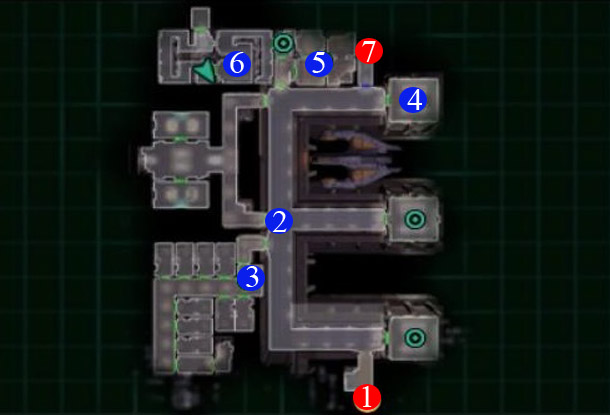
1) Landing Pad – You’ll touch down on one of the landing pads in the Refugee sector. Unfortunately this pad has been claimed. Once you step out Quello will demand payment. You can threaten him or pay him. Either way there will be trouble later on once the Red Eclipse gang arrive.
Head down the corridor to the east. As you turn around the corner you’ll bump into some Exchange thugs. You can take them out or let them taunt the guy for LS or DS points. There’s also a couple of refugees here who will ask for credits. If you help them Kreia will talk to you. Agree with her for more influence over her.
2) Workbench – There is a workbench here, but more importantly in a nearby container you’ll find the Airspeeder Navigation Interface. One of the items you need to repair a broken airspeeder belonging to the Serroco gang.
3) Tienn Tubb and TT-32 – You’ll first meet the droid TT-32 who asks you to help retrieve a droid that was sold to the droid parts merchant, Kodin at #9. If you do you’ll get a Renewable Droid Shield.
Tienn Tubb will help you later on once you have a Blank Transponder Card for the Ebon Hawk.
4) Ex Bounty Hunter, Vossk – Talk to Vossk and he’ll tell you about the different factions and some of the bounty hunters on Nar Shaddaa.
5) The Ebon Hawk Owner? – Yes, that’s right. A man by the name of Ratrin Vhek will claim to be the owner of the Ebon Hawk. He doesn’t have any actual proof of ownership except that he knows where the hidden compartments are located. Agree to hand over the Ebon Hawk for LS points or kill him for DS points. If you give him the ship or tell him to go away he’ll end up trying to steal the Ebon Hawk back anyway and he’ll get killed by the Red Eclipse gang.
6) Oondar the Bad Merchant – Oondar is in competition with Geeda on the other side of this area #8. They will ask you to get rid of the other merchant. You can tell either of them to leave, either Oondar or Geeda but you’ll no longer have access to their inventory.
7) Exchange Boss – A deal with an Exchange Boss has gone wrong. Once you enter the room they’ll turn on you. Killing them will give you notoriety with the Exchange.
8) Geeda the Good Merchant – Geeda will sell you some regular items for sale. If you come back to her later in the game she’ll have much better items for sale.
9) Kodin, Droid Parts Merchant – If you’ve been to see TT-32 at #3 then you’ll be able to buy the IT-31 droid for 500 credits which you may be able to Persuade down to 150 credits. Threaten Kodin for DS points and get the droid for free.
Once you’ve purchased IT-31 talk with it and send it back to TT-32. Follow the droid back and speak with TT-32 for your reward.
10) Swoop Racing – This room and the next room are the swoop racing area. Lupo has been cheating the swoop racers by using an unbeatable droid, C9-T9, to race against them.
Speak with Borna Lys and she’ll have a way to sabotage the droid, making the swoop racing fairer for everyone else. Persuade her for the Access Codes and then use Repair or Computer on the terminal next to the C9-T9 droid. You’ll be able to check it for oddities and sabotage it one way or another.
Talk to Lupo and convince him to sell the Swoop Racing to Borna. Head back to Borna and she’ll give you a reward. You can now take part in the Swoop Racing with a good chance of winning.
Once you’ve cleared this area head through one of the exits to one of the other three areas.
11) Exit to Entertainment Promenade
12) Exit to Docks
13) Exit to Refugee Quad
Entertainment Promenade
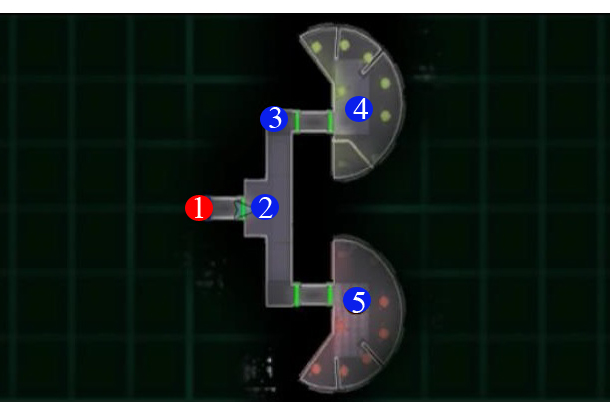
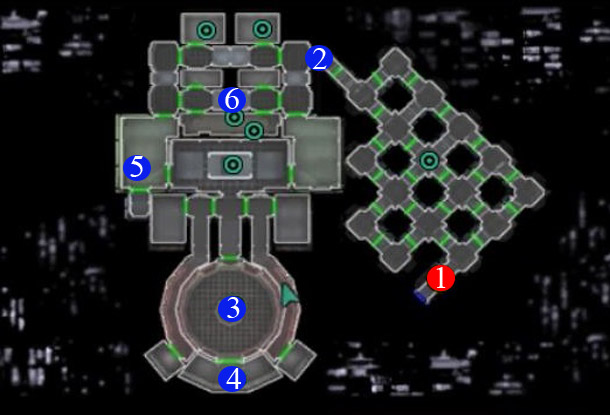
1) Exit to Refugee Landing Pad
2) Twik’gar and Kallah-Nah – As you enter the Entertainment Promenade there will be a couple of thugs on the left, Twik’gar and his friend. They’re asking about a Pazaak player called Geredi. You can convince Geredi to come out or just leave the thugs waiting. Geredi is one of three Pazaak players you need to beat in order to meet the Champion so this is one way to get rid of him if you don’t want to play him properly.
On the other side of the door is a little character called Kallah-Nar. If you speak with him after talking to the Pazaak Den guard you’ll be able to find out the password to enter the Pazaak Den. Secondly, you can find your current stading with the exchange. You need a certain amount of notoriety with the Exchange in order to be given a meeting with Visquis, the local Exchange boss. You can also pay Kallah-Nar 2,000 credits to improve your stading with the Exchange but if you do the other quests this shouldn’t be necessary.
3) Pazaak Den Door Guard – The guard won’t let you in unless you utter the password. Speak with Kallah-Nar at #2 to find out the password.
4) Pazaak Den – There are three Pazaak players in here that you need to beat in order to meet the Pazaak Champion. You will either need to win against them 3 times before they give up and admit you are better or use guile and tactics.
S4-C8 – This droid loves playing Pazaak. You can have a few games with it and try to beat it or convine the droid to let you take a look at its programming. Alter the programming so that it’s no longer addicted to Pazaak and you’ll have one less opponent to beat.
Dahnis – This pretty girl is just Atton’s type. If Atton is in your party she’ll let him win in order to flirt with him. That’s two down, one to go.
Geredi – If you’re sticking to the Light Side then you’ll have to beat him legitimately three times. Otherwise tell him his “friends” are waiting for him outside.
The Champion – Once all three players have been beaten or are no longer playing the Champion will arrive. If you really like playing Pazaak then try and beat him three times. Otherwise convince him that winning all the time isn’t fun. He’ll agree and give you one of the best Pazaak cards, the “Tiebreaker +/- 1”.
5) Bar – You’ll meet a few characters here including the bartender, some thugs and a dancing trainer. This is an optional area but you’ll need to come here if you want to get access to Vogga Hutt’s hoard (A quest given at the Docks).
Once you’ve been to the Docks and discovered how to get into Vogga’s hoard you can buy the Juma Juice from the bartender here. The Juice will put Vogga’s Kath Hounds to sleep.
Domo, the dancing trainer will complain about not having enough dancers. You can dance yourself, or the Handmaiden will dance as well if she is in your party. This is not necessary as the thugs in this room let you know how to speak with Vogga.
If you put your stealth field on and go near to Vogga’s thugs, in the southern partition, you’ll overhear them talking about how no-one can see Vogga unless they have something to say about Goto.
Refugee Quad
1) Exit to Refugee Landing Pad – As you step into this area you’ll be confronted by a couple of Exchange Thugs. You can intimidate them to let you through or kill them. Killing them will allow some of the Refugees in this area to escape once you find them later.
2) Geriel – This man is sick, showing symptoms of the plague but you can heal him if you have sufficient Treat Injury skill for Light Side points. Convincing him to kill himself will give you Dark Side points.
3) Refugee Center – this large area is where most of the Refugees hang out. The Exchange hold the area on the western side of the map and the Serroco gang own the eastern side of the map.
Hussef – Speak with Hussef to learn about the refugees and how they are hemmed in on either side by the Exchange and the Serroco gang. You can help them out by dealing with either or both of these groups. If you are going for DS points persuade Hussef that they are doomed and the Exchange boss, Saquesh, will give you a good reward.
Aaida – She is looking for her partner Lootra. If you have been to the docks you’ll know that he’s still alive. You’ll need to have killed the Exchange thugs guarding the exit to allow her to escape. If you have intimidated the thugs the only way to start a fight with them again is to kill their boss, Saquesh.
Naddaa – The Exchange has taken her daughter captive #4. For LS points try to help her out. Later you’ll be able to arrange for her to be freed. Once you’ve rescued Adara go back to Naddaa for LS points.
Kaul – If you give him 20 credits he’ll give you a tip to go into Stealth mode when looting containers so the guards won’t notice you.
Kahranna – She’s looking for a passage off this moon. You can pretend to by the pilot she’s looking for and collect the credits for DS points or tell her you’ll help find someone. You’ll find help for her at the Docks.
Odis – Is looking for work as a pilot but has no Freighter. You can speak with Fassa at the Docks to organize a Freighter for him or the Lunar Shadow Crewmen.
Twi’leks – These two will give you a mysterious message that Atton is not all he appears to be. You can try to talk to Atton about it but you’ll probably not get any information out of him until you have high influence over him.
4) Adana – This is the daughter of Naddaa. Kill the guards and tell her she to wait here. Later you can negotiate with Saquesh #5 and have her released. Go back to her and tell her she’s free to go. Follow her back to her mother, Naddaa, and speak to her for LS points.
5) Saquesh – The local Exchange representative. You can intimidate him and try to get him to release his grip on the refugees. This will result in a fight with him and all of his thugs. Once you kill him though you’ll receive LS points. You can negotiate with him to ease up on the refugees or if you follow the Dark Side agree to remove the refugees by convincing Hussef that they are all doomed.
6) Serroco Gang – This area belongs to the Serroco. To gain entrance into this area you’ll need to Persuade the guards posted at the entrances to let you in or begin a fight and kill them.
Speak with the Serroco gang leader and try to get him to ease up on the refugees. This won’t work and a fight will begin. It’s a fairly tough battle so get ready with your shields and force powers.
Once you’ve cleared the area you’ll be able to explore this section and pick up all the loot. There’s an Airspeeder here that is currently not operational. Once you find all the parts you’ll be able to fast travel between different locations on Nar Shaddaa.
The Airspeeder requires three items. The Maneuvering Flaps are found in a container in Pylon 3 at the Docks. The Airspeeder Navigation Interface is found in a container just outside of Tienn Tubb’s store at the Refugee Landing Pad. Lastly, the Cryogenic Power Cells are found at the Docks. Lassavou gives them to you as a reward. Speak to Fassa about releasing his debt. Perform the job that Fassa asks you to do and then ask him to release Lassavou’s debt. Go back to Lassavou and you’ll receive the Cryogenic Power Cells.
7) Serroco Storage Area – Lost of good loot here.
Docks
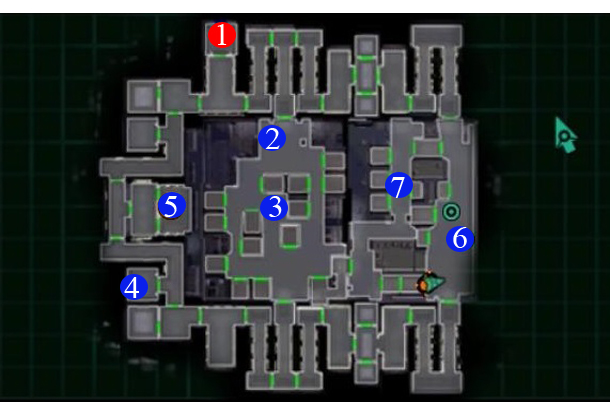
1) Exit to Refugee Landing Pad – After entering the Docks you’ll see a cutscene betwenn Vogga Hutt and Hanharr. Head towards Fassa (#2).
2) Fassa the Dock Manager – Fassa is quite an important character and will be able to help you solve two quests from the Refugee Quad as well as give you one himself.
Fassa’s Freighters – After speaking with Fassa he’ll put you to work identifying the freighters that are coming into the Docks. He wants you to organize the priority of the freighters. You can take the long path and divert the power to each Pylon while running to each one to see the ID of each freighter. The faster route is to fix the power to all Pylons. You can then go to any one of the consoles to see all IDs. Here’s the solution: Silver Zephyr, Alakandor and lastly, Toorna’s Profits. Return to Fassa for your reward.
Lassavou’s Debt – After speaking with Lassavou in one of the containers near to #3 and after completing the Fassa’s Freighters quest you can ask Fassa to let Lassavou’s debt go. Let Lassavou know and you’ll get another piece for the Airspeeder in the Refugee Quad.
Kahranna’s Transport – Speak with Kahranna in the Refugee Quad first and agree to help her find passage off Nar Shaddaa. Once you’ve been to Goto’s Yacht come back to Fassa and he’ll agree to let Kahranna find boarding on one of his freighters.
Odis’ Pilot Work – In the Refugee Quad you’ll also find Odis who is looking for work as a Freighter Pilot. Speak with Fassa about it once you have been to Goto’s Yacht to complete this quest.
3) Vogga’s Horde – There’s a number of people you’ll meet here and I haven’t marked exactly where you’ll find them in each container. Open each one and see who’s inside.
Aqualish Thugs – If you try to approach them they’ll tell you to get lost. Get into Stealth mode and walk close to them. You’ll find out how to break into Vogga’s hoard by dancing for Vogga and then using Juma Juice to sedate the Kath Hounds. Juma Juice can be purchased from the bartender in the Entertainment Promenade.
Lunar Shadow Crewman – These guys are looking for a new pilot. You can tell them about Odis in the Refugee Quad for Light Side points or find the pilot in the Jekk’Jekk Tarr area and convince him to return. You’ll need to use a character with a gas mask, not your main character, and go in there to find him.
Bith Scientist – The scientist wants you to return with an item from Pylon 3 and he gives you 500 credits to buy it. Heading over to the Pylon 3 (#4) you’ll find the seller is dead. Read the Datapad and then kill the “cleaning droid” that attacks you. Return to the Bith to find him missing. He’s left a Datapad behind and you get to keep the 500 credits.
Lassavou – Speak with Fassa (#2) to complete this quest for the Cryogenic Power Cell which is part of the Airspeeder. For Dark Side points tell him you’ve come to cellect the debt. You’ll get 200 credits by no Cryogenic Power Cell.
Lootra – He’s Aida’s husband who you spoke with in the Refugee Quad. To connect them together you’ll need to kill the Exchange Thugs guarding the entrance and then let Aida know the path is clear to go. If you threaten the thugs you won’t be able to attack them again unless you kill the Exchange boss first.
4) Pylon 3 – Head here for the Bith Scientists quest (#3). Search the container here for the Maneuvering Flaps, another piece of the Airspeeder.
5) Vogga the Hutt – You can get to see Vogga by either agreeing to dance with him by visiting the Entertainment Promenade or telling him that you want to talk about Goto. If you dance for him he’ll fall asleep. Put the Juma Juice in the water bowl to put the Kath Hounds to sleep. You’ll now get access to Vogga’s Horde through the door to the north for some pretty cool items including a Lightsaber.
You can also talk to Vogga about the Fuel situation on Telos and negotiate a deal for the Telosians after dealing with Goto on the Yacht. Once you have the deal set up you’ll need to talk to Lt. Grenn in the Entertainment 081 area of the Telos Station.
6) Vogga’s Storage – You’ll come here with the T3-M4 droid after visiting the Jekk’Jekk Tarr. We’ll come back to this in the walkthrough below.
7) Exit to the Jekk’Jekk Tarr – When you have been invited to visit the Jekk’Jekk Tarr Mira (or Hanharr if you are a Dark Side character) will intercept you and go in herself.
Jekk’Jekk Tarr
Mira will be the one who actually enters Jekk’Jekk Tarr regardless of whether she or Hanharr intercepted you. You’re goal is to meet with Visquis. You’ll need to pass through two green colored bars through the door to the right of where you enter. The yellow colored bar through the door to the left is where the Luna Shadow Captain is hiding out. You can convince him to go back to his crew or offer the job to Odis in the Refugee Quad. Mira is unprepared for this encounter and will be captured once she meets Visquis.
Your main character will now awaken. Bring him/her to the Jekk’Jekk Tarr to confront Visquis. You’ll learn Breath Control as you enter so you can breathe in a toxic environment. You’ll need to keep casting it as it runs out or you’ll be poisoned.
You’ll be attacked by a LOT of Gand so slice your way through them or use group effect force powers. Make your way to the room Visquis was in and speak with the attendant to find the exit which is in the northern part of the room.
Jekk’Jekk Tarr Tunnels
1) Entrance – When you first arrive here as your main character you’ll need to work your way through the tunnels to the sealed door at #2. You’re map won’t be working so an easy way to make it there is to hug the left wall, taking every turn to the left until you reach the sealed door.
2) Sealed Door
3) Mira vs Hanharr in the Battle Room – Once your main character reaches the sealed door you’ll take control of either Mira or Hanharr in a battle to the death. As Mira use ranged weapons and run away to keep your distance. Hanharr will run over the mines and make your job easier. As Hanharr just close the distance and swipe away. His expert melee skills will finish Mira quickly.
Once the battle is finished Visquis will release the Kath Hounds. Defeat them and then head to #4 for the Keycard.
4) Old Beast Tender Corpse – Search the corpse for the Keycard to get out of here. Open the door in the north and get ready to take on the Ubese Bounty Hunters.
5) Emergency Tunnel Control – You can explore the whole area with Mira or your main character. To get your main character back proceed to the console here to access all the available escape routes.
6) Workbench
With your main character head back to the battle arena where you’ll be captured by Goto and taken to his Yacht.
Back to the Ebon Hawk
After a cut-scene you’ll be back with T3-M4 in the Docks. Fight your way past the HK units and you’ll meet up with Mira and Atton. You’ll have a few challenging battles with Zhug Brothers and Gand to get back to the Ebon Hawk. It’s not that they’re tough but there are so many of them. Once you reach the Ebon Hawk you’ll fly off to rescue your main character in Goto’s Yacht.
Goto’s Yacht
You’ll enter Goto’s Yacht from the hatch in the north. You’ll have plenty of droids to fight here so make sure you have weapons suitable for taking down droids.
There are a number of consoles around the ship that will give you access to various functions. You’ll need to find the codes for each function before you have full access to that funcion. In order to make changes to a function you’ll also need the proper function, such as the Shut Down program or Overload program.
You have two main objectives here. The first is to free your main character by making it to the Audience Chamber. And the second is to get to the bridge, with access to Power Distribution and shut down the power so you can get back to the Ebon Hawk.
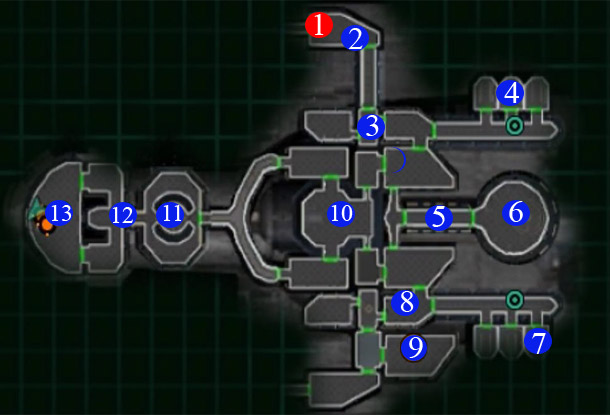
1) Hatch to Ebon Hawk – You won’t be able to return to the Ebon Hawk until you’ve shut down the Power Distribution from the Bridge.
2) Console & Utility Droid – Make sure you have someone with the computer skill and slice into the console. From here you can download the “overload” program. If you don’t you’ll need to kill the Goto Guard Droids and listen to their last transmission. It’s binary code. Select the correct count to get the program. Here are the answers.
zero zero zero = 0
zero zero one = 1
zero one zero = 2
zero one one = 3
one zero zero = 4
one zero one = 5
one one zero = 6
one one one = 7
Either that or slice the control to get the program which is much easier. The Utility Droid next to the console will have the “shut down” program.
3) Goto Starboard Commander – Kill the droid and search it for the access code to the Containment Cells. Use the console here to upload the two programs you’ve received “overload” and “shut down”. Unlock the containment cells and run the “shut down” program on it to remove the shields. You’ll now have access to these cells.
4) Damaged Droid – This little droid isn’t going anywhere. Search it for the Turret Defense access code. Use a console and unlock the Turret Defense System. Once again run the “shut down” program on the Turret Defense System.
5) Turrets – Hopefully you’ve shut these Turrets down but if not you can use some shields on all of your characters and take the down. There are droids here as well just to make things more difficult.
6) Main Character & Power Distribution Access Code – Head to this room to rescue your main character. Make sure you use the console here as it’s the only place where you can acquire the Power Distribution access code. Use a console to unlock the Power Distribution but you can only shut it down from the Bridge.
7) Damaged Droid – This little droid will have the “reset” program.
8) Lab Station
9) Workbench
10) Defense Turrets – This room is lined with Defense Turrets but they’re not too difficult to take down with the flurry. On the way back from the bridge this is also where you’ll run into the Twin Suns bounty hunters.
Continue towards the east and you’ll come across some mines and a Goto Central Commander. Kill the droid and search the remains to find the Minefield access code.
11) Command Console – Use the console here to unlock the Minefield system. Either use the “overload” or “shut down” program. If they’re in overload they will still work but will explode when the droids at #12 run over them.
12) Mines and Droids – There is a corridor of mines with droids beyond them. Either shoot at the droids in solo mode and let them run over the mines towards you. Once the droids are dealt with you’ll be able to disable the mines and get to the bridge.
13) Bridge – Check the cylinder on the right as you enter for some nice items and the Droid Controller access code. It’s a bit late now that all the droids are dead!
Use the Central Command Console and and run the “shut down” program on the Power Distribution system. You get the access code for it at #6. You’ll now be able to open the hatch to get back to the Ebon Hawk.
On the way back you’ll come across thugs and bounty hunters. Most notably the Twin Suns who will attack you at #10. Continue back to the Ebon Hawk and you’ll return to the Nar Shaddaa Docks to meet Zez-Kai Ell.
Docks
After taking out the Hk-50 droids speak with Fassa and complete any missions you need to complete. Such as find a job for the pilot from the Refugee Quad. Head up to the north and speak with Vogga the Hutt. He’ll give you 500 credits to go back to the Telos Station and organise a deal with Lt. Dol Grenn at the TSF office in the Entertainment 081 area.
Fly back to the Telos Station now to complete the deal or continue to the next planet. I choose Onderon but you’ll end up having to escape to the Onderon moon, Dxun when you get there.
Next: Dxun
Back: Knights of the Old Republic 2 Walkthrough