Level 3 – Choose Your Fate
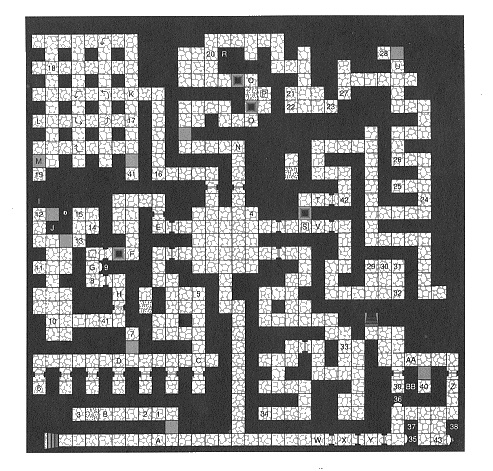 Level 3 is an interesting level. After beginning in the bottom left of the map you’ll find a chamber with six doors. Each of them leads through a series of challenges to a gold key. Collect at least four gold keys to continue to the next level. You’ll need Cure Poison Potions to protect against the Rock Creatures.
Treasure/Items
- Beserker Helm, Leather Pants, Suede Boots and Leather Jerkin
- Arrows and Cheese
- Compass
- Chest with food, 2 gold coins and 2 scrolls
- Drumstick
- Chest with the Mirror of Dawn
- Apple, Drumstick, Leather Jerkin and Gold Key
- Bread
- Silver Coin
- Arow
- Wand of Calming
- Chest with Coins and a Blue Magic Box
- Gold Key
- Apple, 2 Cheese and Corn
- Leather Pants
- Bread
- Arrow
- Cheese
- Gold Key, Fine Robe and Saber
- Arrow
- Elven Huke
- Helmet
- Gold Key
- Sling
- Food
- Food
- Rabbits Foot
- Drumstick, Blue Gem
- Gold Key
- Beserker Helm
- Food
- Food
- Arrow
- Gold Key
- RA Key
- Flask and Scroll
- Torch
- Torch
- Flask and Mail Asketon
- Drumsticks and Sword
- Food
- Food
- Food
Level 3 Walkthrough
You certainly won’t go hungry on this level and I found myself eating food just to clear inventory space. It also helps that I tend not to sleep and just use Stamina potions instead. You may also want to leave the torches behind and just cast the Light spell instead.
Head down the stairs to level 3 and push the secret button on the wall to the left. This will open a passageway leading to items 1, 2 and 3. Time the teleporter at the end to pick up the Compass when the teleporter turns off.
Choose Your Door Choose Your Fate
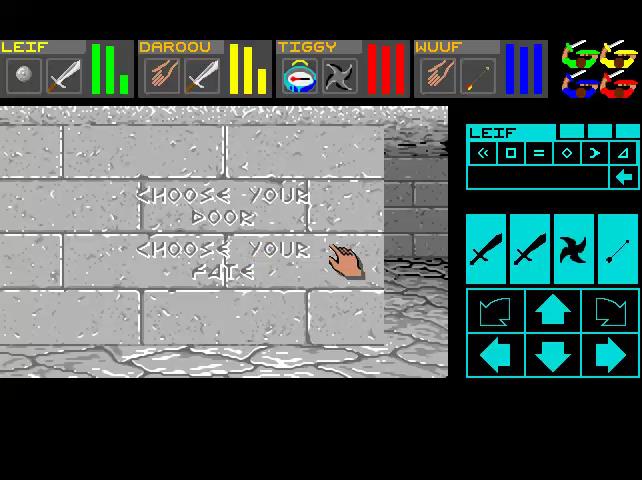 Continue down to the next left and enter the Choose Your Fate chamber. There are six doors here to choose from and each of them hides a Gold Key somewhere within its passages.
Room of the Gem
Up ahead is a pressure plate with a wooden door beyond it. You’ll need to find the Blue Gem to open this door. Place an item on the pressure plate to close the pit to the right.
There’s a few Rock Creatures in this area that you’ll need to deal with. Apparently the Poison Cloud spell works quite well but it’s hard to tell. Continue chopping at them until they’re dead.
Press the secret button at U on the map to open up the wall next to you hiding the Blue Gem. Take the Blue Gem back to the door at the wooden door at the start. Head through to find the Gold Key and other items.
Creature Cavern
A fairly straightforward section where you have to battle through the monsters to reach the Gold Key. This area is filled mostly with Mummies and Trolins which shouldn’t be too difficult to deal with.
Chambers of the Guardian
After defeating the Trolin and Rock Creature you’ll find a series of cells with buttons next to them. One of the cells has a Chest in it. Push the button to the left of whatever cell the Chest is in to move its location. Continue doing this until the Chest with the Gold Key in it appears outside of the cells.
The Matrix
It’s helpful to cast Magic Footprints here and have the Compass in one of your hands because you will be spun around at certain points in this maze. Have a look at the map above to find your way. Press the secret button at spot L which opens M with the Gold Key behind it.
Time is of the Essence
A series of puzzles that involves speed. Make sure your characters aren’t overloaded with equipment or low on stamina. Both will make you move more slowly.
The Vault
You will need two Gold Coins to get into the Vault. Mummies and Trolins will guard the way. At the Cast Your Influence Cast Your Might puzzle you’ll need to cast the Open Door spell and then throw something through the open door to close the pit.
Pick up the Silver Key in the alcove and replace it with an item to open the door. You’ll need the Silver Coin to open a door further along. The Rock Creatures here can be a little frustrating. Have a Cure Poison Potion on hand in case you need it.
Once you have the Gold Keys head out to the locked doors. There are four in total that you need to unlock and a fifth one with the Mail Asketon behind it.
Once you’re through this level continue down to Level 4 – Meet Your Doom.