Level 3 (Maintenance)
Return to System Shock
Level 3 (Maintenance)
You’ve probably explored some of the Maintenance level before going to the Executive level or the Flight Deck. The outer maintenance corridors will be blocked off until you pull the Jettison Enable switches in the 3 Groves. The Groves can be reached by using the tram lines in the Executive level.
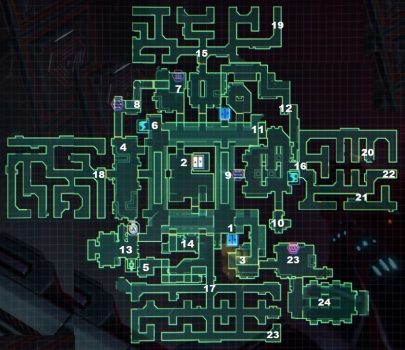
The elevator to the Research Labs and Reactor Level can be found at (1). The first time you get here you’ll want to take the Maintenance Elevator (2) up to Level 4 (Storage). From there you can continue to the Flight Deck, Executive Level and the Groves.
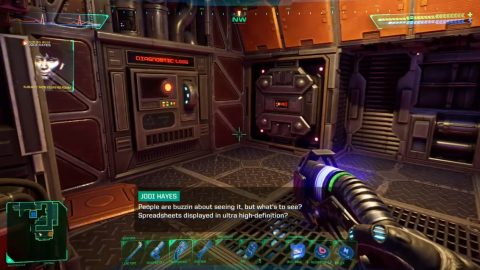
The Repair Bay (3) is to the east. You’ll find Audio Log (Jodi Hayes) as well as the Diagnostic Logs. Once you return from Executive you’ll be able to perform the diagnostic and the side maintenance corridors will be opened.
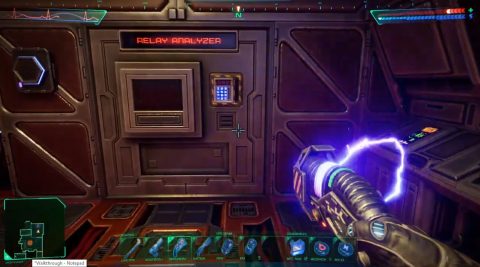
When you perform the diagnostic you’ll get a Diagnostic Report. Play it to hear that there’s a malfunction in relay 428. You’ll need to go to the Relay Analyzer at (7) and type in that number. At this point the four Maintenance Corridors will be unlocked.
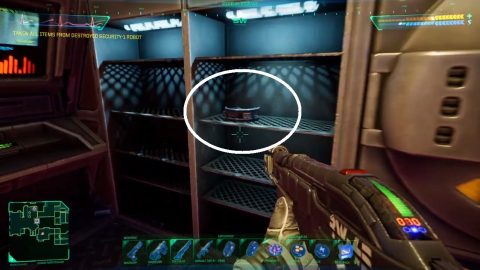
Keep exploring the rest of the level and you’ll find just by the elevator and up a ladder an Audio Log (Jared Fortier) and a Target Identifier v1.

In the corridor just to the west of the elevator go down a ladder in a pit and immediately up another ladder. Follow the corridor around to (5) where you’ll find a Laser Rapier and Audio Log on a shelf.
The Maintenance Lift (2) can be found in the center of the level. There’s also a Recycle Station here and various sized boxes where you can store items. I use this as a place to store unused items that I might want to come back for later.
Near to the Charging Station (6) you’ll find Audio Log (Jared Fortier). Be careful using this charging station as the dangling wires will damage you each time you use it.
Through the crawlway and into the next room (8) you’ll find a Magnum 2100 on the floor. Just to the west is a Junction Box. Solve the puzzle to open the door to the south leading to room (4) where you’ll find Abe Ghiran’s Head. In room (4) you’ll also find two Audio Logs (Abe Ghiran).
There’s a Junction Box at #9 which opens the door to the Beta Quadrant. Inside you’ll find a Charging Station, the entrance to Beta Maintenance and a grav lift going up. Take the lift up to find the Interface Demodulators (1)10. You’ll need one when you find the damaged relay.
There’s also the Navigation and Mapping Unit v2 as well as various other bits of ammo and loot.
At (11) you’ll find a Sensaround v2 to detect nearby enemies. Explore the passageways to the northeast for Audio Log (Jason Harvey) (12).
Towards the southwest you’ll find the med suite (13), with Transderm Dispenser, Restoration Bay and Cargo Lift.
Take the ladder up to the small room at (14) to find Audio Log (Dana Hunter) as well as a few Batteries.
The door to the office at (3) won’t open until you have less than 45% security on the level. You can’t do this until you’ve opened the maintenance corridors. Once you open the door you’ll need to get past the Retinal Scanner. To do this grab Ghiran’s Head from the floor near the entrance to Delta Maintenance at (4). Then activate the retinal scanner.
Inside you’ll find two Audio Logs (SHODAN) and the Cyberspace Terminal (23). Jack into cyberspace and destroy the connection to unlock the Maintenance CPU Room.
The CPU Room (24) is to the south but the CPU Nodes will be behind a barrier.

Pull the Switch, take out the turrets that lower down from the roof and destroy the nodes. Check the monitor for a number that forms part of the self destruct code that you’ll use later.
Maintenance Corridors
The Alpha (15), Beta (16), Gamma (17) and Delta (18) maintenance corridors can be found around the outskirts of the level. The doors will be locked until you perform the Diagnostic.
In Alpha you’ll find the malfunctioning relay at (19) as well as the Mark III Assault Rifle. The location of the malfunctioning relay may actually be random as I’ve heard it’s been found in different locations.
In Beta you’ll find an Audio Log (20), SK-27 Shotgun (21) and a possible location of the malfunctioning relay (22). Gamma has the Mag Pulse Rifle (23).
Grab an Interface Demodulator from the room at (10) and replace the malfunctioning demodulater at (19). Then head to Executive to jettison Beta Grove.
Level 6 (Executive)

Return to the Executive level and head to Diego’s Hideout. Pull the Master Jettison Enable switch in the room to the west of (26). Then make your way to the Beta Grove control room to the west of (19). Pull the Jettison Switch and look out the window to see the Grove being jettisoned.

That’s all for this level so now you can go back to Diego’s hideout and take the elevator up to Engineering.
Next: Level 7 (Systems Engineering)
Back: Delta Grove or Executive