Level 8 (Security)
Return to System Shock
Level 8 (Security)

After attempting to escape the door (1) to the main part of Security will be open. When you head out to the central chamber you’ll see a large tower. This level is more vertical than horizontal.

Take out the Drones flying around and Assassins on the ledges above. There’s also a few Mutated Cyborgs in the side passageways. You’ll find the Cargo Lift and First Aid Kit in a side passage (2).
There’s a Mark III Assault Rifle in the northwest corner of the main room (3). In the center you’ll find a Charging Station and Audio Log (Lonni Stevens) (4) on one side, and after taking out the enemies you’ll some EMP Grenades in a closet (5) around the other side. On the eastern side you’ll find an ammo closet (6) with Ammo Dispensers.
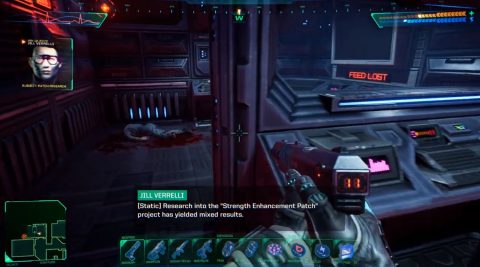
Take the grav lift (7) up on the north side and clear out the enemies. In the office (8) you’ll find Energy/Projectile Shield v3 and a Mag Pulse Rifle. In the camera room (9) to the north you’ll find Audio Log (Jill Verrelli) on a counter and the Group-B Access Card on the corpse.
The access card will get you into a little closet (10) where you’ll find Proximity Mines and a Battery.
To start making your way up the tower you can jump from the ramp (11a) in the northeast corner to the ledge (11b) on the side of the tower. From here you can jump across to the higher room at (12) or the bridge.
Take the grav lift up to the entrance to the detention bay (13). You can’t get inside yet but you are a little higher.
Look out towards the tower at (13) and jump up to the little ledge, then the bridge above. From here you can jump over to the bridge connecting the center tower on the south side.
From here jump to the open windows on the south side, clear out the enemies and enter the CPU Node room (14).
Pulling the switch lowers the force field but also triggers turrets. Hit the switch, take out the turrets, then destroy the CPU Nodes. This will lower the security considerably.
The room to the west (15) has a Skorpion and Mod-Kit Station. This mod kit has a reload speed upgrade for the railgun.
The southern room (16) has Audio Log (SHODAN) and a cyber terminal. Inside one of the drawers you’ll find Audio Log (Bianca Schuler) and Audio Log (SHODAN).
Once you destroy the connection in cyberspace you’ll unlock the detention cells back at (13). Look out towards the tower and you’ll be able to float down to the entrance to the western corridor at (17).
Make your way through the lunch room to the office (18) where you’ll find a Crystal Skull on a side table and the Security Access Card and Audio Log (Jaco Van Dyk) in a suitcase.
Take the grav lift down to Monitoring (19) and press the button in the little alcove to the west to reveal the Charging Station. From here there are doors leading to Experimental and Surveillance.
Inside Experimental (20) you’ll find a Railgun and the LG-XX Plasma Rifle behind a force field. Press the force field button on the counter by the wall and grab it.
Inside Surveillance (21) you’ll find Audio Log (CY-014). That’s it for this area so activate the boots and drop down to the ground in the central area.
To get back to the detention cells you can take the grav lift up on the south side (22). Use the security access card to get through the door and take out the Security-2 Bot on the other side. You’ll notice a few Security Bots in alcoves around the sides.

If you use the Charging Station, shoot them or perhaps just wait too long they’ll wake up. In the bottom corner you’ll find the Charging Station and an Accelerator Railgun.
Take the grav lift up in the northeast corner of the room and you’ll be back at the entrance to the detention area (13). This time the doors will be open.
Pull the switch outside the cells to open each cell. Inside you’ll find enemies, ammo or other items. The first cell to the north (24) has a hatch leading out to the northeast corner of the map.
Now that you have Security Access you’ll be able to unlock the door to room (25). Watch out for the turrets that drop down from the roof. A corridor around the edge of this room houses the security staff. Inside the various rooms you can find 4 Audio Logs and other items.
Once you’ve finished exploring this room go through the security door by the charging station. On the ground you’ll find the Mark III Assault Rife (26).
Go up the ramp and press the button in the live feed room (27). This extends the bridge on the upper level of the western side of the tower.
Open the security door on the south side of this room and take the grav lift down to the ground. On the southern side of the ground floor take the lift up (28) and jump down to the bridge.

Enter the center of the tower but make sure you turn on Environmental Protection. Climb up the long ladder and you’ll get a message that separation is imminent.
Run across the bridge to the north and open the door to the Diego boss fight (29).

This is a tough boss fight and Diego may blow up any cover you try to hide behind. Use any Reflex Patches and First Aid Kits you need. I threw Proximity Mines at him to weaken him first.
Once Diego is defeated loot the body for the Personal-5 Access Card. Then use it to unlock the door to the elevator. Take it up to the Bridge and watch the rest of the station get destroyed.
Next: Level 9 (Bridge)
Back: Return to Level R (Reactor)