Dakota System
Back to Wing Commander Walkthrough
Dakota 1
 The Dakota System is on the winning path and you’ll be given a Raptor to fly with Knight now as your wingman. In the first mission you’ll need to escort a Drayman, acting as a hospital ship to the jump point and then escort another Drayman with cargo back to the Tiger’s Claw.
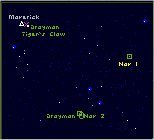
Briefing: You will proceed first to Nav 1, escorting an outbound hospital ship. Your objective is to protect her from the Kilrathi until she makes her jump out. Once she’s gone, go to Nav 2, where you’ll rendezvous with another ‘sport. Bring this Drayman back to the Tiger’s Claw in one piece… she’s the one carrying the vaccine for Fargo.
Tiger’s Claw to Nav 1 – On the way to Nav 1 the Drayman will be attacked by 5 Salthi! They’ll take out the Drayman pretty quickly unless you can distract the Kilrathi with missiles. Order Knight to break and attack then attack the other Salthi with missiles and gun fire.
Nav 1 – Once you get to Nav 1 you’ll be attacked by another 3 Krant.
Nav 2 – While waiting for the second Drayman to jump in you’ll be attacked by 3 Jalthi. Try to kill at least one of them before the Drayman jumps in to give it a fighting chance.
Dakota 2
 It’s time to do a patrol to find out where the enemy forces are located.
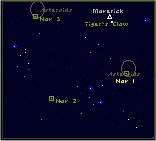
Briefing: As you can see, there’s not much to go on. There’s some debris near Nav 1. Could be rocks, could be mines…stay alert. The jumppoint at Nav 2 seems to be clear as does Nav 3. Make the rounds and return with your report.
Nav 1 – There’s an asteroid field at Nav 1 along with 2 Gratha.
Nav 2 – At Nave 2 you’ll be ambushed by 5, yes 5, Krant with 1 Ralari capship.
Nav 3 – Nothing but an asteroid field here which you can mostly avoid.
Dakota 3
 There’s a Kilrathi convey passing by not to far from the Tiger’s Claw. Engage the fleet and destroy them.
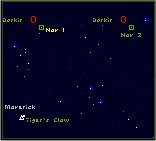
Briefing: You’ll first intercept a Dorkir-class tanker at the jumppoint near Nav 1. Blow her to bits and proceed to Nav 2. At that point, you should sight at least one Kilrathi troop transport. Those transports are your main objective … and probably the best defended. You are to engage and destroy all Kilrathi transports. No survivors.
Nav 1 – The first part of the convoy has 5 Krant and 1 Dorkir tanker.
Nav 2 – For the first wave you’ll engage 2 Jalthi escorts with a Dorkir transport. The second wave will be the same, 2 Jalthi escorting a Dorkir transport.
Success: Kurasawa System
Failure: Rostov System