Kurasawa System
Back to Wing Commander Walkthrough
Kurasawa 1
 In the Kurasawa System you’ll be flying a Rapier alongside Bossman. For the first mission you’ll need to check out two nearby nav points.
Briefing: We’ve detected several Kilrathi fighters circling two nearby jump points. One Dorkir-class transport has already jumped in here, at Nav 1a. You’ll intercept and destroy it, then move on to Nav 2 where another squadron of Kilrathi fighters awaits an incoming ‘sport. When you’ve taken care of any ‘sports that appear at Nav 2 return to the Tiger’s Claw via Nav 1b, in case there are any late arrivals.
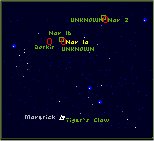
Nav 1a – Head to the nav point and take out the 5 Dralthi and the Dorkir.
Nav 2 – The Dorkir at this nav point is protected by 3 Krant. Mop them up and head back to Nav 1b.
Nav 1b – An easier fight with just 2 Jalthi and a Dorkir to contend with.
Kurasawa 2
 A Ralari jumps into the system near the Tiger’s Claw. Your job is to meet it at the rendezvous point and escort it back. This is an almost impossible mission to complete. If you somehow manage to pull it off you’ll head straight to Venice for the final confrontation with the Kilrathi. If not you’ll have to go through Rostov.
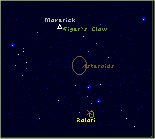
Briefing: The Ralari entered the system at the jumppoint near Nav 1. There’s an asteroid belt along the way. Keep your eyes peeled for trouble. Once you’ve arrived at the rendezvous point, you’ll escort the destroyer back here.
Asteroid Field – There are 4 Salthi hiding in the asteroid field. Save your missiles for the next fight.
Nav 1 – There are 4 Gratha here and will make short work of the Ralari unless you can take them out quickly. Target the Gratha closest to the Ralari and taunt the ones you can’t immediately target. You’ll have about 20 seconds to kill 2 of the Gratha.
Kurasawa 3
 The TCS Formidable has just jumped into the system. Rendezvous with it and bring it back to the Tiger’s Claw. Another tough mission but luckily Bossman is quite a capable fighter pilot.
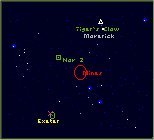
Briefing: You are to proceed directly to the Formidable, which jumped in at Nav 1. The destroyer has reported a minefield between Nav 1 and the Claw. Once you’ve arrived at the rendezvous point, you’ll escort the destroyer back here. You should return via Nav 2, and avoid the minefield entirely.
Nav 1 – On the way to the TCS you’ll pass through a mine field. Feel free to just fly around it.
Nav 2 – You’ll be attacked by 4 Krant on the way back. Speed up and try to get behind them for some easy kills.
Success: Venice System
Failure: Rostov System