Gateway System
Back to Wing Commander Walkthrough
Gateway 1
 If you somehow manage to lose the missions in the Enyo System you’ll be taken to the Gateway System and you’ll be on the back foot right from the beginning. Your flying a Hornet with Paladin as your wingman.
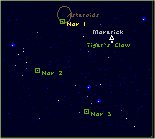
Briefing – You’ll follow a simple three-point route, gentlemen. Just fly to the Nav Points, and make sure they’re clear. We’re picking up some debris around Nav Point 1. Probably just asteroids, but it could be a Kilrathi mine field so be especially careful in that area.
Nav 1 – There’s an asteriod field here that you can largely avoid if you approach the nav point from the southern side.
Nav 2 – There are 4 Salthi at Nav 2. Use your heatseeker missile to take one out and then go for the other 3 as quickly as you can.
Nav 3 – At Nav 3 you’ll enounter 2 Gratha. These are heavy fighters that will tear your little Hornet to pieces. Stay clear of a direct confrontation and use your manoeuvrability to get behind or to the side of them. Once clear head back to the Tiger’s Claw.
Gateway 2
 You’ll be forced to defend the Tiger’s Claw as waves of Kilrathi attack. You’ll be flying in the Hornet with Paladin still as your wingman.
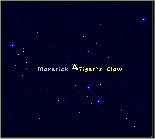
Briefing – We’ve got a Code Red alert, people. At least half a dozen Kilrathi fighters, coming in fast. With Blue Devil and Star Slayer squadrons out on patrol you Killer Bees will have to stop them yourselves. We’ve got two Hornets in space already and we’ll scramble the remaining wings at double-time. You and Paladin will be first out the launch tube.
Wave 1 – 4 Dralthi
Wave 2 – 4 Dralthi
Don’t let them get too many clear shots on the Tiger’s Claw otherwise there’s no coming back.
Gateway 3
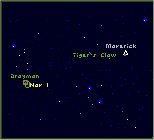 Briefing – You’ll meet a Drayman-class transport here, at Nav 1. As soon as it arrives, the ‘sport will head for the Tiger’s Claw. It’ll be moving at top speed, and won’t deviate from its shortest course so you’ll have to protect it from any attackers. Stay with her … don’t let enemy fighters draw you away from the tanker.
Nav 1 – You’ll meet 2 heavy fighters, the Gratha, at Nav 1 as you wait for the Drayman to jump into the sector.
Tiger’s Claw – On the way back to the Tiger’s Claw you’ll be attacked by 4 Salthi. One of the Salthi will be piloted by Bhurak Starkiller, a hot shot Kilrathi. Try to take him out first. Don’t chase him if he runs away, just focus on the other three.
Success: Brimstone System
Failure: Cheng-Du System