Shrines – Death’s Door
Back to Death’s Door
There are 16 Shrines in total in Death’s Door, 8 Magic Shrines and 8 Vitality Shrines. You’ll need to find 4 Shrines of each type before you can upgrade your vitality or magic by one point.
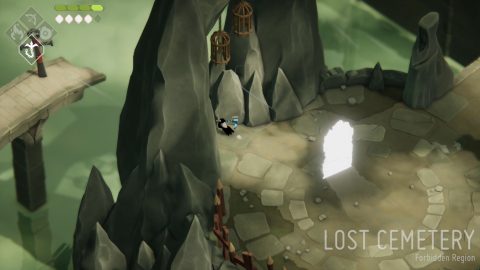
Lost Cemetery
Vitality Shrine #1
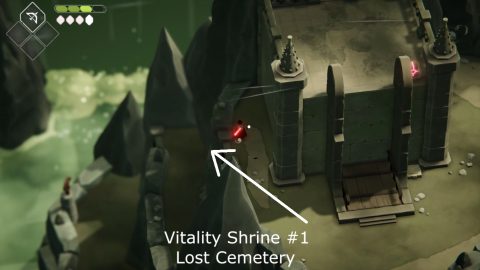
After riding the lift down walk behind the building and the camera will pan around. Climb down the ladders and enter the cave to find the first shrine.
Estate of the Urn Witch
Magic Shrine #1
In the northwestern section of the Estate go through the bush in the middle of the hedges. Walk through the bushes to the north until you find the shrine.
Ceramic Manor
Magic Shrine #2
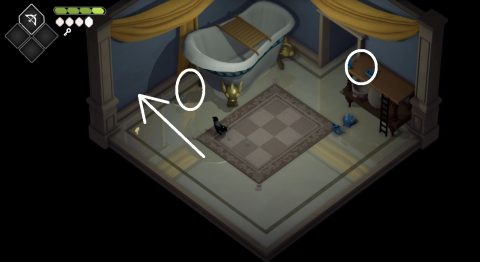
Look at the reflections on the ground in the bathroom. You’ll see some ceramic jars that aren’t there in the room. Hit the invisible jars to open the door, then go through to the shrine.
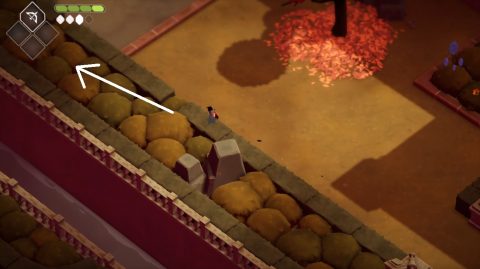
Overgrown Ruins
Magic Shrine #3
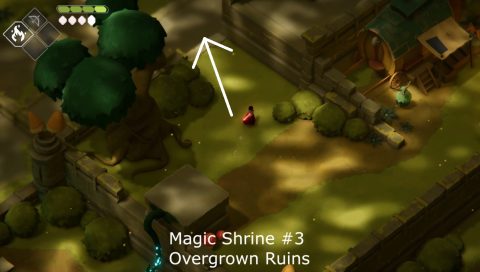
Drop over the edge just before the forest village. The camera will pan around. Walk to the north to find the shrine.
Vitality Shrine #2
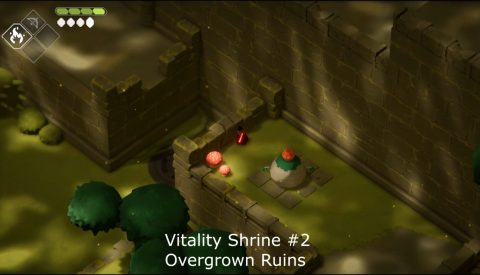
To the north of the ruins break the low wall and stomp down into the pipe entrance below. Follow the pipe and you’ll come out on a ledge to the east. Enter the cave to find the shrine.
Lost Cemetery
Magic Shrine #4
Before entering the caves leading to the Stranded Sailor drop down the ladder. Follow the path, break the wall and enter the cave where you’ll fight a Giant Knight. Defeat the knight, take the exit to the west and climb up the ladders to the shrine.
The Stranded Sailor
Magic Shrine #5
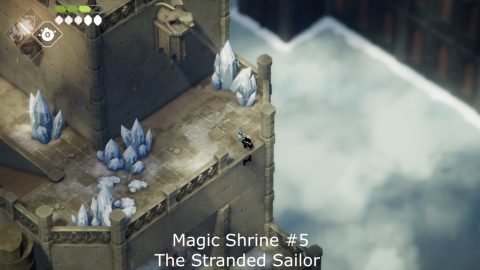
Head up the stairs and go around the back of the building so the camera pans around. Drop off the edge by the gargoyle. Drop down again and stomp into the pipe entrance. Follow it around and you’ll emerge by the shrine.
Lost Cemetery
Vitality Shrine #3
Once you have the hookshot spell go back to the Reaper Door in the Lost Cemetery and hook over to the walkway to the north. Follow the broken bridge along and drop down to the shrine.
Estate of the Urn Witch
Vitality Shrine #4

Light all the fires in the area to the east of the Estate and a bridge will lift up to a small island. Go across it and down the ladder to the shrine.
Furnace Observation Rooms
Vitality Shrine #5

When you get to the platform with the bull lifts going off in four directions ride the bull lift to the northeast. Climb the ladder to the north and then head west along the pipes. You’ll find the shrine on the other side.
Overgrown Ruins
Magic Shrine #6
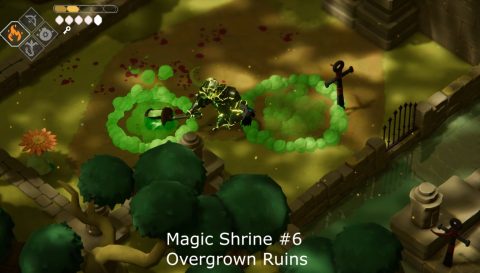
From the gondola at the entrance go west and hookshot across the water. Shoot the button and continue west to face waves of enemies ending in a Poison Knight. Defeat him, head up the vine and then up the stairs to the north to find the shrine.
Mushroom Dungeon
Vitality Shrine #6
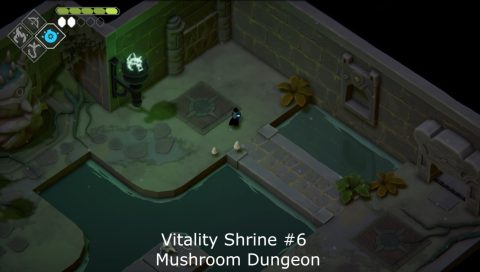
In the room where you have the battle with the knights throwing grenades blow up the breakable wall in the corner. Light the three fires in the next room to open the gate. Go through to the shrine.
Flooded Fortress
Magic Shrine #7
Near the start of the flooded fortress take the walkway to the north and shoot an arrow through the arch so it hits the button in the distance. New tiles will appear in the water. Follow them to the north to the shrine.
The Stranded Sailor
Vitality Shrine #7
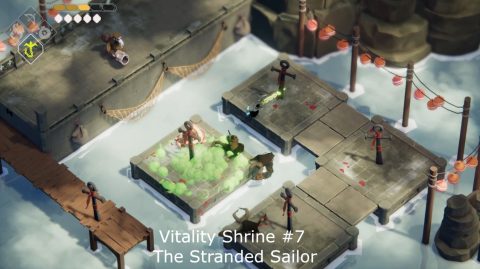
At the western docks hookshot across to the north and defeat all the enemies. Once the coast is clear climb up the ladders to the shrine.
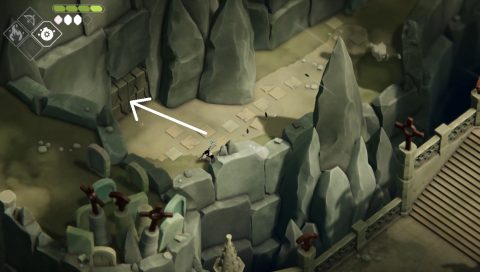
Castle Lockstone
Magic Shrine #8
After lighting the brazier in the statue room to the west take the exit to the south. Hookshot into the little alcove and pull the hidden lever. This opens the gate to the west. Head outside to find the shrine.
Vitality Shrine #8
In the caves take the path to the west and hookshot across the gaps.
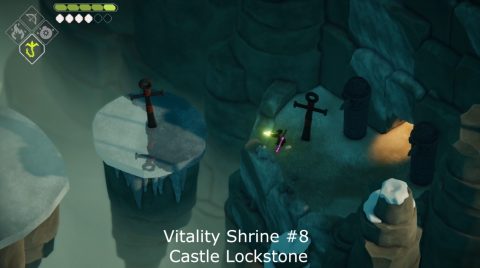
Make your way across the slippery ice, shooting the buttons and running onto the pillars when they lower. If you’re quick enough you’ll eventually find the final shrine.

Next: All Stone Fragments
Back: All Shiny Things