
Level 1: Into the Dark
This level is more of a tutorial, showing you the types of puzzles and encounters you’ll face further down in the dungeon. There’s a few enemies here but nothing to worry about. Mostly Giant Snails and a few Herders. There is one Skeleton Warrior at the end of the level. Secrets are in green.
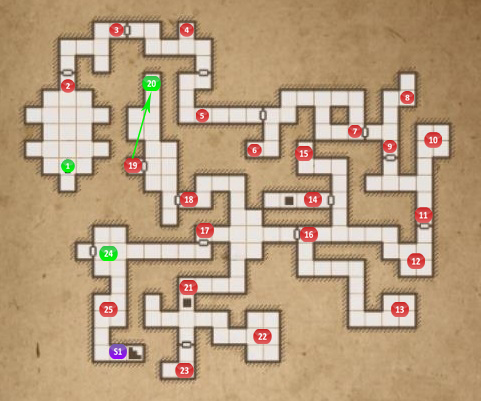
1. After being cast into the dungeon the first secret is right next to you. Turn around and press the stone button on the wall to the left. This opens up a wall where you’ll find a Shuriken and Lurker Boots.
2. Pick up the Torch from the wall. You can place it in one of your characters hands to shed a light around. You’ll find plenty of torches throughout the levels. When you take the Torch the gate opens.
3. Pull the Chain to open the next Gate.
4. Inside this alcove you’ll find 2 items of clothing, the Peasant’s Tunic and the Peasant’s Breeches. A little further down the corridor you’ll find a Cudgel in the niche.
5. There’s a locked gate in front of you. I guess you’re trapped in this dungeon forever. Just kidding. Place any item on the pressure plate to open the gate. You’ll be using Rocks as a weapon so keep the nearby Rock and instead place a Torch on the pressure plate.
6. In the niche you’ll find a Brass Key.
7. Use the Brass Key on the lock to open the Door. Around the corner of the next corridor you’ll find a Rock on the floor.
8. Click on the runes on the wall to read them. “Loose Rock”. One of the stones on the wall looks odd. Press it to open up a wall. Inside you’ll find an Iron Key for the next gate.
9. Use the Iron Key to open this Gate.
10. Your first enemy is here, a Giant Snail. It’s slow enough not to cause your party any problems. Once it’s killed it’ll drop some tasty food. Inside you’ll find Leather Pants a Knife and Leather Boots.
11. Pull the Lever to open the Gate.
12. Inside the niche you’ll find a Throwing Knife, a good weapon for a Rogue.
13. Kill the Giant Snail and ignore the Door at 16 for now. You will need and Iron Key to open it. Instead head down to the south. Inside the room at 13 you’ll find a Baked Maggot, Loincloth, Sandals and a Rock.
14. Open the Gate and then read the runes on the wall. “To close the pit something needs to fly”. Throw something over the pit to land on the pressure plate on the other side. This will close the trapdoor so you can get across. In the niche is an Iron Key. If you fall down the pit you can take a portal back up to this level.
15. At the end of this passage you’ll find Pitroot Bread and a Rock.
16. Use the Iron Key to open the door.
17. Straight ahead you’ll see a Daemon statue on the wall. The writing next to it reads “Heal my sight”. You’ll need to find 2 jewels to place into its eyes to open the door. You can find them at 19 and 23.
18. Inside this room are 4 Herders. Try to lure them out one at a time to avoid getting trapped. Once they’ve been killed search the room for 2 Grim Caps, a Tar Bead and a Rock.
19. Pull the Lever in the north of the room to open the Gate at 19. Inside you’ll find the first Blue Gem. The wall to the right has a Button that opens the secret at 20.
20. Press the Button in the cell to open a wall to this secret. It contains 2 Cave Nettles, a Tar Bead and a Dagger.
21. Pull the Lever in the corridor to close the trapdoor. There’s a Giant Snail wandering around and two more locked in the cell at 23.
22. In this room you’ll find a Loincloth, Tattered Cloak, Rock and the Mages first spell, a Scroll of Fireburst.
23. Stand on the Pressure Plate to open the Gate. Kill the 2 Giant Snails and go inside for the second Blue Gem. To get out of the cell without losing any items press the small Button on the wall to the right. Stand on the Pressure Plate inside the cell and place an item on the other Pressure Plate beyond the bars of the cell. The gates will now open and you can take your item back.
24. Once you open the Door at 17 you’ll be attacked by your first Skeleten Warrior. The room at 24 contains your first Iron Door. Press the 2 small Buttons on the walls to open the Iron Door. Inside you’ll find the Whitewood Wand and a Scroll with information about it.
25. Crystal of Life and a Scroll with information about how it works. You can use the Crystals to revive and heal your party.
S1 – Stairs leading down to Level 2.
Back: Legend of Grimrock Next: Level 2: Old Tunnels
