Level 4: Archives
Level 4 is split into six sections, the main section with the stairs leading up to Level 3 and down to Level 5, four separate dungeons where you can find the four Scrolls and then the Slime Dungeon which is accessed from a secret area of Level 3. There are more puzzles than combat in this level except for the Slime Dungeon which is very tough for lower level parties.
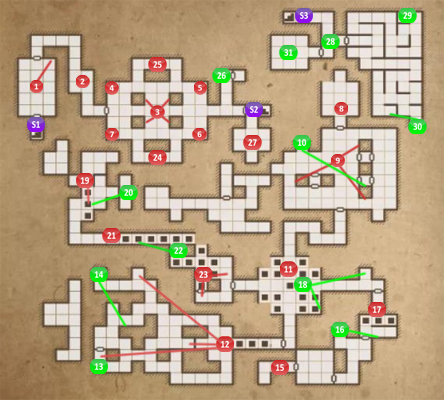
1. When you stand on the Pressure Plate you’ll be attacked by 2 Elder Herders. They have the Poison Cloud ability so try to stay clear of them. One of them will drop an Iron Key so you can open the Gate leading further into this level.
2. Scroll with the Restore Energy recipe, Empty Flask and Grim Cap.
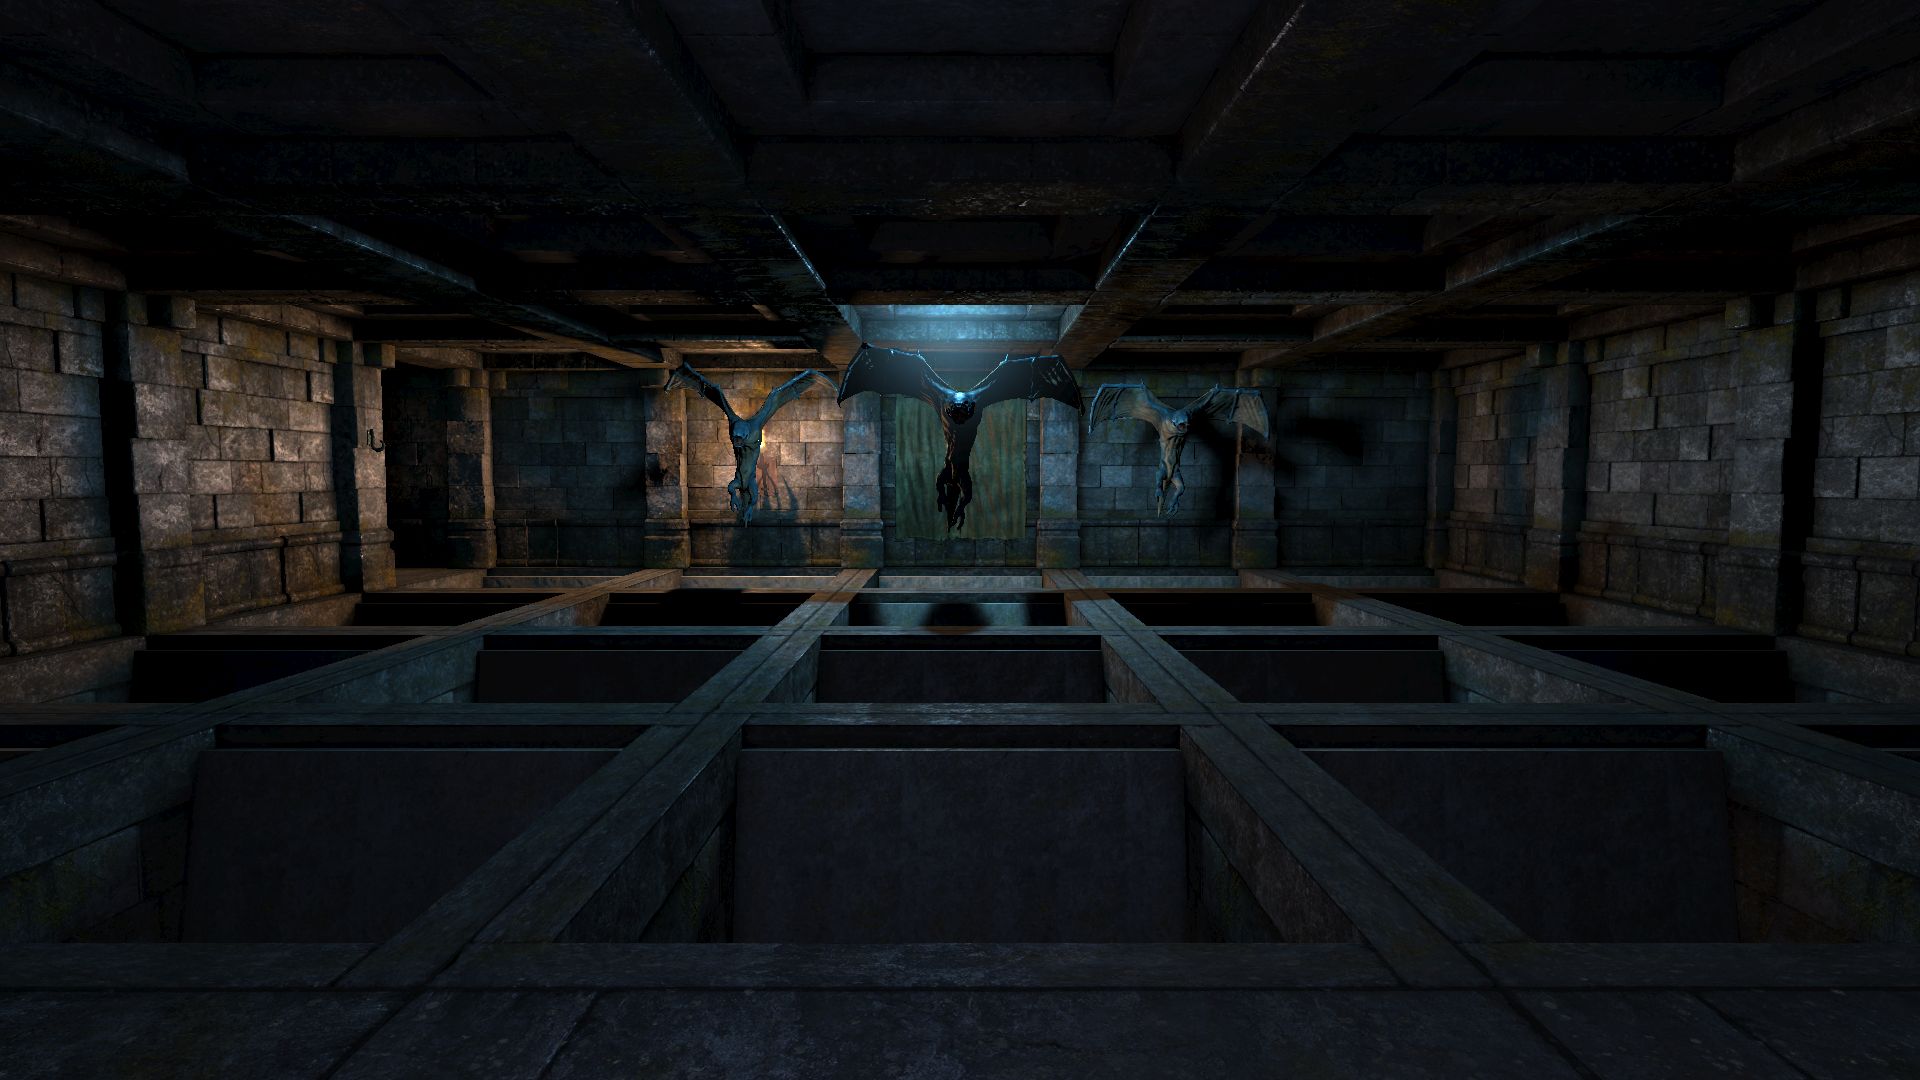
3. Main Chamber. The first time you visit there will be 2 pairs of Skeleton Archers wandering around. The Teleporters in the corners lead to four separate dungeons. You’ll need to visit each one to find the Scrolls to place in the central pillars to complete the fragments of each puzzle. The solutions are below:
Put to sleep – but still dreaming
Eternally imprisoned – to depths beyond measure
Caverns still echoing – by his call
Crimes forgotten – but never forgiven
Once you complete the puzzle the areas #24 and #25 will be opened up, releasing a swarm of Scavengers. The Teleporters will be turned off as well. It’s best to run to the Crystal of Life at #27 and fight them from there.
4. Teleporter to Beast Gardens and Menagerie
5. Teleporter to The Catacombs
6. Teleporter to Trails of Thought
7. Teleporter to Time and Tide
8. Beast Gardens and Menagerie. Press the Button by the door and quickly move to the right to block the Energy Sphere’s path. This will keep the door open.
9. There are 3 Cells here with 3 Pressure Plates inside each of them. The 3 Buttons, locations shown on the map, will open the Cell Gates. You need to lure 3 Skeleton Warriors into the Cells to complete this puzzle. The south eastern Cell also has a Button that opens up secret #10. The Skeleton Warriors will continue to spawn until the puzzle is completed. Search around the area for 3 Blooddrop Blossom and a Note with a map on it.
10. Press the Button inside the southern Cell to open this secret where you’ll find Leather Boots, Ring Gauntlets and Pitroot Bread.
11. The first Scroll and Teleporter back to the main dungeon area. The first time you reach this point you’ll be attacked by Crowerns.
12. The Catacombs. As you enter The Catacombs the three trapdoors ahead will open. You need to remove the items from the 3 Pressure Plates to close each trapdoor again. The locations are shown on the map above. Numerous Skeletons wander around the Catacombs so be on your guard. One of the Pressure Plates is weighed down by a group of 4 Skeleton Warriors.
You may want to drop down the pit first for Tar Bead and 2 Crossbow Quarrels. To get back push the Button on the wall, kill the Skeleton Warrior and go back through the Teleporter.
13. Pull the Lever to release the Skeletons. Kill them and then press the Button in their Cell to open the wall behind it. Another Skeleton Warrior attacks. Kill him and you’ll find a Sack with a Burrow Rat Shank, Leather Gauntlets, 2 Tar Bead and a Bone Amulet.
14. Press the small Button on the wall to open the alcove here and release another 4 Skeleton Warriors. Once you’ve killed them press the Button again and quickly run to the alcove for the Flarefeather Cap and a Fire Bomb. Press the Button to get out.
Once you are done in The Catacombs walk over the closed trapdoors and pick up the next Scroll. Go through the Teleporter back to the main section of this level.
15. Trails of Thought. Stand on the Pressure Plate to open the door to the Teleporter Room. You’ll need to find the correct path through to find the Button to open the other door and then go through it.
From the Pressure Plate outside the room take the following path, Forwards, Forwards, Forwards, Right, Back, Left, Back, Right, Forwards, Left, Back, Left.
Turn to the left and press the Button to open the door. Facing towards the door you just opened continue along this path, Forwards, Right, Back, Left, Forwards, Right, Back, Right, Forwards, Left, Forwards, Right. You should be right in front of the exit.
16. Kill the Crowern and go through to the next puzzle. Push the small Button on the wall to open a secret in the previous room. Inside you’ll find the Venom Edge which can shoot Poison Bolts.
17. Go back to the puzzle room and stand on the first Pressure Plate. This closes the trapdoor in front of you. Go Forwards, Back, Right, Left and Forwards to complete the puzzle. You can now pick up the Iron Key to open the next door.
Drop down on of the pits for 2 Slime Bells. To return push the small Button on one of the walls, kill the Skeletons if you haven’t dropped down here before and go through the Teleporter.
18. Pick up the third Scroll first before attempting this secret. In a little alcove to the left is a small Button. This closes the trapdoors ahead on the left so you can reach another Button. Press the second Button to turn off the Teleporter and open the trapdoor in the center. Quickly drop down the central pit. You’ll land in a cell where you can find the Gear Key for a secret at #26. To get back pull the Lever, kill the Skeletons if you haven’t killed them already and then go through the Teleporter.
19. Time and Tide. 3 Throwing Knives are in the niche to the right. Stand on the first Pressure Plate and wait for the three ticks. Instead of a fourth tick a Teleporter will open up for a brief moment. Shoot an arrow through the Teleporter just as it opens and your arrow will land on another Pressure Plate which closes the trapdoors.
20. Place an item on the first Pressure Plate and then stand on the second trapdoor where the Teleporter appears. You’ll be teleported to behind a gate with the Book of Infinite Wisdom. Have one of your characters read it for +5 Skillpoints. Go through the Teleporter to get back.
21. This is a timing puzzle with a secret in the middle. Once you step on the Pressure Plate the trapdoors will begin closing. You need to move along them at they same speed as they close and open. Two steps forward and on the right wall is a Button for secret #22.
You may want to drop down the pit first to kill a bunch of Skeletons and to find a Burrow Rat Shank, Cave Nettle and Tar Bead. Pull the Lever to head back to the other section and go through the Teleporter to get back.
22. When you press the Button on the right wall a section of passage opens up a few steps ahead. Go through to the right and quickly pick up the Chitin Mask from the niche.
23. Continue following the trapdoors and throw the Chitin Mask across to the Pressure Plate to the right. You can throw anything across but the Chitin Mask should already be in your hand. This will open the Gate ahead. Turn back and go through the gate. You can now run around and pick up your Chitin Mask again.
Go through the door to pick up the next Scroll and then take the Teleporter back to the main area. If you have all of the Scrolls place them in the correct niches shown at #3 in order to complete this puzzle.
24. Once the Scroll puzzle is complete the areas at #24 and #25 will open releasing a horde of Scavengers. Pull the Lever here to reactivate the Teleporters in the main hall. There’s also a Tar Bead on the floor.
25. Tar Bead, Cave Nettle and a Battleaxe.
26. Use the Gear Key found in secret #18 to open this Iron Door. Inside you can find the Chitin Greaves.
27. Crystal of Life. Near to the crystal you can find the Scroll of Frostbolt, a Frost Bomb and a Burrow Rat Shank.
S1. Stairs to Level 3
S2. Stairs to Level 5
Slime Dungeon
28. The runes on the wall say “Feed me” and a statue stares at you with open mouth. You’ll need to find the Green Gem to open the door to the secret.
Open the door to the east and prepare for a tough battle. The Slimes can soak up damage and also have attacks that may cause sickness. Each Slime has around 450 Health. They can also attack with their acid through the grates. Try to draw the Slimes out to the long corridor and kill them one-by-one.
29. Treasure – The Golden Deity Figure.
30. Press the Stone Button on the wall to open the door that contains the Green Gem.
31. Feed the Green Gem to the statue on the wall to open the door here. Inside you’ll find a Crossbow, 6 Poison Quarrels and 2 Poison Bombs. As you leave you can take the Green Gem with you.
S3. Stairs back to Level 3.
Back: Level 3: Pillars of Light Next: Level 5: Hallways