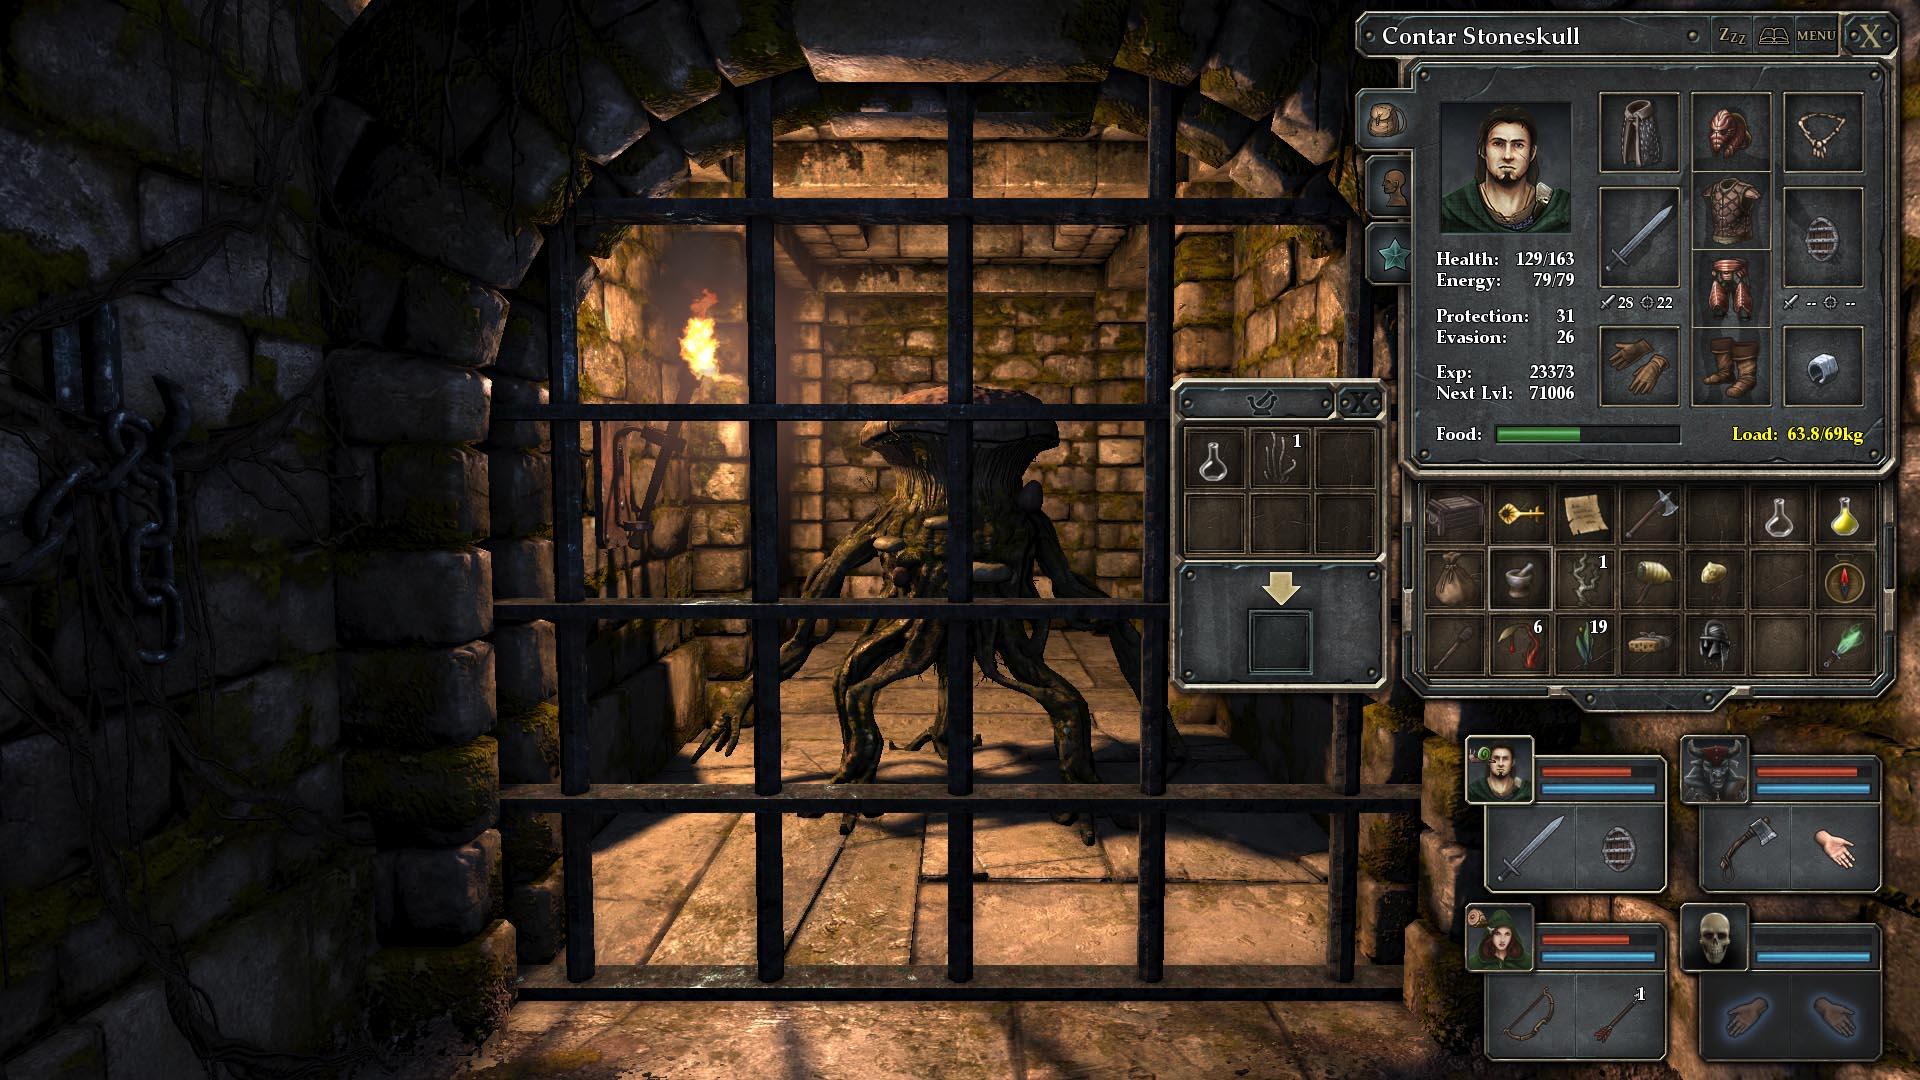
Level 5: Hallways
Level 5 is a little shorter then the previous levels because you should have already explored about a third of it by falling down pits in Level 4. This level contains 7 secrets and is fairly balanced between combat and puzzles.
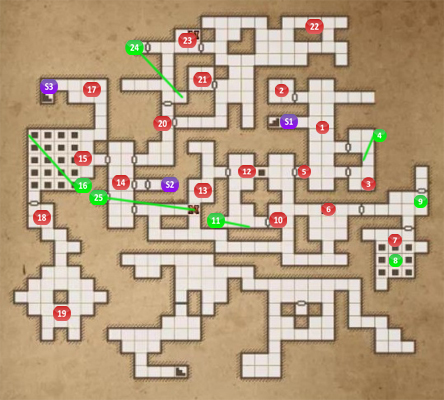
1. As soon as you step down you’ll notice the look of the dungeons have begun to change. The corridor to the north-east has collapsed.
2. In this room you’ll find the Scroll of Fire Shield and 2 Crossbow Bolts.
3. This room looks empty but search the walls for a small Button that opens the passage to the room further north. The room in the north has an Iron Key and a Box with a Scroll of Light, 2 Tar Beads, a Cave Nettle a Slime Bell and 2 Baked Maggots.
4. Between the two rooms is a small Button that opens up a secret alcove with the Scaled Cloak.
5. Use the Iron Key to open this door.
6. The first of two Dragon Statues. Take note of the way it’s facing as it will be important later on. The shelves contain 2 Tar Beads and there’s a Shuriken in the corridor further south.
7. In this room you will see 9 pits and three Buttons. Two on your side of the room and one on the other side. I will label the Button on your side furthest to the west as number 1, the Button closest to you as number 2 and the Button on the other side of the room as number 3. Press them in this order 1, 3, 1, 2, 3. Now you should be able to reach the alcove with the Iron Key. When you pick up the key two other alcoves will open up releasing a Crowern and a Wyvern. Kill them and then press 3 to search one of the alcoves and 1 to search the other alcove. Inside you’ll find a Blooddrop Blossom and one of Toorum’s Notes giving you a clue to the puzzle in the other room.
8. Drop down one of the pits to a secret. You’ll have to face more flying enemies. When you are done press the Button on the wall beside the portal to open the secret. After defeating the Crowern and Wyvern you’ll find 2 Lightning Bombs and 2 Fire Bombs in the niche. Go through the Teleporter to get back to Level 5.
9. Pull the Lever down, press the Button by the gate, flip the Lever up and down 3 or 4 times and leave it up, then press the Button by the wooden door to open it. After defeating the Herder’s you’ll find a Conjurer’s Hat for your mage.
10. Use the Iron Key to open this door. Beyond it you’ll face Crowerns and Wyverns that shoot lightning bolts.
11. Press the Button on the wall for access to an alcove with the Fist Dagger.
12. Crystal of Life. Jump down the pit here to find another one of Toorum’s Notes.
13. Get ready for your first fight with a Giant Crab. They’re as tough as nails. Once it’s been defeated search the northern passage for the Ring Greaves.
14. The exit from this level lies behind two Gates. You’ll need 2 Ornate Keys to get past them. One of them lies to the west in the Deserted Tunnels, and the other to the east in the Chamber of Pits. There’s also a Scroll here that you can find if you break the barrels. It tells you to rest in the place where the Dragons have their gaze.
15. Chamber of Pits. Before doing anything else drop into one of the pits. Defeat the Skeletons and pick up the Herbs and Food. Head back up the stairs when you are done.
On the wall is a Lever and Button. The Lever determines whether the trapdoors close from the entrance to the exit or back again. The Button starts the process. Press the Button once to see which path you need to follow. You’ll need to move quickly across the trapdoors to the other side but see #16 for a secret along the way.
16. On the far wall you may spot a Button. Press it to get access to a niche in the corner to your left. In the niche is the Bracelet of Fortitude. If you fall down just climb back up the stairs and start again.
17. Boiled Crag Beetle and Bow. Pull the Lever to get back to the Chamber of Pits.
18. Another Button and Lever to control the trapdoors so you can get back.
19. Once pick up the Ornate Key the alcoves will open releasing a number of creatures. You can avoid them by placing something on the shelf before picking up the key but you’ll miss out on all the fun. Once the enemies have been defeated search the alcoves for Lightning Bombs and Alchemy Herbs. To open the exit place something on the shelf where you found the Ornate Key.
20. Deserted Tunnels. To get into the Deserted Tunnels you’ll need to pull the Lever in the alcove, quickly throw a Rock onto the Pressure Plate and then run through the Wooden Door before it closes. The Wooden Door will close behind you so you’ll need to find another way out.
21. Tar Bead and Ring Gauntlets.
22. Parts of these tunnels will open up as you explore, releasing more enemies, so the map will look different until all of the areas have opened up. You’ll find some herbs on the floor and the Warhammer in a niche at point #22.
23. The second Dragon Statue pointing south next to the second Ornate Key in a niche. Pull the Lever in the north, just past the Dragon Statue to open up the corridor back to the beginning of the Deserted Tunnels.
24. Some more Skeleton Warriors will have spawned when you get back to this corridor. To reach the secret you’ll need to pull the Lever and throw the Rock on the Pressure Plate as before. This time quickly run to the north and into the secret area for a Grim Cap, Huntsman Cloak and 3 Fire Arrows.
25. Move to the point on the map where the 2 Dragon Statues are facing and sleep. When you wake up the Iron Door at #25 will be open. Look inside for the Lurker Vest.
Use the 2 Ornate Keys to unlock the Gates at #14 and head down to the next level.
S1 – Stairs to Level 4.
S2 – Stairs to Level 6.
Back: Level 4: Archives Next: Level 6: Trapped