Level 11-13: The Tomb, The Prison & The Cemetery
This is it! The final confrontation with whatever lies at the bottom of Grimrock and your escape from this mountain, if you can survive. I’ve combined the next three levels together as they’re all pretty small and you’ll need to move between them regularly.
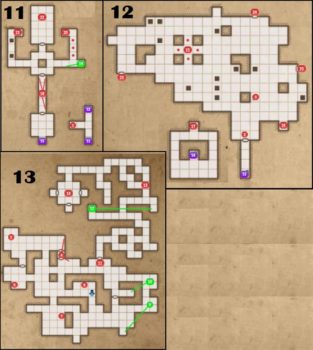
1. You’ll skip through Level 11 only briefly at first as the rest of the level is locked for now. Continue down the stairs S2 to The Prison.
2. You should have the Prison Key from Level 10. Use it here to gain access to the prison. There are Goromorgs and other creatures constantly spawning so you don’t have to worry about clearing out the area. Drop down the pit at #3 instead.
3. You can actually drop down any of the pits to reach Level 13. There are 4 items you need to find here to activate the machine on Level 12. The pieces can be found at #5, #6, #7 and #8. Try not to get overwhelmed with the Shrak Torrs down here. A fairly safe place to fight them is from the room at #5.
4. Press either of the Buttons to open the gate to the Teleporter which will take you back to Level 12.
5. The first piece of the machine can be found here. It’s the Bladed Gear. Some of the pieces are quite heavy so you may need to clear out some of your inventory before continuing.

There’s also a Button on the northern wall that will open the door at #11.
6. On the shelf you’ll find the second item you need for the machine, Ore.

Nearby you’ll also find some other items which are probably worthless to you by now, a Bag of Torches and Ring Gauntlets.
7. Pick up the Infusor from the shelf, the third item required to fix the machine.

8. The last piece is the Bladed Gear.

9. Before continuing through the door at #11 open the next two secrets. You’ll find little Buttons on the wall shown on the map which open two small rooms. This room has Fire Bombs and some Food.
10. Press the Button to open the next secret. Inside the small room you’ll find a Box with Alchemy ingredients inside.
11. This door is opened by pressing the Button at #5. Inside you’ll come across first Giant Spiders and then Giant Crabs.
12. Press the Button at the end of the eastern passage to open the alcove at #12. Inside you’ll find the second last treasure of the game, the Globe of Tetharion.
13. As you clear out this section of Giant Crabs watch out for the Gold Key that one of them drops.
14. Crystal of Life and Treasure. Use the Gold Key that you found on one of the Giant Crabs to open one of the treasury gates. You can choose from either Sacks with Alchemy Ingredients and Potions, a Full Set of Plate Armour or Fire Bombs, Lightning Bombs and a Fire Blade. Once you are done make your way back and take the Teleporter back to Level 12.
15. At #15 is the machine, The Undying One, that you need to repair. Unfortunately it’s guarded by 4 Wardens with about 1,200 HP each. When you get close they will awaken. Hit them with ranged attacks to wake up one of them at a time. They charge quickly like the Ogres and also have a melee attack.
Once the Wardens have been defeated place the four items in the machine to bring it back to life. The Ore goes on the northern side, the Bladed Gear to the ease, the Infusor to the south and the Steel Gear to the west.
You can’t damage The Undying One without a special tool which you get from Level 11. When you activate The Undying One a Teleporter will appear at #16. Quickly go through it before you get crushed.
16. Teleporter to #17.
17. There’s nothing here except the stairs (S4) to the locked section of Level 11.
18. When you step on the Pressure Plate the two Gates will close, locking you inside, and the corridor will fill up with poison gas. Press the three Buttons on the walls, shown on the map, to open the Gates. The Buttons can be hard to see with all of the gas. Just keep your cursor in the center of the screen.
19. Press the small Button on the wall to open the secret area with the last treasure, the Goromorg Miniature.
20. To reach #22 you’ll need two Ornate Keys. The first is protected by Pressure Plates and Statues that will shoot spells at you as you try to make your way back. To deactivate them place an item on each of the Pressure Plates. You can now pick up the first Ornate Key and safely make your way back.
21. Throw an item over the pit and past the Teleporter when it turns off to close the first trapdoor. To close the second trapdoor you need to press a Button on the western wall where the trapdoor teleporter is turning on and off. Once you’ve pressed the Button the second trapdoor will close and you’ll be able to make your way across to the second Ornate Keys. Use both Ornate Keys to open the door to #22.
22. At first it seems like there’s nothing here except a few scrolls. The Weapon of Power can only be seen if you turn off all the lights. Remove the Torches from the walls and cast the Darkness Spell if you need to. The Weapon of Power will appear on the altar. Take it and go through the Teleporter that appears behind you.
The Undying One: This is the final battle. Don’t worry about all the other creatures unless they get in your way. The Undying One will crush them and make a straight path towards you. Place the Weapon of Power in one of your Characters hands and use it like a melee weapon on the machine. It will stop for a few seconds, giving you chance to remove one of the items you placed to repair it. You’ll need to do this at least four times until you’ve removed all of the items.
Once the last item has been removed you can finally hurt The Undying One. It has around 1,000 HP and moves quickly. It’s only attack is to crush you if you get in its way. If you get into trouble you can drop down a pit to Level 13 and use the Crystal of Life to heal back up to full health.
After The Undying One has taken a critical amount of damage it will stop and explode. You just need to survive a few more seconds for the final cut-scene.
23, 24 and 25. At some point during the fight Prison Keys will drop somewhere around the southern area of the map. They’re quite hard to spot as you’ll probably be sprinting away from The Undying One. If you do manage to pick them up you can open the doors around the outskirts of this area. Inside you’ll find some useful items such as the Lightning Rod, Lightning Bombs and a Sack with Healing Potions.
S1. Stairs to Level 10.
S2. Stairs to Level 12.
S3. Stairs to Level 11.
S4. Stairs to locked area of Level 11.
S5. Stairs to Level 12.
Back: Level 10: Goromorg Temple II