
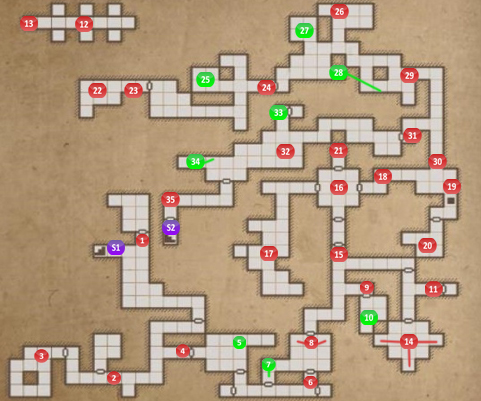
Level 2: Old Tunnels
Level 2 ramps up the difficulty a little and the levels will become increasingly more difficult as you venture further down into Mount Grimrock. Luckily your party will level up and you’ll also find some powerful weapons to help you along your way. You’ll encounter your first Crowern on this level, as well as large groups of Skeleton Warriors.
1. Pull the Lever to open the Gate. Kill the Giant Snail and then search the room for a Peasant’s Cap and a Rock.
2. Pick up a Rock in the alcove to the left and then pull the Lever to open the Gate next to it. Inside you’ll find a Doublet, Dagger and Mole Jerky.
3. Inside this room you’ll find a new enemy, the Herder Spore. It’s smaller then a regular Herder but shoots poison bolts at you. Try to dodge out of the way. Behind the pillar you can find a Machete, Compass and an Iron Key.
4. Use the Iron Key you just found to open this door.
5. The runes on the wall say “Shelter Left, Cells Right”. Place a Torch in the holder to the left to open up a secret. Inside you’ll find your first piece of heavy armour, the Iron Basinet.
6. Kill the Giant Snail and turn to face the first cell on the left, half-way down the corridor. You can’t open the gate but you can reach the Sandmole Hide Vest and the Brass Key. Use the Brass Key to open the last gate on the left.
7. There’s a rock here. Turn left and press the small Button on the wall to open the wall to the cell behind you for 3 Poison Arrows.
8. Place an item on both Pressure Plates to open the door.
9. You’ll encounter your first Crowern here. The runes on the wall say “No weapons allowed inside”. Place any weapon in the niche to open the gate. Inside the cell is 2 Giant Snails a Grim Cap and an Iron Key.
10. Press the small Button on the wall to open up an alcove with the Pointy Shoes.
11. Go through the Teleporter to the cells at #12.
12. You arrive here from #11. There are a number of cells here and 2 Buttons. The Buttons move the items in the cells clockwise and counter-clockwise. Inside the cells are a Skeleton Warrior and a Sack with Bread, Leather Cap and the second Iron Key.
Push the first Button on the left twice to release the Skeleton Warrior. Push it twice more for the Sack.
13. Teleporter back to #11.
14. The first real trap. The runes say “Enter thy grave”. The room appears empty but when you step on the Pressure Plate in the middle 3 Skeleton Warriors will be released one-by-one. Try to kill the first one as quickly as possible before the second one is released. You can then dance around and kill the last two. Search the alcoves for the Bone Amulet, Scroll of Ice Shards and a Tattered Cloak. Pull all 3 Levers to open the exit.
15. Use the 2 Iron Keys to open the 2 gates.
16. Crystal of Life. You will need to find 2 Brass Keys, one in the west passage and one in the east passage, to open the Gate to access the teleporter.
17. Defeat the 2 Crowerns and then press the Button on the wall near to the Torch in the southern corner. This opens a small alcove just to the north with another Button. Press the second Button to open another alcove further north. This time a Crowern is released. Press the Button in the second alcove to open another alcove, this time in the south. Search the third alcove for a Brass Key and a Throwing Knife.
18. A Teleporter prevents you from continuing down the passage. Press the small Button on the wall opposite to turn off the teleporter briefly and quickly run backwards 3 steps to get past it before it turns back on.
19. To close the pit throw an item across the pit so that it lands on the Pressure Plate on the other side.
20. Defeat the Crowern and search the room to find the second Brass Key, a Hand Axe and Cave Nettle.
21. Use the 2 Brass Keys to open the gate and enter the Teleporter to #22.
22. Teleport from #21. You’ll also find a Throwing Knife and Scroll of Poison Bolt.
23. Press the small Button on the wall two steps back to the right to open the gate.
24. When you press the Button to open the door a secret will open up behind you. Turn around quickly so you don’t get trapped by the Herders.
25. Inside the secret room you’ll find a new weapon for one of your characters, a Sling. Place it in one hand and Rocks in the other. Right-click the Sling to launch a Rock at your enemies.
26. A Brass Key and a Lever which opens the door to the secret at #27.
27. Kill the Herders and then pick up the Phalanx Helmet, Tar Bead, Leather Pants and the first Skull. Skulls are unique items that can also increase the Power of Minotaurs with the Head Hunter ability.
28. The Button for the next secret is found on the wall behind the pillar. Inside the room that you open you’ll find the first of seven treasures, the Golden Chalice.
29. In a passage near to the Button you can find a Grim Cap, Cave Nettle and Nomad Boots. Use the Brass Key on the lock in the wall to open up a passage.
30. Pull the Lever to open up the wall leading back to the first section of this level.
31. Stand on the Pressure Plate for a few seconds to open the door.
32. In this room you’ll meet your first group of 4 Skeleton Warriors. AOE spells work really well against them as you can damage all of them at the same time.
33. The runes on the wall say “Only a patient man can defeat the Daemon’s gaze”. Stare at the Daemon statue for about 15 seconds until the Iron Door opens. Once you defeat another 4 Skeleton Warriors you can pick up the 3 Fire Bombs in the niche inside the room.
34. Push the Button on the wall for the last secret of this level. Defeat the Skeleton Warrior and inside the room you’ll find a Box with a Healing Potion, Leather Brigandine and the Scroll of Poison Shield.
35. Here you’ll find a Sack with a Mortar and Pestle inside. This is the only one in the game. Inside the Sack there’s also 2 Tar Beads, 2 Cave Nettles, 2 Empty Bottles and a Scroll with some Alchemy recipes. To open the Gate leading to the stairs take the Torch out of the torch holder.
S1. Stairs to Level 1.
S2. Stairs to Level 3.
Back: Level 1: Into the Dark Next: Level 3: Pillars of Light
