
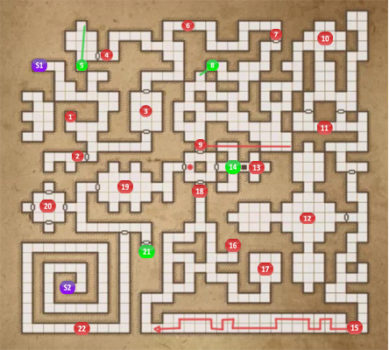
Level 9: Goromorg Temple I
The Goromorg Temple spans the next two levels and you’ll meet some new enemies, including the quick and tough Ice Lizards. There’s also a change of scenery here with banners hanging from many of the walls. You can slice through the banners to find hidden items behind them.
1. Tear off all of the banners you come across. The marked location as some Pitroot Bread on a shelf behind the banner.
2. Holy Scriptures. Inside you’ll find a couple of scrolls guarded by a Uggardian. Tear the banner to find the Button to open this door. The Uggardian drops an Ornate Key when you kill him. One of the Scrolls gives you a clue to a puzzle further on.
3. Checkered Room. to open the closed Gate place items on the Pressure Plates in a checkered pattern, beginning with the plate in front of the closed gate.
4. Armoury. A Uggardian protects this armory. Once you’ve killed him search the room for a Long Sword, Lightning Bombs, Iron Basinet, Ring Mail and Broadhead Arrows.
5. Destroy the boxes and press the Button in the alcove to the north to open the secret area. After killing the Uggardian you’ll find a very good axe, the Norja.
6. There are two points along this passage where you’ll be spun around. Pay careful attention to your surroundings to see when you get spun around or look at your map to see which direction you’re facing.
7. Temple Grounds. Here begins a difficult section where you’ll be pursued by Ice Lizards. They are immune to ice spells and move fairly quickly. Try to face them one at a time and you can run back to this point to rest. Just remember to close the door behind you. The Ice Lizards will respawn after a time so you an use this area to level up your characters. One of the Ice Lizards from here to point #11 will drop a Gold Key so keep an eye out for it. You may need to move aside the Steaks they drop to be able to find the key.
8. Press the Button on the wall here to open up the secret area with Pit Fighter Gloves a Lightning Bomb and Fire Bomb.
9. Pull the Lever on the wall, shown on the map, to open up the Gate at #9. On a shelf you’ll find the Scroll of Lightning Bolt.
10. By now you should have cleared out most of the Ice Lizards. Around this area you’ll find the Circlet of Wall and 2 Lightning Bombs.
11. This is the end of the Ice Lizards, for now. Shut both of the Gates here to prevent them from chasing you when they respawn. On either side of this corridor you’ll find 2 Tar Beads.
12. Outer Sanctum. Use the Ornate Key on the lock to open the door to the Outer Sanctum. The Door will close behind you and you’ll need to fight 2 Uggardians. Once they’ve been defeated you’ll notice three rooms with a Teleporter in each. There are runes in each of the rooms giving a clue to the number of each Teleporters. Enter one of the Teleports and then look at the feet of the statue in the center for a Scroll which says III-II-I-III. Teleporter III is the one to the west, II to the north and I to the south. Enter them in the order that the Scrolls tells you, West, North, South, West and you’ll be Teleported to #13.
13. Before doing anything place an item on the Pressure Plate at your feet. If you try to move over the trapdoor it will open and you’ll fall down to the level below. There is an opening and closing trapdoor just in front of the closed one. You’ll need to quickly move onto it, place an item through the Gate onto the Pressure Plate and move back again. The Gate will open and you can go through to pull the first Lever.
Getting to the second Lever is much more difficult. You need to move both over the Trapdoor when it closes and through the Teleport when it turns off to reach the other side. You may want to SAVE your game before you try it. Pull the second Lever to open the Door. Go back to the main corridor and pick up the Ornate Key from the shelf.
Before going back through the Teleporter drop down the trapdoor for another secret.
14. In this room are 3 Torch Holders, Tar Bead, Pitroot Bread a Teleporter and a closed Gate. Pick up the Scroll just behind the Gate for a clue. The Scroll says to stand where the shadows of the Torches cross and to throw a rock to the east and north. You don’t actually need to use Torches or throw a Rock, Arrows work just as well, but you will need to be standing in the right place.
Place 3 Torches in the Torch Holders and stand in the spot where the shadows cross, shown with the green A on the map below.
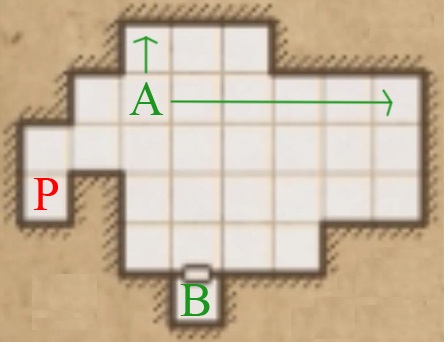
From A throw a Rock or shoot an Arrow first to the east and then to the north. The Gate at B will open. Go through the Gate for the Cuirass of Valor. Go back through the Teleporter (P) to return to #13.
15. On your way to 15 check all the passages for 2 Tar Beads. Pillared Hallway. To get across the hallway follow the instructions from the Scroll you found at #2. Two left, one right, one left… The path is shown on the map.
16. Fight your way past the Uggardians until you come to the location marked on the map for Toorum’s Note. You’ll also find a Stone. Take it with you if you don’t have one because you’ll need it later.
17. A new enemy awaits you here, the Shrakk Torr. They can spread disease. Tear off the banner at the end of the room for the final part of the Lurker set, the Lurker Hood.
18. Press the Button on the wall to open the Steel Door. On the shelf you’ll find a Book of Infinite Wisdom. When you take it the walls around this central area will raise up. Stand on the Pressure Plate, red dot shown on the map, to open the western door. Don’t forget to pick up the Sulphurous Potion from the shelf before you continue.
19. Crystal of Life and Puzzle Room. To get through the exit you need to solve the riddles. Place the right object on each shelf. You’ll hear a click when you get it right.
Tear of the Land – Rock
Severed Dread – Skull
Unraveller of Mysteries – Key
Games Bane with Head of Steel -Arrow
When you have the four items correct the Gate leading out of this room will open. You can go back and pick up your items if you like. Just past the Gate you’ll find a Scroll.
20. Treasury. If you found the Gold Key you’ll be able to unlock one of the Gates to collect the goodies.
21. To open the Iron Door for this level you’ll need to place a Bone Amulet on the shelf. On the shelf you’ll find Zhandul’s Orb, the most powerful artifact for your Mage.
22. Around these spiralling passages you’ll have to get past 2 Ogres. They can be difficult to fight in such tight quarters. Make sure you’re healed up before taking them on.
S1. Stairs to Level 8.
S2. Stairs to Level 10.
Back: Level 8: The Vault Next: Level 10: Goromorg Temple II
