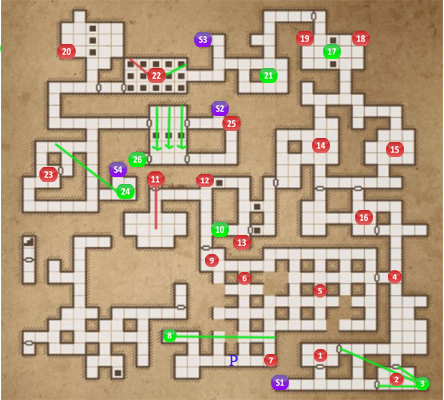
Level 7: Ancient Chambers
The Ancient Chambers have been overrun with Green Slimes and Uggardians. There’s also a few puzzles but nothing that’s too tricky. Behind the Iron Door at the end of the level you’ll find the last of the Chitin Armor Set, the Chitin Boots.
1. The starting area is filled with Slimes so make sure your party is healed up before starting level 7. In this room you’ll find a Tar Bead and Grim Cap.
2. After killing the 2 Slimes in this room you’ll find a Tattered Cloak. Move it aside to find another one of Toorum’s Notes hidden underneath with a clue to the secret in this room.
3. To reach the secret alcove open all of the doors in this area, as marked on the map, except the southern door of room #1. Inside the alcove you’ll find Ring Greaves, a Battleaxe and Throwing Knives.
4. Maze of Shadows. The corridor to the north has collapsed so the only way past is through the maze. If you stand too near to the light sources you’ll be teleported back to the beginning of the maze.
5. Search the maze to find 2 Slimebells. You find another of Toorum’s Notes on the northern side of the maze. Inside a niche here is the Scroll of Darkness. It should make navigating this maze a little bit easier.
6. Hardstone Bracelet.
7. A Wooden Box with a supply of Food. There’s also a Button which opens a up a wall to the Teleporter (P on the map).
8. After pressing the Button at #7 go through the Teleporter to find a secret room. Quickly kill the Herders before they poison you and search the room for 2 Throwing Axes, 2 Crossbow Quarrels and Mole Jerky. On one of the walls you’ll find a small rune. Press it to open a wall leading to behind the Teleporter where you can pick up 4 Frost Bombs.
9. Opening the gate will lead you to the next area of the dungeon. This 2×2 room is also a good place to run back to if you want to fight the Uggardians and Slimes.
10. Drop down the pit for the Bracelet of Tirin.
11. To get past the pit at #12 you’ll need an Iron Key. Step on the Pressure Plate to open the Wooden Door. This also releases 5 or 6 Slimes. Quickly retreat down the corridor before you get trapped in the room. Once all the Slimes are dead you can pick up the Iron Key from the niche and the Diviner’s Cloak and Boiled Crag Beetle from the slime room.
12. Use the Iron Key to close the trapdoor.
13. To get past you’ll need to open the Gate and then close the Trapdoor by letting the light particles reach the receptacles. Push the Button, move left and back. Wait for the light particle to hit the receptacle then move forwards and then to the left. The next light particle will hit the other receptacle and close the Trapdoor.
14. More Slimes. There’s a Throwing Axe on the floor.
15. Crystal of Life and Fire Torc.
16. There are two doors giving access to this area. One with a Button and the other with a Pull Chain. You can only open the door from this side with the Pull Chain. Pressing the Button causes a Fireball to be released from a nearby statue.
Inside is a Gate with two Pressure Plates. One plate opens the gate the other releases a light particle. Step on the pressure plate to open the gate until it’s fully open. Stand on the other pressure plate for a moment and then back to the first pressure plate. The light particle should reach the receptacle, opening a wall and releasing Uggardians. Once they’ve been defeated search the room for the Scroll of Invisibility and the Shaman Staff.
You can now also explore the room to the west which has another one of Toorum’s Notes.
17. Drop down the pit for a secret. As soon as you drop down you’ll land on a Pressure Plate that releases a poison bolt from a statue at the other end of the room. Quickly make your way down to the other side of the room while dodging as many poison bolts as possible. In a niche at the end of the room you’ll find the Boots of Valor.
When you pull the Lever the gates at the other end of the room opening, releasing Giant Spiders and Crabs. Kill them and return to the other side of the room. Pick up the Burrow Rat Shank before heading through the Teleporter.
18. Teleporter to #19.
19. Teleporter to #20.
20. Look in the niche for a Sack with Alchemy Herbs and an Empty Glass Bottle.
21. Lever Puzzle. From left to right only levers 1,3 and 5 matter. Lever 1 – Up, Lever 3 – Down, Lever 5 – Down. After the click the wall will open revealing an Assassin’s Dagger.
22. Light Projectile/Trapdoor Puzzle. When the light projectile enters the receptacle the trapdoors open and close. When the trapdoors are closed run to the central trapdoor to block the path of the projectile. From here you you can first make a dash for the secret in the niche, the Bracer of Fortitude.
If you fall down you’ll have to face an Ogre but he shouldn’t be too difficult at this stage of the game. You’ll also find a Heavy Shield, Crossbow Quarrel and Milkreed. A Giant Spider is also wandering around down there. You can return to level 6 via S3.
Back at the trapdoor puzzle run to the center trapdoor as before. This time you need to make a dash to press the Button on the north wall on the western side. This opens the Door and releases 2 Uggardians.
23. Flail, protected by a Tentacle.
24. Find the Rune Stone on the wall and press it to open a wall leading to the secret stairs. Go down the stairs and pull the Lever to open the gate and then come back up. This will give you access to all of Level 8 from the regular staircase S2.
25. Another Skull for your Minotaur.
26. When you enter this room projectiles will start firing. To open the Iron Door you must block all of the projectiles before they reach the receptacles. If you fail you’ll be teleported out of the room. If you succeed wait about 5 seconds for the Iron Door to open. Inside you’ll find the Scroll of Enchant Fire Arrow and the Chitin Boots.
S1. Stairs to Level 6.
S2. Stairs to Level 8.
S3. Stairs leading to the basement of the Light Projectile/Trapdoor puzzle.
S4. Stairs to secret area of Level 8.
Back: Level 6: Trapped Next: Level 8: The Vault