Communications Center (The Lost World)
Back to Jurassic World Main Page
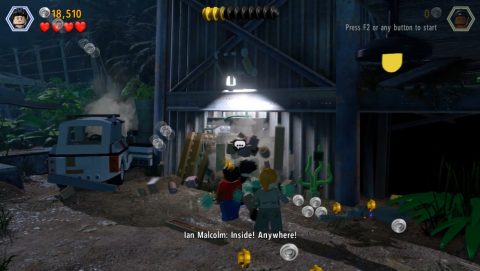
Communications Center
Make your way to the hut by the gate and use Kelly to break the glass. Turn the crank inside the hut to open the gate and head through to the first real area of this level.
Compound
After the cutscene break the tank by the gate and put the pieces together so that Kelly or Sarah can climb over the fence. The winch on the car is missing a hook. Head around towards the garage and have Sarah dig through the droppings. Grab the Hook and attach it to the front of the car. Pull the winch to the gate and activate it to break open the gate so the other characters can come through.
As you walk towards the garage you’ll be attacked by a Raptor. Fend it off and then enter the garage with Ian Malcolm. Activate the generator to turn on the lights and lift up the car and garage door.
Head out through the garage door, break the glass to the room next to the garage and kill the little Compys. Put the pieces together to fix the generator and then activate it to get power to the pump.
Approach the pump and you’ll need to fight off another Raptor. Take the pump handle and attach it to the car. Once it’s full get inside. You won’t get far before you’re attacked by another Raptor and crash into the building.
Break the pallets in front of the door and go inside.
Amber – Apatosaurus
After going through the gate and before the garage switch to a Velociraptor and track the scent. You’ll dig up some bricks. Put them together to make a blue target. Use a character who can shoot those targets and a regular target will appear on the garage sign. Hit that as well and the Amber Fossil will drop down.
Minikits
1: Destroy the plant to the right at the start of the level.
2: Build the three signs. One is to the right after jumping over the fence into the compound by the garage. The second is found after exiting the garage and then third is behind the car after you crash it into the building.
3: Between the garage and the radio tower is a dark alcove. Go inside with Malcolm to find the kit.
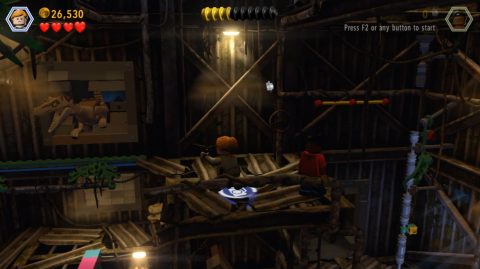
Radio Tower
As Ian holds the door shut Kelly and Sarah will need to make their way to the top. Approach the skeleton holding the key in the corner. When the Raptor attacks take a photo of it to scare it off.
Use the Key to break the padlock and then scream to break the glass. Use the pieces to build a wall and jump up to the next level.
Push over the plank to form half a bridge then jump to grab the chain on the other side. The other character can make it all the way across.
On the other side you’ll be attacked by a Raptor. Fight it off then break the pieces. Put the bricks together to make a ladder so the other agile character can climb up.
Boost one character up and the bar will break. Put the pieces together to make a pole and climb up. Jump across to the next level. Take a photo of the Raptor as it tries to break through the wall.
Walk along the thin ledge and break the pipes on the other side. Put them together to make a trampoline and jump up to the next level.
Fight off the next Raptor, swing across the gap and bounce up the wall to the next level. Scream to break the glass and put the pieces together to fix the lift.
Approach the lift, take a photo of the next Raptor and put the pieces together to make a button. Push the button to lower the lift so Ian can ride it up.
Minikits
4 (Free Play): On the second floor by the pole that you build smash the wall to reveal a dark alcove. Go inside for the Minikit.
5 (Free Play): Where you jump from the rods to stick to the wall drop down instead of jumping up. Shoot the blue target for the Minikit.
6 (Free Play): On the top floor of the tower in the back left corner is a hatch. Use a small character to climb through and find the kit.
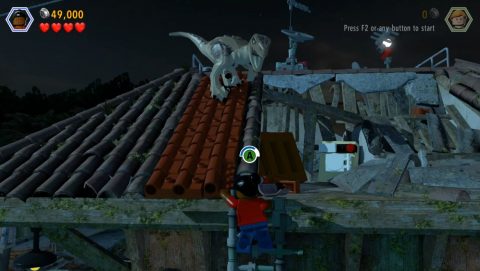
Rooftop
Once you reach the rooftops either jump or slide down on the right side. Destroy the fans to the left by the edge of the building and use the pieces to create a poles to jump over to the other building. You’ll see a helicopter arriving in the background.
Walk to the left around the balcony and climb up the ladder. Remove the tiles from the roof three times and the Raptor will come sliding down.
Climb up to the top of the roof, break the radar dishes to find the crank. Attach the crank to the antenna and turn it to lower the zipline. Ride the zipline across to the other building, head up the stairs and enter the helicopter to complete the level.
Minikits
7: Once you drop or zipline down to the rooftop destroy one of the fans and use the pieces to make a kit.
8 (Free Play): There are 3 blue broken satellite dishes on the rooftops. Repair them all for the kit.
9 (Free Play): To the right of the sign when you zip down towards the helicopter you’ll see a target. Shoot it and climb up for the kit.
10 (Free Play): Use a Crowbar to open the gate under the helicopter.
Next: San Diego
Back: The Hunted