Key of Love
Back to The Messenger
Howling Grotto
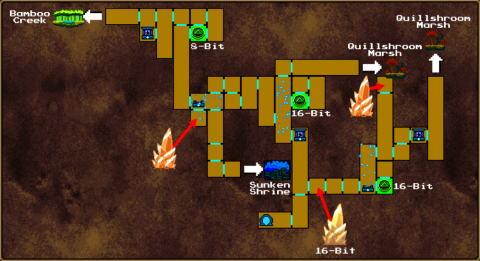
From the Tower of Time HQ head through the portal to the Howling Grotto. From here you’ll need to find the entrance to the Underwater Maze.
Make your way up to the Shop in 16-Bit and then west (left) to the Checkpoint. There is a Time Barrier blocking the path to the Underwater Maze so you’ll need to be in 8-Bit before going through the Time Barrier.
Drop down the gap in the floor just to the left of the Checkpoint. You’ll find a large Crystal and a circular Time Barrier.
Change the time to 8-Bit, climb back up and enter the Underwater Maze just to the right of the Checkpoint.
If you have the Seashell from the Quillshroom Marsh the music volume will increase and you’ll see sparkles when you get close to the right exit. Navigate your way through the maze and you’ll come out at the Sunken Shrine.
Sunken Shrine
Head to the right and open the Portal back to the Tower of Time HQ. Go right one screen to the Sealed Gate. This room is also a hub. The path up leads to the Lightfoot Tabi (durable footwear), the path to the right leads to a large Crystal, the path down to the left to the Sun Crest and the path down to the right to the Moon Crest.
Lightfoot Tabi
Take the path up and you’ll find a Shop. Go through the Time Barrier to 8-Bit and continue making your way up. in the room above change the time to 16-Bit to fill the room with water. You can now swim past the spinning blade.
Continue up and around to the right. There is only one path to take. Change the time to 8-Bit and make your way past another section with moving spinning blades. To the right you’ll find another Shop. Drop down to the right and swim through the narrow tunnel to the right.
Dodge the spikes and drop into the water. Change the time to 16-Bit and take the exit above.
In the room above you’ll need to dodge the platforms with moving spikes and make your way around to Power Seal #23.
Drop back down and head back to the left. Navigate past the spinning blades and head over to the left through the pools of water. In the last pool of water enter the Time Barrier in the center to change the time to 8-Bit. Continue to the left to find the Lightfoot Tabi.
You can use the Tabi to run along water or lava. Just don’t stop or try to turn around or you’ll start to sink. Drop down to the right to return to the Sealed Gate.
Sun Crest
Drop down on the left side and follow the path around. You’ll need to run on water over spikes so the Ligthfoot Tabi are essential for this area.
The path to the left is blocked off in the future but there’s a Time Barrier in the way. Swim along the river to the right and enter the circular Time Barrier. You can now head back to the left, go through the Time Barrier and you’ll still be in 8-Bit.
Make your way past the Fire Demons and crushers and break the blocks up to the circular Time Barrier. Go through to 16-Bit to remove the water below so you can break the lower blocks. Change the time back to 8-Bit so you can swim through the broken blocks.
Continue on your way down and swim through the small gap to the left of the Shop. This leads to the next Power Seal.
Use the Lightfoot Tabi to make your way over the spikes up to Power Seal #24.
Head to the right and drop back down to the Shop. Continue to the right and then make your way up. Once you reach the top you can go to the left if you break the blocks. This leads to a large Crystal. Grab it if you want and then take the exit to the right to the Sun Crest.
Take the exit to the right and climb up to the Sealed Gate. You’ll pass through a Time Barrier to 16-Bit along the way. Take the exit down to the left for the Moon Crest.
Moon Crest
When you drop down you’ll change to 8-Bit. Make your way along the tops of the spikes and over to the right. Change the time to 16-Bit and then run along the spikes under the crushers.
Continue down, making use of the Lightfoot Tabi and use the Time Barrier to change to 8-Bit. Continue down past the spikes and drop down to the Checkpoint.
For the final Power Seal take the exit in the water to the lower right.
Make your way past the spiked watery platforms to Power Seal #25.
Climb up the wall and head back around to the left. Swim past the spikes and then make your way over to the left. Drop down to change to 16-Bit and then swim back up to take the exit above.
Make your way up using the moving platforms and change to 8-Bit by using the Time Barrier in the top right corner. The exit to the top left should be open so continue climbing up. Make your way past the enemies and up to the Moon Crest.
Take the exit to the left and climb back up to the Sealed Gate.
Key of Love
Use the Sun Crest and Moon Crest on the Sealed Gate and it will open revealing the Key of Love. Grab it, head to the left and go through the Portal to the Tower of Time HQ.
Back: Key of Strength Next: Path to Dark Cave


