Azure Tower Level 1
Back to Eye of the Beholder 2
Azure Tower Level 1
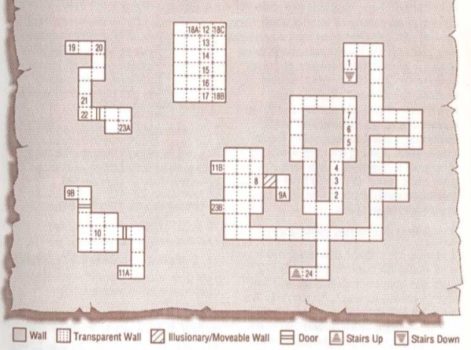
The first level of the Azure Tower offers some respite from the constant battle. There are no enemies here so you can take your time before moving up to the higher levels.
1) Stairs down to Temple Level 2 Location 43D.
2-7) You’ll end up here if you fall through one of the pits on Azure Tower Level 2 Location 6.
8) The wall to the east is an illusion.
9A-B) Stepping into the teleporter at 9A will teleport you to 9B.
10) A Polished Chrome Shield +2 and a Mage Scroll of Hold Monster. The Chrome Shield is one of six that you need to find to get access to Level 4 of the Azure Tower. It gives the wielder a +2 save against being paralyzed by the gaze of Medusae or Basilisks.
11A-B) Stepping into the teleport at 11A will take you to 11B.
12-17) You’ll land on one of these spots if you fall through the pits on Azure Level 2 Locations 34 to 39A.
18A-C) Place an item on the Pressure Plate at 18A and a Button will appear aat 18B. You have about 5 seconds to run to 18B and press the Button. A teleporter appears at 18C. Run through the teleporter to be transported to 23B.
19) You’ll land here if you fall down the pit on Azure Tower Level 2 Location 35B.
20) The plaque on the east wall reads “You will pay for your freedom…”
21) The plaque on the west wall reads “One item.”
22) Place an item in the niche on the south wall and press the Button on the west wall to open the door to the east.
23A-B) Stepping into the teleporter at 23A takes you to 23B.
24) Stairs up to Azure Tower Level 2 Location 1.
Back: Silver Tower Level 3 Next: Azure Tower Level 2


