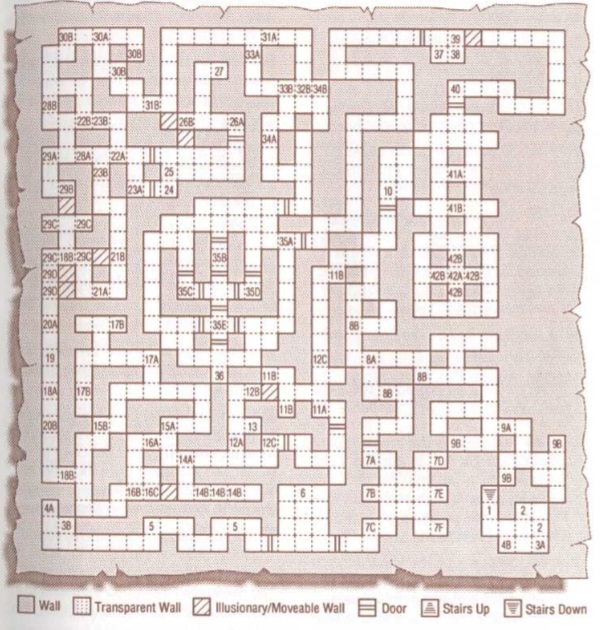
Azure Tower Level 4
Back to Eye of the Beholder 2
Azure Tower Level 4
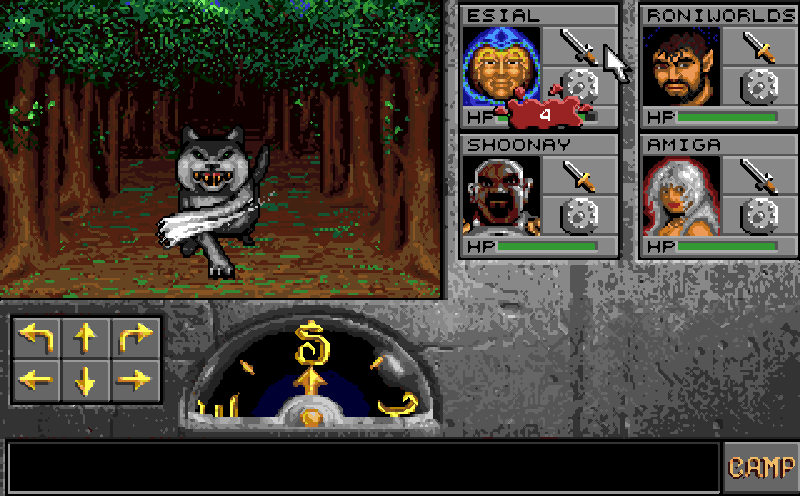
The Medusae roam this level. They have a stone causing gaze that petrifies your party. Having the Polished Chrome Shields equipped will lessen your chances of being turned to stone. The Medusae also have a poisonous bite so stay away from them if possible. Luckily the Medusae don’t have many hit points so a few well aimed swings should kill them.
Aerial Servants are the other creatures on Level 4 of the Azure Tower. They’re pretty tough and do a lot of damage so use the Haste spell to kill them as quickly as possible.
1) Stairs down to Azure Tower Level 3 Location 55C.
2) When you first arrive at Location 1 you’ll be attacked by two Aerial Servants.
3A-B) The teleporter at 3A takes you to 3B.
4A-B) The teleporter at 4A takes you to 4B.
5) Aerial Servants.
6) When you approach the statue a voice claiming to be the guardian of the labyrinth speaks to you and gives you a warning. The door to the east then opens.
7A-F) Place the Polished Chrome Shields in the six slots to open the door to the north. Retrieve the shields and wield them because they give protection from the Medusae’s petrifying gaze.
8A-B) When you reach 8A Medusae are released from the three Locations 8B surrounding you.
9A-B) When you step at 9A medusae will appear at the three Locations at 9B.
10) Three Medusae.
11A-B) When you step at 11A Medusae will be released from 11B.
12A-C) When you step at 12A the wall is removed from 12B and a wall appears at 12C. Stepping on 12A again reverses the process.
13) A Tooth Key.
14A-B) When you step at 14A Medusae will be released from 14B.
15A-B) When you step at 15A a wall appears at 15B. If you’ve triggered 16A already this location has no effect.
16A-C) When you step at 16A a wall appears at 16B and disappears from 16C. If 15A was triggered first this location has no effect.
17A-B) When you step at 17A two Medusae are released from each Location at 17B.
18A-B) When you step at 18A two Medusae are released from each Location at 18B.
19) Spin trap. When you step here you’ll be rotated 180 degrees.
20A-B) An invisible teleporter at 20A transports you to 20B.
21A-B) An invisible Pressure Plate is at 21A. When you step on it it removes the wall at 21B. Stepping on it again places the wall back.
22A-B) An invisible Pressure Plate is at 22A. When you step on it it removes the wall at 22B. Stepping on it again places the wall back.
23A-B) When you step at 23A three Medusae will be released from each of the 23B locations.
24) There’s an invisible Pressure Plate at Location 24. Stepping on it creates a wall at 22A and opens the door to the north.
25) When you step on the Pressure Plate at Location 24 the eleven Medusae in this room will attack and try to surround you.
26A-B) Stepping on the invisible Pressure Plate here removes the walls to the south and west at Locations 26B.
27) A Medusa. On the floor you’ll fid a Stone Dagger Portal Key and a Mage Scroll of Invisibility 10′.
28A-B) Stepping on the location at 28A puts up a wall at 28B. If you stepped on 22A first this location has no effect.
29A-D) When you step on 29A the south wall at 29B will be removed, a wall will appear at 29C and the east wall will be removed at 29D.
30A-B) When you step at 30A three Medusae will be released from each location at 30B.
31A-B) When you step at 31A three Medusae will be released from each location at 31B.
32A-B) Stepping on 32A will put up a wall at 32B unless you have already stepped on 33A.
33A-B) Stepping on 33A will put up a wall at 33B unless you have already stepped on 32A.
34A-B) When you step on 34A two Medusae will be released from 34B.
35A-E) To open the door at 35A you’ll need to trap Medusae on the Pressure Plates at 35B, 35C, 35D and 35E. Use either a Hold Person or a Hold monster spell to paralyze them. Quickly run around and close the doors around them. Trap the Medusae in 35E last or you’ll trap yourself inside. Medusae continue to spawn so don’t worry about killing them.
36) The plaque reads “Trap the ladies to weight the plates.”
37) The Hilt of Talon, three Femurs and a Skull.
38) Mage Scroll of Flesh to Stone, two Femurs and a Skull.
39) The Secret Button in the north wall opens the passage to the east.
40) Use a Tooth Key to open the door.
41A-B) Click on the banner hanging at 41A and a Mage Scroll of Cone of Cold will drop from Location 41B.
42A-B) When you step on 42A transparent walls will surround the part at 42B and Dran will appear. The only way is down the pit to the Frost Giant Prisons.
Back: Azure Tower Level 3 Next: Frost Giant Prison