Azure Tower Level 2
Back to Eye of the Beholder 2
Azure Tower Level 2
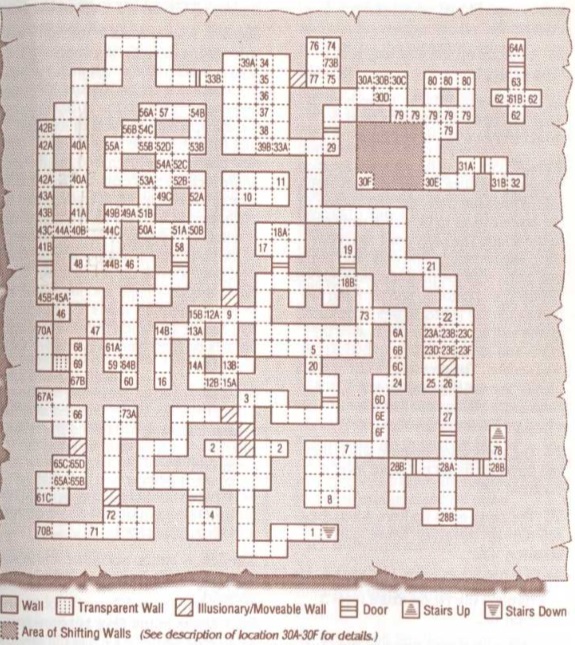
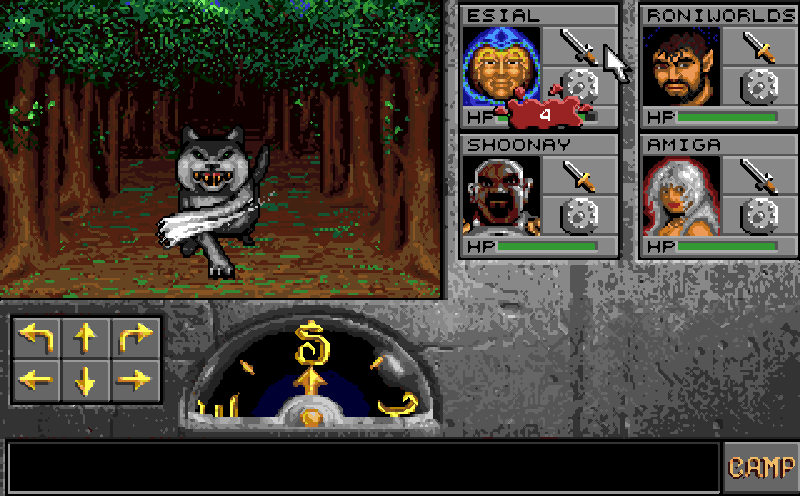
Be sure to save your game often on Level 2 of the Azure Tower because you’ll face some very dangerous foes. First are the Lesser Basilisks that can turn a character to stone with a single look. Make sure you stay out of their path and attack from the sides where possible. Second are the Bulettes. They have no special abilities but hit so hard they can kill a party member with a single strike.
1) Stairs down to Azure Tower Level 1 Location 24.
2) In this room are two statues of old men looking upwards. Stand on the Pressure Plate in front of each of them and cast a Dispel Magic Spell. The walls to the north will disappear.
3) A Bulette attacks when you enter this passageway.
4) It’s here you’ll find the elderly elf of the stone carving. He asks to touch one of the party members. The one he touches will gain enough experience points to level up one level.
5) Basilisks roam this area.
6A-F) The pits from 6A to 6F opens for 3 seconds and then close in succession. As they close move forwards and make your way down the corridor to the south.
7) This room is guarded by five Basilisks.
8) A Red Soul Gem. This is one of three needed to open the door at Location 18B.
9) The wall to the north is an illusion.
10) Basilisks.
11) A Red Body Gem. One of three needed to open the door at Location 18B.
12A-B) The teleporter at 12A takes you to 12B.
13A-B) The teleporter at 13A takes you to 13B.
14A-B) The teleporter at 14A takes you to 14B.
15A-B) The teleporter at 15A takes you to 15B.
16) A Red Heart Gem. One of three needed to open the door at Location 18B.
17) A plaque on the wall reads “When heart, body, and soul meet as one, the future reveals itself.”
18A-B) Place the three gems in the carving in the north wall at 18A and the door will open at 18B.
19) You’ll end up here if you fall through the pit on Azure Level 3 Location 42.
20) You’ll end up here if you fall through the pit on Azure Level 3 Location 42.
21) The plaque on the east wall reads “The sentry.”
22) A Bulette stands guard here. You’ll need to kill it to get past. It drops a Crystal Key when killed.
23A-F) There is a moving wall to the south of this room that moves with the party and prevents you from getting past. Stand on the Pressure Plate at 23A and throw two items onto the Pressure Plate at 23C. This will move the wall to the side. You can now move past the wall to the south.
24) You’ll end up here if you fall through the pit on Azure Level 3 Location 10A.
25) You’ll end up here if you fall through the pit on Azure Level 3 Location 10B.
26) You’ll end up here if you fall through the pit on Azure Level 3 Location 10C.
27) To open the door to the south insert the Eye of Talon into the slot on the wall and then remove it.
28A-B) When you step on the Pressure Plate the doors to the west, east and south open. A Bulette also attacks from 28B.
29) You’ll need a Crystal Key (from Location 22) to open the door to the north.
30A-F) There are three Levers on the wall at Locations 30A to 30C and a Button at 30D and an Amulet of Life at 30F. Pull the Levers at 30A and 30B down and press the Button at 30D to remove the transparent wall to the west of 30E. You can now walk through and pick up the Amulet of Life at 30F. Each time you pull the levers and press the button a Basilisk spawns from Location 32.
31A-B) The Button at 31A closes the door. The Pressure Plate at 31B opens the door when a Basilisk walks over it.
32) Basilisks spawn here when you use the Levers and Button at Location 30.
33A-B) When you press the Button at 33A a Basilisk is released at 33B.
34-38) The pits here drop you down to Azure Tower Level 1 Locations 12 to 16.
39A-B) To close the pit at 39A and make it across to the other side of the room press the Button at 33A to release a Basilisk. Lure the Basilisk over to the Pressure Plate at 39B which closes the pit. Trow an item at it the Basilisk and if the item hits it will fall down onto the Pressure Plate, keeping the pit closed.
40A-B) The two Pressure Plates at these locations cause a Fireball to fly from the wall at 40B. There are Bulettes wandering these corridors who may also trigger these traps.
41A-B) The Pressure Plate at 41A closes the pit at 41B.
42A-B) The Pressure Plates at 42A release Fireballs from the north wall at 42B.
43A-B) Pull the Levers at 43A and 43B to open the door to the south.
44A-C) Pressure Plates at 44A and 44B cause Fireballs to fire from the east wall at 44C. Stepping on 44A also opens the pit at 41B but only while there is a weight on the Pressure Plate.
45A-B) The Pressure Plate at 44A causes a Fireball to shoot out from the wall to the south at 45B.
46) A wandering Bulette.
47) Shell Key and Mage Scroll of Improved Invisibility.
48) A Crimson Key. This is used on Temple Level 2 Location 33.
49A-C) Stepping on the Pressure Plate at 49A causes three Fireballs to fly from 49B, 49C and 51A.
50A-B) Stepping on the Pressure Plate at 50A causes Fireballs to shoot west and north from 50B.
51A-B) Stepping on the Pressure Plate at 51A causes Fireballs to shoot west from 51B and south from 53A.
52A-D) Stepping on the Pressure Plate at 52A causes Fireballs to shoot from the walls at 52B, 52C and 52D.
53A-B) Stepping on the Pressure Plate at 53A causes Fireballs to shoot west from the wall at 53B.
54A-C) Stepping on the Pressure Plate ate 54A causes Fireballs to shoot from the holes in the walls at Locations 54B, 54C and 55A.
55A-B) The Pressure Plate at 55A shoots Fireballs from 55B.
56A-B) The Pressure Plate at 56A shoots Fireballs from 56B.
57) A Polished Chrome Shield +2. This is one of six that the party needs to gain entry to Level 4 of the Azure Tower.
58) Use a Shell Key to open the door.
59) The magic mouth will offer you a challenge. To accept it you must place all Holy Symbols and Magic Books in the alcove at Location 60.
60) Place your Holy Symbols and Magic Books here before stepping through the teleporter at 61A.
61A-C) Stepping into the teleporter at 61A will teleport you to 61C if you’ve left all of your Holy Symbols and Spell Books behind in preparation for the challenge. If you still have one or more in your inventory you’ll be taken to 61B instead.
62) Bulettes are here ready to ambush you if you try to enter the challenge while still holding Magic Books or Holy Symbols.
63) The Button opens the door to the north.
64A-B) Stepping into the teleporter at 64A takes you to 64B.
65A-D) Bulettes wait for you here as part of the challenge. The wall to the north of 65D is an illusion.
67A-B) The teleporter at 67A takes you to 67B.
68) The plaque on the north wall reads “I wait beyond the wall of souls! You mus break through, but it will lash its pain back with every stroke!”
69) The wall to the west is the wall of souls. You must hack at it six times but each time you hit it all of your party members will take 8 points of damage. This means that each of your characters must be able to survive 48 points of damage.
70A-B) Stepping into the teleporter at 70A takes you to 70B.
71) When you teleport to this room you’ll be attacked by a Greater Guardian Daemon. On the floor is the Eye of Talon gem.
72) The wall to the north is an illusion.
73A-B) Stepping into the teleporter at 73A takes you to 73B.
74) A Polished Chrome Shield +2. One of six that you need to enter Level 4 of the Azure Tower.
75) The plaque on the wall to the south reads “Who could guess a hapless looking party such as yourselves could best me in battle! We shall meet again!”
76) Once the challenge is over your Holy Symbols and Spell Books will be teleported here from Location 60.
77) The wall to the west is an illusion.
78) Stairs up to Azure Tower Level 3 Location 1.
79) This is where you land if you fall down from the pits on the Frost Giant Prison level Locations 7A-7F.
80) This is where you land if you fall down from the pits on the Frost Giant Prison level Locations 9A-9C.
Back: Azure Tower Level 1 Next: Azure Tower Level 3