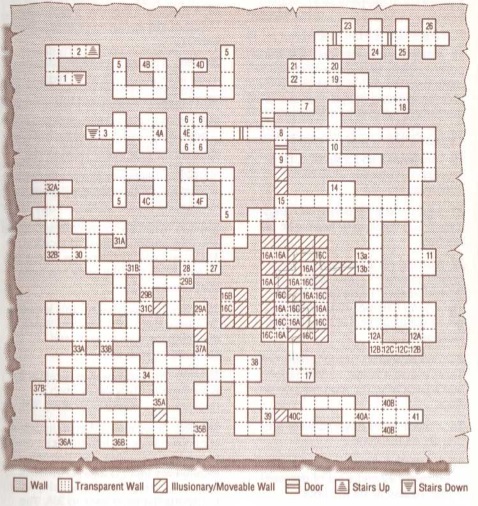
Silver Tower Level 3
Back to Eye of the Beholder 2
Silver Tower Level 3
 Level 3 of the Silver Tower is where you find the Crystal Hammer that you need to get access to the Azure Tower. It’s inhabited by Will o’wisps and Beholders. The Wisps have a low armor class, making them difficult to hit. Use Prayer and Haste spells to increase your damage output. Beholders are resistant to magic so don’t waste your magic spells on them. Dodge around the Beholder’s spells. Never try to face them head on.
1) Stairs down to Silver Tower Level 2 Location 49.
2) Stairs up to Location 3.
3) Stairs down to Location 2. The plaque on the wall to the north says “Four keys and one door. Find them to gain more.”
4A-F) There’s a teleporter at each of these locations. You’ll be teleported randomly between them and need to find the four Darkmoon Keys before proceeding.
5) Darkmoon Keys.
6) Use the four Darkmoon Keys to open the four locks. This will open the door to the east.
7) A Beholder. It drops a Femur when killed and another Femur lies on the ground.
8) When you step here the door to the south opens and a Beholder attacks.
9) There’s a Secret Button at the bottom of the south wall that opens an alcove with three Healing Potions. The south walls are an illusion. Going through them takes you to Location 15.
10) A Beholder.
11) There’s a plaque on the wall that reads “This is a shelter from all. Meditate freely.”
12A-C) Will o’wisp lure. When you enter this room the wisps from 12A will attack. When you attempt to hit it back it will flee to 12B. If you chase it the wisp will move back to 12C. There’s a Pressure Plate on the floor at 12B that triggers a fireball.
13A-B) The plaque at 13A reads “The alcove is safe. Rest and prepare for the journey that awaits.” Press the Button on the west wall at 13B to get access to Location 16.
14) A Dagger and a Femur.
15) The walls to the north are an illusion. They lead to Location 9.
16A-C) The squares marked 16A are non-movable walls. The squares marked 16C are movable. At 16B there is a Button on the west wall that reverses the walls, making 16A movable and 16C non-movable. Your goal is to make it to the room at location 17.
17) A Beholder is stuck in the roof here. You can choose to attack it or free it. If you free the Beholder it will attack. If you attack it it will squeeze through to the room above. Push the Button on the wall and you’ll be able to float up to the room above at Location 18.
18) The Button on the south wall takes you back to Location 17.
19) A Beholder.
20) Cursed Bracers of Protection -2 and a Femur are on the floor.
21) A Potion of Healing, two Daggers, a Staff and a pair of Leather Boots.
22) The Crystal Hammer +2 called “Shieldbreaker” is here. It’s needed to break the seal to the Azure Tower on Level 2 of the Temple. There’s also a Shield +3 and Halberd +2.
23) Two Beholders. One the floor is a Femur, Iron Ration and Rotten Food.
24) Mace and Mage Scroll of Fireball.
25) A Beholder and Dragonskin Armor +4 and a Short Sword +2.
26) A Beholder is here finishing off his meal. He wants to eat you for dessert. There’s also a Skull, Femur and a Wand of Dispel Magic.
27) A Will o’wisp.
28) The plaque on the wall to the west reads “A test of vision. It may change without warning.”
29A-B) Stepping on the Pressure Plate at 29A will cause walls to appear at 29B.
30) Two Will o’wisps.
31A-C) There’s a Pressure Plate at 32A. When you step on it walls appear at 31B and are removed from 31C.
32A-B) When you stand at 32A a Will o’wisp will be released from 32B.
33A-B) There’s an invisible teleporter at 33A that transports the party to 33B.
34) Rotation trip. When you stand here you’ll be turned around 180 degrees.
35A-B) The wall to the south at 35A is an illusion. When you step through it a Will o’wisp will be release from 35B.
36A-B) Locations 36A and B both have invisible teleporters. Stepping into one will teleport you to the other.
37A-B) When you step on the Pressure Plate at 37A the wall to the north will be removed and a wall will appear at 37B.
38) A Beholder and Will o’wisp. On the floor you’ll find Chain Mail, Ring of Sustenance and Rations.
39) The Secret Button on the east wall reveals a secret passage to the east.
40A-C) When you reach 40A you’ll be greeted by an apparition. When she disappears two Beholders will appear at 40B and a wall will block your exit at 40C.
41) There’s a pedestal with the imprint of a hand. Touch the imprint to receive the Mark of Darkmoon. This is necessary to pass the Magic Mouth on Temple Level 2 Location 11. Once you have the mark you’ll pass out and awaken on Temple Level 1 Location 3.
Back: Silver Tower Level 2 Next: Azure Tower Level 1


