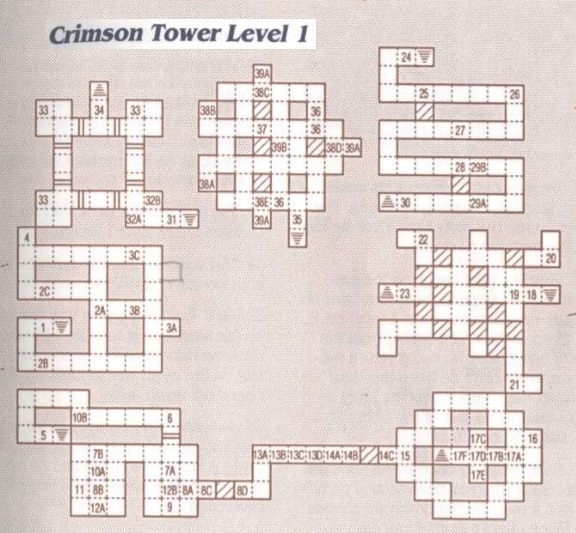
Crimson Tower Level 1
Back to Eye of the Beholder 2
Crimson Tower Level 1
You’ll face 9th level Mages and Hell Hounds on the first level of the Crimson Tower. Mages have the Fireball and Ice Storm spells but once they’ve cast them they’re not very dangerous. Hell Hounds are immune to fire and can breathe fire over the entire party for 9 to 18 points of damage.
1) Stairs down to Temple Level 2 Location 48.
2A-C) The Lever at 2A turns the invisible teleporter on and off. When it’s on it teleports the party from 2B to 2C.
3A-C) The Lever at 3A turns the invisible teleporter on and off. When it’s on it teleports the party from 3B to 3C.
4) There’s a triangular niche in the north wall. Placing a small item in it turns it into a Sphere of Fire which can be used a single time by any party member to cast a Fireball. A Mage patrols this area and drops a Crimson Ring when killed.
5) Stairs down to Temple Level 2 Location 50.
6) Click on the banner hanging from the north wall to find a Crimson Ring.
7A-B) The teleporter at 7A takes the party to 7B.
8A-D) The teleporter at 8A teleports the party to 8B. There’s Sticky Paper at 8B. Pick it up but put it in your inventory and not in a characters hand. If you hold it the paper will get stuck to your hand. The teleporter at 8A works once and then disappears. Place a Crimson Ring in the hole at 8C. Walk through it to go to 8D.
9) The teleporter at 9 takes the party to 8B.
10) The teleporter at 10A takes the party to 10B.
11) Stepping through the teleporter at 11 takes the party to Crimson Tower Level 1 Location 1.
12A-B) Stepping through the teleporter at 12A takes the party to 12B.
13A-D) On the floor are two Crimson Rings and a Mage Scroll of Fear. When you move towards the items at 13A they move to 13B. They will continue moving to 13D. If you follow them all the way down the corridor they’ll appear back at 13A. Place the Sticky Paper on the floor to trap the items so you can pick them up.
14A-C) The plaque on the wall to the north at 14A reads “Ringmaster am I! Watch my fly!” Use a Crimson Ring on the wall at 14B and step through it to be taken to 14C
15) The plaque on the east wall reads “One ring to bind them all!”
16) On the floor you’ll find “Mapaj”, a brass coin.
17A-F) These walls are illusionary. At 17C you’ll find Plate Mail +3 and at 17E you’ll find a brass coin called “Shall Rejoice” and a Robe of Protection +2. The stairs at 17F lead up to Crimson Tower Level 1 Location 18.
18) Stairs down to Crimson Tower Level 1 Location 17F.
19) In this room the walls will move about randomly. Just keep walking around until you’ve explored everything.
20) A shrunken Frost Giant is here and tries to warn you but he gets turned to stone before he can finish.
21) Insal the Thief from the Catacomb is hanging on the wall. He will throw you a Coin that opens the doors at either 32A or 32B.
22) Another Frost Giant is trapped here. This one has partially turned into a tree. He wants to touch the party to take the “Mapaj” and “Shall Rejoice” coins. In return he’ll give you a Coin that opens one of the doors at either 32A or 32B.
23) Stairs up to Crimson Tower Level 1 Location 24.
24) Stairs down to Crimson tower Level 1 Location 23.
25) The wall to the south is an illusion.
26) Hell Hounds.
27) Two Darkmoon Mages. One of them drops Bracers of Protection (non-magical) when killed.
28) The wall to the south is an illusion.
29A-B) There is an invisible teleporter at 29A that teleports the party to 29B.
30) Stairs up to Crimson Tower Level 1 Location 31.
31) Stairs down to Crimson Tower Level 1 Location 30.
32A-B) Insert a coin into the slots to open the doors. The slot at 32A opens the west door and the slot at 32B opens the north door.
33) Two Darkmoon Mages guard each of these rooms. One of them will drop either Bracers or a Ring of Protection.
34) Stairs up to Crimson Tower Level 1 Location 35.
35) Stairs down to Crimson Tower Level 1 Location 34.
36) A Hell Hound guards each of these locations.
37) The plaque on the wall to the north reads “Hall of Hells.”
38A-E) There are two red disks at Locations 38A and 38B. Spinning them so the notches face in certain directions will cause the walls of force in this room to disappear. Spinning the disks so both notches face up will make the walls of force disappear around 38C. Facing the notches to the right will make the walls of force disappear around 38D. Facing the notches down will make the walls of force around 38E disappear.
39A-B) At each alcove at 39A there is a niche. Place a Sphere of Fire into each niche and the west wall at 39B will disappear, revealing a hole in the ceiling and a ring in the wall. Pull the ring to be swept up to Crimson Tower Level 2 Location 1.
Back: Frost Giant Prison Next: Crimson Tower Level 2