Azure Tower Level 3
Back to Eye of the Beholder 2
Azure Tower Level 3
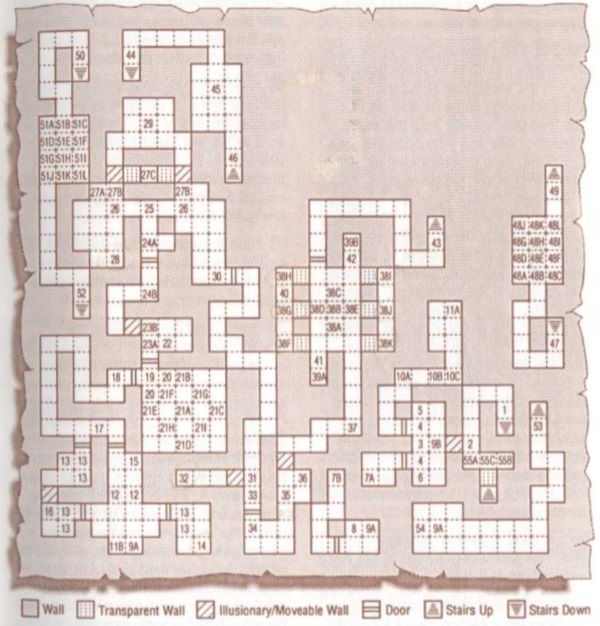
Greater Guardian Daemons inhabit Level 3 of the Azure Tower. They are immune to cold and electrical attacks. To hurt them at all you’ll need weapons with at least +2 attack. On this level you’ll find the last of the Polished Chrome Shields needed to access Level 4 of the Azure Tower.
1) Stairs down to Azure Tower Level 2 Location 78.
2) The western wall is an illusion.
3) The Button on the wall at first opens the southern door on the west wall. Once you’ve been through the teleporter at 7A the Button will open the northern door. The Pressure Plate on the ground does nothing.
4) The Pressure Plates do nothing.
5) The plaque on the wall to the north says “Guards and ward.”
6) The plaque on the wall to the south says “Short cut…”
7A-B) Stepping through the teleporter at 7A takes you to 7B.
8) A Shell Key.
9A-B) Stepping through the teleporter at 9A takes you to 9B.
10A-C) There are pits at 10A, 10B and 10C that open and close. When 10A closes stand in the spot between 10A and 10B. When 10B closes quickly run east and then north to the spot above 10C.
11A-B) Enter the teleporter at 11A to be taken to 11B.
12) Greater Guardian Daemons stand guard in the hall. When you attack them more rush out from Location 13.
13) Greater Guardian Daemon reinforcements for those standing guard at Location 12.
14) A Polished Chrome Shield +2. This is one of six that you’ll need to enter Azure Tower Level 4.
15) Use a Crystal Key to open the door to the north.
16) The wall to the north is an illusion.
17) When you walk past the magic mouth on the south wall it yells out for help. If there are still guards in the room to the southwest they’ll rush out and attack.
18) A magical glyph is on the floor. Stepping on it both opens the door to the east and causes major damage to the party. The Greater Guardian Daemons at Location 20 move to attack when the door opens.
19) Stepping on this Pressure Plate closes the door to the west. When you step off it the door to the north opens.
20) Greater Guardian Daemons.
21A-I) The Pressure Plate in the center of the room is weighed down by a Mage Scroll of Ice Storm and Brahma’s Boots. Dodge past the Fireballs and pick up the items. This makes walls appear from 21F, 21G, 21H and 21I. When you step off the Pressure Plate Fireballs fire at you from 21A, 21B, 22C, 22D.
22) Two Greater Guardian Daemons.
23A-B) A Secret Button at 23A opens the passage at 23B.
24A-B) When you stand on the Pressure Plate at 24A Fireballs will shoot from the wall at 24B. This can help you to kill the Greater Guardian Daemons at Location 25. Stand on the Pressure Plate and off again to shoot Fireballs at them. When you are done press the Button on the wall to close the door and prevent the Fireballs from hitting you.
25) A Greater Guardian Daemon. The Pressure Plate here does nothing.
26) Six Greater Guardian Daemons.
27A-C) Pull the Lever at 27A to open the walls to the north at 27B. This also opens the path to the Greater Guardian Daemons at Location 29. Hit the transparent walls at 27C four times to make them crumble. Behind them you’ll find the Starfire Scepter and a Mage Scroll of Stone to Flesh. The Starfire Scepter provides limited protection against Dran’s fire attacks.
28) A Polished Chrome Shield +2. This is one of six that you must find to get access to Level 4 of the Azure Tower.
29) Nine Greater Guardian Daemons.
30) Place the Starfire Scepter in the hole in the south wall and then remove it to open the door.
31) The west wall is an illusion.
32) A Polished Chrome Shield +2, Jhona’s Cloak of Protection and a Parchment showing a partial map of Level 4 of the Azure Tower. If a fighter wears Jhona’s Cloak it reduces combat recovery time.
33) When you reach this location you’ll be contacted by Khelben Blackstaff. It’s not really him, it’s Dran pretending to be him. He’ll try to convince you to let the monsters in the next room kill you. Don’t listen to him.
34) When you stand on the Pressure Plate the door will close behind you. The Button on the wall opens the door again.
35) Four Greater Guardian Daemons. One of them drops a Tooth Key when killed. There’s also a Sling +1 on the floor.
36) Use the Tooth Key to open the passage to the north. Dran contacts you again and this time reveals who he is.
37) A Rock.
38A-K) To open the door to the north and continue on your way you’ll need to place an item on the Pressure Plates at 38F, 38G, 38H, 38I, 38J and 38K. To do so you’ll need to use the Pressure Plates in the middle off the room to select where the teleporters at 39A and 39B send your items.
Two of the middle Pressure Plates can be pressed at a time. Use them like a pointer. Stepping on 38A and 38D selects the Pressure plate at 38F for example. Throw an item through the teleporter at 39A and it will land on 38F. 38B and 38D selects 38G and so on. Once an item is on each Pressure Plate around the edge the door to the north will open.
39A-B) These teleporters send items to the Pressure Plates around the edges. Which Pressure Plate they get sent to is determined by which one is selected by using the five Pressure Plates in the center of the room.
40) Mage Scroll of Wall of Force.
41) A pit in the floor. If you fall down you’ll land on Level 2 of the Azure Tower Location 20.
42) A pit in the floor. If you fall down you’ll land on Level 2 of the Azure Tower Location 19.
43) Stairs down to Azure Tower Level 3 Location 44.
44) Stairs down to Azure Tower Level 3 Location 43.
45) You land here if you fall down the pits at 48A-L.
46) Stairs up to Azure Tower Level 3 Location 47.
47) Stairs down to Azure Tower Level 3 Location 46.
48A-L) The 12 pits in this room continuously open and close. You’ll need to take the right path to the other side of the room. Stand on 48B when it closes. From here move north two steps to 48H. Go north to 48K, east to 48L and then north to 49.
49) Stairs up to Azure Tower Level 3 Location 50.
50) Stairs down to Azure Tower Level 3 Location 49.
51A-L) Another room filled with pits. The path to take is south to 51B, east to 51C, south to 51F, south to 51I, south to 51L, west twice to 51J and then south to the corridor.
52) Stairs down to Azure Tower Level 3 Location 53.
53) Stairs up to Azure Tower Level 3 Location 52.
54) The niche in the west wall has a Crystal Key and a Ring of Feather Falling.
55A-C) Use a Shell Key to open the lock at 55A and a Crystal Key at 55B and the transparent wall at 55C will open, revealing the stairs up to Azure Tower Level 4 Location 1.
Back: Azure Tower Level 2 Next: Azure Tower Level 4