E2M4: Deimos Lab
Back to Ultimate Doom
Deimos Lab Walkthrough
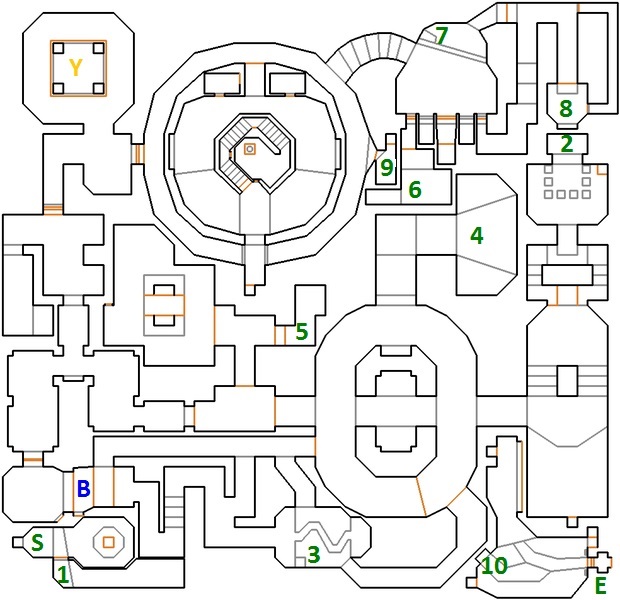
This level is much larger than the previous level and there are some difficult areas where you’ll want to make sure you have some spare rockets or plasma clips.
From the Start open Secret 1 on the flickering wall to the right for a Shotgun and Box of Bullets. Go through the teleporter ahead to be taken to the main area.
Take out the Imps and Shotgun Guy on the stairs to the north. Once you start fighting enemies will be alerted from the open area to the west. Keep an eye out for them wandering in. Take the lift up and go either left or right around to the next room. You’ll see some loot behind the pillars. Get up close to the red pedestal on the right and the pillars will lower as well as the wall behind them. This is Secret 2. Use a couple of rockets to take out the Cacodemon and other enemies and then pick up the Computer Map.
Go back down the stairs and then head to the west. We’ll come back to secret 3 and 4. For now continue west past the ring of slime and take the next right. Secret 5 will close so turn to the west and take out the enemies in the next room. If you drop in you won’t be able to get back out so take out the enemies first, including one Cacodemon. Once the enemies have been thinned out drop into the room and pick up the loot Press the skull button to lower the neighboring room so you can get back out. Secret 5 should now be open. If it’s not shoot the wall to open it. Inside you’ll find a Chaingun and Blur Artifact.
Go back and head around to the west for the Blue Key. Take the lift up and press the switch to lower the bridge so you can get acrosss. Follow the path around to a Radiation Suit. Drop off the south side of the bridge and pick up the Beserker for Secret 3.
Make your way back to the ring of slime and do a lap going clockwise. The tunnel to the north should open. When you enter you’ll be attacked by a dozen Demons and Specters. Get to the nearest corner and punch them when they get close. This is Secret 4 where you’ll also find a Soul Sphere, lots of Bonuses and a Radiation Suit.
Head back to the west and go north to open the blue door. Continue to the north and either kill the Baron or lure him into the room with the Yellow Key. When you pick up the key the large crusher will activate. Lure the Baron into the crusher to save ammo.
Open the yellow door to the east and turn left to go around the ring. Take the stairs down on the left to another room with 5 doors. First drop off the edge to the north for a few medpaks and Secret 7. Make your way around the passage to the east for Secret 8 and a couple of rockets. Open the door to the east and go back to the room with doors.
Open the large center door. When you go inside the two nearest doors will open, releasing a few enemies. Take them out and then open the door to the west. Shoot the barrels in the alcove across the blood and then run inside for Blue Armor. This is Secret 6.
Go back to the ring and continue around. You’ll notice a small triangular gap on the left. Drop down for Secret 9. Pick up the Plasma Gun and step onto the teleporter which takes you to the center of the ring. Kill the Cacodemon and Demon and then make your way down the steps.
At the bottom you’ll find 2 Barons of Hell a couple of Cacodemons and a handful of Imps. Take out the smaller creatures first before focusing fire on the Barons. Once you’re done go through the teleporter to the south. You’ll end up in a separate section in the southeast.
Kill the Demon and then drop off the edge. Make a dash for the ledge on the eastern side and push the skull button to raise a bridge to the exit. Go through the teleporter and then back through the teleporter to end up in the same section. Go over the bridge and touch the exit door. Turn around to see another bridge rising up for Secret 10. This leads to a Soul Sphere. Grab it and then head back through the exit.
Back: E2M3: Refinery Next: E2M5: Command Center