Castle Nex
Back to Legend of Grimrock 2
Castle Nex is located on the eastern side of the Forgotten River. It’s made up of 6 levels, Castle Nex, Library, Twisted Passage, Test Chamber, Void and finally the Castle Roof. To enter you’ll need to have the 4 Essences and place them on the right statues in the courtyard.
There are two endings to Legend of Grimrock 2. The first can be found by defeating the Dragon on the roof and going through the portal. Many mysteries will still remain, however. So if you want to find the second ending defeat the boss and then come back down to the castle entrance. Follow the Trickster to his lair and proceed from there.
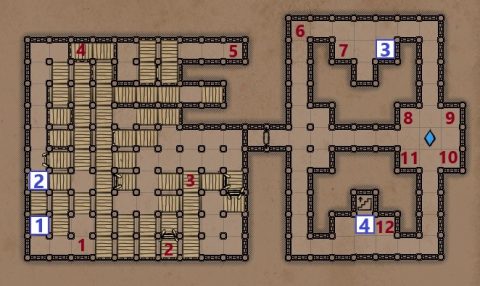
Castle Nex Entrance
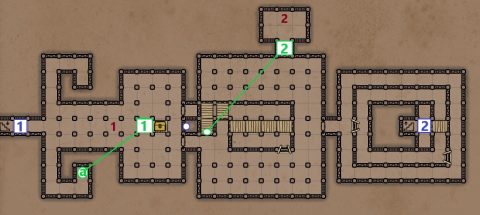
1: Exit to the Forgotten River
2: Stairs up to the Library
Secrets
1: Press the Button (purple circle) to open up the south teleporter (a). Go through to arrive at Secret 1. Inside the chest you’ll find a Potion of Strength. Greater Healing Potion and a Potion of Resurrection.
2: Press the underwater Button (green circle) to open the north wall for a few seconds. Run quickly to the opening before it closes. Inside you’ll find a Tome of Knowledge.
Items
1: Cursed Compass, Letter inviting you up to the roof.
2: Tome of Knowledge, Skull, Throwing Axe (2), Cannon Ball (5)
Library

1: Exit to Castle Nex ground floor.
2: Lever Puzzle. To get clues to which levers to pull run around the lone pillars twice and an inscription will appear. The inscriptions are:
One II
Two V
Three III
The first lever position will give you 2 clicks. The second 5 clicks and the third 3 clicks. To get the two clicks pull the North Lever down and press the Button. To get 5 clicks West Lever and East Lever should be down. Press Button. To get 3 clicks North Lever and East Lever should be down. Press Button. The door to the stairs will open.
Items
1: Pellets (10)
2: Blooddrop Cap (4), Etherweed (3)
3: Ancient Map
4: Potion of Resurrection, Note (Clue to pillars)
5: Broadhead Arrow (3)
6: Greater Healing Potion
Twisted Passage
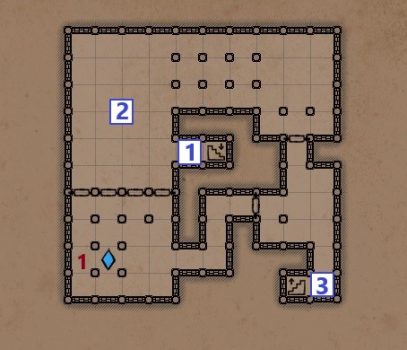
1: Stairs down to the Library
2: This chamber has many invisible moving teleporters. The only way to detect them is by using the Cursed Compass you found on the first level of the castle. The red line of the compass will point to any nearby teleporters.
3: Stairs up to the Test Chamber
Items
1: Horned Fruit
Test Chamber
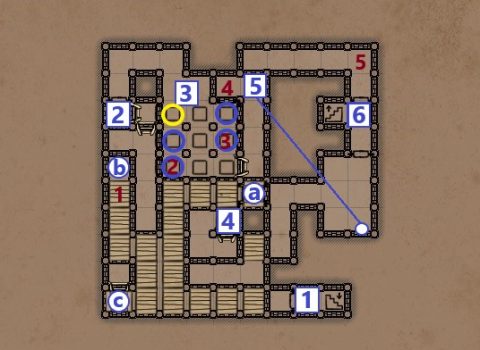
1: Stairs down to Twisted Passage.
2: To open the door here you’ll need to place items on the pressure plates at (a) and (c). Place an item on (a) first and the barrier stopping you getting down at (b) will disappear. You can then place an item on (c). Head through the door at (2).
3: Teleporter/Spark Puzzle. Pressing the Button will fire a spark around the room. Place items on pressure plates circled in purple. Press the Button to the north and then quickly place an item on the plate circled in yellow before the spark reaches it. The spark will now be caught in a loop.
4: Disappearing bridge.
5: Pull the Lever to open the path to the north.
6: Stairs up to the Void.
Items
1: Potion of Dexterity
2: Pellets (10)
3: Venomfang Pick
4: Cannon Ball (3)
5: Potion of Resurrection (2)
Void
The Void is the last floor before the Castle Roof and consists of a confusing collection of walkways and ladders. The room consists of walkways on 4 or more levels which can’t be seen by looking at a 2D map. Your goal is to press the two buttons, one to activate a bridge so you can get to a higher level and the other to activate a bridge on the highest level leading to the exit.
1: Button that activates a bridge so that you can climb higher.
2: Button that activates a bridge so that you can reach the exit to the Castle Roof.
3: Press the Button to activate the teleporter back to the ground floor.
4: Stairs up to the Castle Roof. Make sure you’re ready for a tough fight.
Items
1: Pellets (10)
2: Cannon Ball (5)
3: Frost Bomb (4), Fire Bomb (4)
4: Food
5: Etherweed (7), Blooddrop Cap (4), Falconskyre (2)
6: Crossbow Quarrel (4)
7: Cannon Ball (5)
8: Sickle Sword, Poison Bomb (3)
9: Potion of Resurrection (2)
10: Scaled Cloak
11: Pellets (20)
12: Greater Energy Potion
Castle Roof
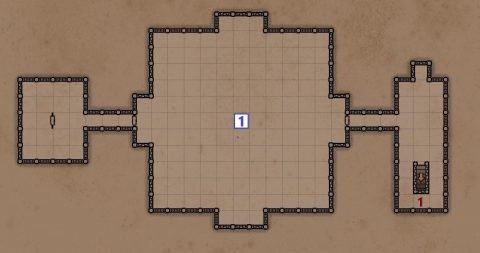
1: When you enter the main part of the roof the boss fight will begin. The Island Master is riding on a dragon-like creature called a Lindworm. The doors will close behind you and you won’t be able to run.
The Master will send out swarms of enemies and shield himself. You won’t be able to damage him until you’ve dealt with most of the enemies. Hit him a few times and then the next swarm will be spawned.
For the first 4 waves the Island Master will be protected behind a barrier. For the last 2 waves he’ll attack along with his minions.
Wave 1: Ghouls
Wave 2: Rats and Wolves
Wave 3: Snakes and Alpha Medusa
Wave 4: Fire Elementals and 2 Magma Golems
Wave 5: Mosquitos
Wave 6: mimicks
After defeating the Island Master he will drop a Power Gem. If you leave through the gate now you’ll complete the game but the Island Master watch you leave with a disappointed expression. Leave the portal alone and continue to the next part for the true ending.
Items
1: Lightning Bomb (2)
Next: Trickster’s Lair
Back: Barren Desert