Wormbound Catacombs
Back to Legend of Grimrock 2
The stairs in the center of the Cemetery lead down to the Wormbound Catacombs. Inside you’ll find members of the house of Wormbound, including a boss fight with Xarant Wormbound. To the southwest you’ll find a Power Gem before heading down lower to Orul’s Crypt.
Wormbound Catacombs Map
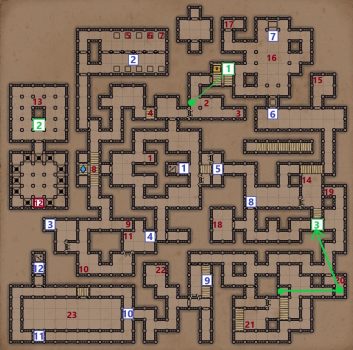
Wormbound Catacombs Walkthrough
1: Stairs up to the Cemetery. The gate at 5 is currently closed so you’ll need to head north first.
2: Mirror Puzzle. Place an item to match the items on the northern side of the room. From left to right place an item on pressure plate 2,4 and 5. The door to the north will open. Go in and take any items you want but you’ll need to leave items on plates 2, 4 and 5.
3: Teleport to the Clock Puzzle which is described in Secret #2 below.
4: When you pick up the Note to the west the gate to the east will open, giving you a shortcut back to the start.
5: The note you just picked up gives you the clue to opening the gate. You’ll need to go under and over the bridge leading to the gate a certain number of times.
The note reads “Under and under and over and all over again and over”. The solution is to go Under, Under, Over, Under, Under, Over, Over. The gate to the east opens.
6: When you step onto the pressure plate. The gate behind you will close and the one in front will open, locking into the boss fight with Xarant Wormbound.
7: Xarant Wormbound will summon 3 Zombies to help him in this fight. He wields dual swords but can also cast Ice Shards and perform a jumping attack from a distance. Try not to get cornered by Xarant or his Zombies. Once they’ve been defeated grab the Skull Key from the coffin and bring it back to the door at #8.
8: Use the Skull Key from the boss room to open this door.
9: Timing Puzzle. The Button fires the spark and the Lever under the bridge opens one door and closes the other. To make sure the spark reaches the receptacle push the Button, walk backwards off the bridge and quickly pull the Lever to open the south gate. When the spark is coming back pull the lever again to open the north gate. The spark will reach the receptacle and the Iron door to the west will open.
10: Zombie Pit. The levers in the pit need to be flipped to activate the teleporter back up and to reveal the Power Gem on the bridge above. Stand in the corner of the pit and use a Force Shield on one side so you can focus on one Zombie at a time. When you’re done grab the Power Gem at #11 and head down the stairs to Orul’s Crypt.
11: Power Gem
12: Stairs down to Orul’s Crypt.
Secrets
1: Press the Button on the wall to open the room to the north. Inside you’ll find a Tribal Spear and a chest with a Hardstone Bracelet and Mudwort x2.
2: Time Puzzle. The pits move clockwise depending on the in-game time. At 6 O’clock the pit to the south will be closed and you’ll be able to pick up the Gear Key. Rest until that time until you can pick it up. Rest again until 12 O’clock and go through the passage to the north where you’ll find Bane.
3: Press the Button to create a magic bridge behind you. Don’t waste time turning around just round backwards across the bridge. On the other side you’ll find an Ice Guardian Figurine that you can place in the alcove at Secret #3 to disable the barrier. Once the barrier is disabled you’ll find a Tome of Water.
List of Items
1: Lightning Bomb x2, Mudwort
2: Leg Plate
3: Pellets x10
4: Lock Picks
5: Crossbow
6: Frost Bomb
7: Full Helmet
8: Fail (Heavy Weapon)
9: Plate Gauntlets
10: Falconskyre
11: Note (Clue to opening east gate)
12: Gear Key
13: Bane (2-handed weapon)
14: Huntsman’s Cloak, Throwing Axe x2, Falconskyre
15: Greater Healing Potion, Mudwort
16: Longsword x 2, Amulet of Nergal, Skull Key, Crystal Shard of Healing, Mudwort
17: Meteor Greaves, Pellets x 10
18: Shovel, Note on Treasure
19: Cheese
20: Crystal Helmet, Ice Guardian Figurine
21: Crossbow Quarrel x 2
22: Crystal Flower, Blooddrop Cap
23: Mudword x 2, Falconskyre, Crossbow Quarrel, Tattered Shirt, Full Helmet, Cannon Ball x 5
Next: Orul’s Crypt
Back: Cemetery